Bombay Sandwich-Style Paratha Frankie| Using Up Left-Overs

Often, for dinner, I put together these sandwiches with slices of boiled potato and beetroot, onion rings, cucumber and a spicy green chutney. Sometimes there is cheese, sometimes there isn’t. These sandwiches are typically called Bombay Sandwiches because, it is widely believed, they originated in Bombay.

I have often had these sandwiches off a road-side stall near our house in Ahmedabad (the guy used to make some amazing ones, I remember!). Slowly and gradually, watching the guy at work, I learnt how to make these sandwiches at home. In fact, these Bombay sandwiches are one of my specialties, and people say I make them exactly the way street-side vendors in Bombay and Ahmedabad do.

If you are interested in the recipe for the Bombay sandwich, do check it out here.

When I recently came across a video on Awesome Sauce India about using the very same stuffing to make sandwiches with left-over rotis, I got all excited. This was such a lovely way to use up extra rotis, a healthier alternative too! I absolutely had to try out my hands on making them, and I did just that yesterday. I made a few little variations to the original recipe, though, and made paratha-based frankies instead of sandwiches, too. The end result was scrumptious, loved to bits by everyone at home.

028

Here is how I made the frankies.

Ingredients:

  1. Left-over whole wheat flour parathas (I used flour ground in the mill)
  2. Onion, peeled and chopped into rounds, as required
  3. Chaat masala, as required
  4. European cucumber (the ‘seedless’ variety), chopped into thin rounds, as required
  5. Capsicum, chopped into long slices, as required
  6. Potato, boiled, peeled and chopped into rounds, as required
  7. Beetroot, boiled, peeled and chopped into rounds, as required
  8. Tomato ketchup, as required (I used Heinz)
  9. Grated cheese, as required (I used Amul)
  10. Butter or oil to toast the frankies, as required (I used Amul butter)
  11. Spicy green chutney, as required (Here is the method I followed to make it)

Method:

  1. Put a thick dosa tava on a high flame, and wait for it to get heated up. Meanwhile, prepare a frankie.
  2. Spread a tablespoon of the spicy green chutney on one side of a paratha, evenly.
  3. Place the paratha on a plate or board, chutney-side up.
  4. Spread a few boiled potato slices in the centre of the paratha, towards one side.
  5. Layer some boiled beetroot slices, onion rings, capsicum pieces and cucumber rounds over the potatoes.
  6. Add some grated cheese on top, as well as a couple of dollops of tomato sauce.
  7. Sprinkle a pinch of chaat masala on top of everything.
  8. Close the paratha, making a semi-circular shape.
  9. Brush some oil or butter on the dosa tava, which should have gotten nice and hot by now.
  10. Place the folded paratha on the hot tava. Cover and cook for a couple of minutes.
  11. Open the cover, and flip the paratha onto the other side. Apply more oil or butter if required.
  12. Cover and cook on the other side for a couple of minutes.
  13. Remove from the tava onto a plate, and serve immediately.
  14. Prepare frankies out of all the parathas, in a similar manner.

Notes:

  1. The original recipe calls for using rotis, but I think they might become a tad too soggy with all the stuffing that goes in. So, I used parathas instead, and was happy with the results.
  2. You could use other vegetables of your choice – like corn, for instance. Other toppings too – like pineapple, olives, mustard sauce or jalapenos – could be used. That said, the stuffing in a typical Bombay sandwich consists only of beetroot, onion, cucumber, potato, tomato and spicy green chutney, sometimes capsicum.
  3. I am not too fond of tomatoes in my sandwiches, so I did not add them. If you like them, of course, you could go ahead and add them too.
  4. Sometimes, when I am in too much of a hurry, I make a simpler green chutney by grinding together just some coriander and green chillies, with a little water. The taste of that chutney, however, is nothing like that of the mint-onion-ginger-garlic-coriander chutney that I have linked up to here. Take your pick!

You like? I hope you will try these frankies out too, and that you will love them just as much as we did!


Boondi Chaat

Because we love chaats so very much, and because we had nothing other than boondi handy, this recipe happened. It turned out to be a beautiful in-between snack. 🙂

I hope you will try this out, too!

001.JPG

Here is how I made the chaat.

Ingredients (serves 3-4):

  1. 3 cups boondi (I used store-bought boondi, MTR brand)
  2. Sweet chutney to taste, I used about 6 tablespoons (Here‘s how I make the chutney)
  3. Spicy green chutney to taste, I used about 2 tablespoons (Here‘s how I make the chutney)
  4. 2 pinches of roasted jeera (cumin) powder
  5. 2 pinches of black salt (kala namak)
  6. 1 small carrot, peeled and grated
  7. 1 small onion, finely chopped
  8. A few fresh coriander stalks, finely chopped
  9. 1 small potato, boiled, peeled and chopped into cubes

Method:

Mix everything together in a large mixing bowl. Serve immediately.

Notes:

  1. You could add other vegetables – like raw mango, beetroot and cucumber, for instance – to this chaat. I didn’t, because I didn’t have any other veggies on hand. The chaat tastes lovely with just carrot, potato and onion as well.
  2. To make the roasted jeera powder, dry roast about 2 tablespoons of jeera (cumin) on a medium flame till it emits a lovely fragrance. Let it cool down completely, and then grind to a powder in a mixer. Store this in a clean, dry, air-tight bottle at room temperature, to use as required. This chaat needs just about 2 pinches.
  3. You could add other ingredients to the chaat too, like fine sev or pooris, but then it would become bhel and not boondi chaat!
  4. If you do not have black salt on hand, use ordinary table salt. That said, I would strictly recommend using the black salt, because it lends such a beautiful fragrance to the chaat.

You like?


Anniversary Lunch At Nasi And Mee Asian Canteen

The husband and I recently celebrated our 8th wedding anniversary, and we decided to head out for lunch. We chose to lunch at Nasi And Mee Asian Canteen in Koramangala, an eatery that has been on my radar ever since it opened, some time in 2016.

Location and ambience

Nasi And Mee is located on the hip-and-happening 80-foot Road in Koramangala, quite easy to locate. (I just got to know they have another outlet in VR Bengaluru Mall near Whitefield, too.)

It is a small place, with about ten tables, and, I hear, it gets quite crowded on the weekends. Prior reservation is, therefore, advisable on weekends.

The moment we entered, we were struck by the beautiful decor of the place – it is contemporary, simple and classy. There is a warm and friendly vibe to the place. There is plenty of natural light inside, and it is far from being dark and dingy.

003
The interior of Nasi And Mee

Cuisine

The eatery’s name, ‘Nasi And Mee’, literally translates to ‘rice and noodles’ in the Indonesian language of Bahasa. The place serves Asian food (of course!), a selection of items from Indonesia, China, Thailand, Malaysia and Singapore, including street food from these places as well as time-tested classics. The menu includes both vegetarian and non-vegetarian food.

This isn’t a ‘fine dining’ spot, but an ‘Asian canteen’. As per their website, they aim to provide good food and unforgettable experiences to their patrons, and pride themselves on using the freshest of ingredients.

The husband and I had a lovely, relaxed time here, gorging on some delish food. It might not be a place for fine dining, but it is surely a place for a leisurely, nice meal, we can vouch for that.

Food

From the extensive menu, we first opted for a Nasi And Mee salad, an in-house specialty.

008
Nasi And Mee salad, an in-house specialty

The salad was juicy and delish and just beautiful, and we loved it to bits.The veggies were super-duper fresh and crisp, and the dressing was just the right mix of sweet and sour and spicy. It was light, but satisfying, a perfect appetiser that stimulated our taste buds and prepared them for the next course, I would say. The portion size was good for only one person, though.

Next, we went for a plate of Mushroom And Water Chestnut Dumplings, another in-house specialty.

012
Mushroom And Water Chestnut Dumplings at Nasi And Mee

The dumplings were very well done, and the filling was, again, fresh and juicy. The water chestnut-mushroom stuffing inside was very mildly spiced, and was just perfect. This dish, too, was light but soul-satisfying. Again, the portion size was good for just one person.

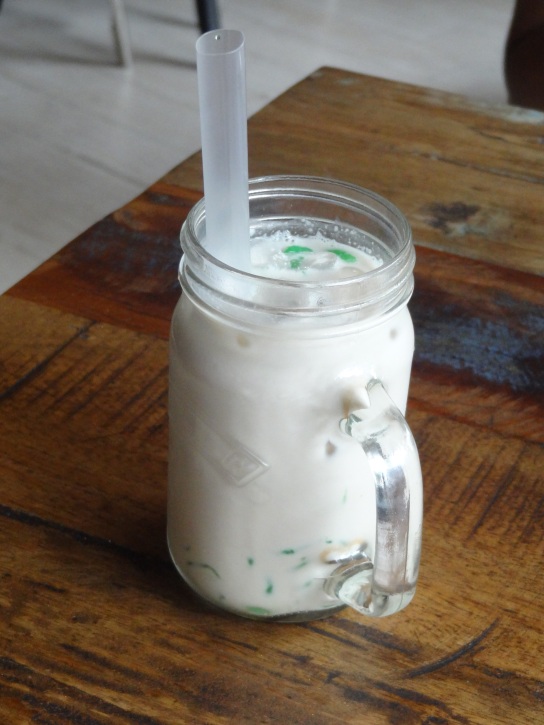
To go with the appetisers, we ordered a Chendol drink, a Malaysian specialty, apparently. This is one of the eatery’s signature drinks, too.

006
Chendol drink at Nasi And Mee

The Chendol, a coconut milk-based drink, turned out to be very beautiful, too. We had initially thought it would be quite heavy on the stomach, but it was light and flavourful. It made for a perfect in-between drink, for sure.

For the main course, we opted for Pad Siew, a food straight off the streets of Thailand.

014
Pad Siew noodles at Nasi And Mee

The Pad Siew was strictly okay, as per both the husband and me. It was an interesting experience eating those flat rice noodles, but we felt the dish lacked flavour. The sauce it was made in (a mix of soya sauce, sugar, and vinegar, as far as I understand) didn’t feel enough, and the noodles, sort of, felt quite bland. The portion size was good for one.

Next, we ordered a plate of  Nasi Goreng, Malaysian fried rice flavoured with sweet soya and chilli. This was an in-house specialty, too.

016
Nasi Goreng at Nasi And Mee

The fried rice was lovely, just the right amount of spicy for us. It tasted beautiful! We especially loved the on-the-skewer babycorn grilled with Hoisin sauce that the dish was served with. I believe these babycorn beauties are part of the restaurant’s ‘Asian Grills’ section – we are so going to order some of those the next time we are here! The portion size of the fried rice was good for two.

For dessert, we chose to go for one of the many home-made ice creams on offer on their menu. We opted for the Kaffir Lime flavour.

019
Kaffir Lime Ice Cream at Nasi And Mee

The ice cream was brilliant! It was infused with the fragrance of kaffir lime, something which I adore. There was no sourness in the ice cream, though – it was beautifully sweet.

And that was how we ended a beautiful, beautiful meal at Nasi And Mee.

Service

I have heard loads of good things about the service staff at Nasi And Mee, about how friendly and interactive and helpful they are, and now, we can vouch for these qualities, too. We loved how the service staff was courteous and friendly, without being overbearing. We were asked, after eating each dish, whether it was to our satisfaction. All of our questions and doubts were addressed so well. The staff here surely knows their job, and are well-informed as well.

Price

The prices here are at par with fine-dining establishments in the city. We paid about INR 1600 for our meal, including taxes, which I didn’t mind paying considering the quality and taste of the food and the wonderful hospitality they offer.

My verdict

We loved the experience of lunching at Nasi And Mee, food, service, experience, et al. We are definitely going back to this place again! There are so many more items on the menu that we would love to try out!

If you have never been to this place before, I would definitely urge you to go.

Green Pepper Pickle| Kurumilagu Urugai

Both the husband and I are big fans of Kurumilagu Urugai or green pepper pickle, the way we Tam-Brahms usually make it. This is such a simple pickle to make, yet so delish! Every time I make this pickle, it never fails to astonish me as to just how easy-peasy it is to make – it hardly takes a few minutes to put together.

I am not sure if green pepper is a winter-special treat, or you get it throughout the year. We typically make this pickle during the winter months only, because it is said to generate heat, and is just perfect for the cold, cold days of winter.

Here is how we make the pickle.

Ingredients (yields about 1/2 of a medium-sized jam bottle):

  1. 150 grams of fresh green pepper
  2. About 1 teaspoon salt or to taste
  3. Juice of 4 lemons

Method:

  1. Wash the green pepper thoroughly, ensuring that you remove all the dirt off it. Place it on a cotton cloth, and pat dry completely. There should be no trace of moisture on the green pepper, once you are done drying it.
  2. Once dry, cut the green pepper bunches into 1-inch long pieces. Alternatively, you could strip all the pepper off the stems, so there are no stems in the pickle at all. The first alternative is relatively easier and works just as well as the second alternative. The second alternative is slightly more tough, but makes for an easy-to-consume pickle. So, take your pick.
  3. Take the peppers or 1-inch long pieces in a large mixing bowl. Add the salt to taste, as well as the lemon juice. Mix well, using a clean, dry spoon.
  4. Transfer the pickle to a clean, dry bottle with an air-tight lid, preferably a glass bottle. You can begin using the pickle after 2 days of using it. It makes for a wonderful combination with curd rice!

Notes:

  1. The freshness of the ingredients makes a huge impact on the quality of the pickle, as is the case with just about any dish you cook. Make sure you use the freshest of green pepper and lemon, for the best-tasting pickle.
  2. The juice of 4 lemons might seem a bit more for 100 grams of green pepper but, trust me, you will need them! Green pepper is HOT, and the sourness of the 4 lemons will not go amiss.
  3. Since we are not using extra salt or any kind of preservative in this pickle, it stays good for 7-8 days only, if stored at room temperature. Refrigerating the pickle might help it stay for a slightly longer duration.
  4. Make sure you shake the bottle/jar every day, which will make sure the pickle is thoroughly coated with the lemon juice and salt. The pickle will stay longer that way.
  5. Ensure that you use only a clean, dry spoon to use the pickle.
  6. Store the pickle in a cool, dry place, away from direct sunlight, if you plan to keep it at room temperature.
  7. Make sure the green pepper is thoroughly dry before you begin the pickling process. Similarly, make sure the lemons are also washed neatly and thoroughly patted dry before you begin making the pickle.
  8. I am guessing you could use vinegar in place of lemon juice, too, but I have never tried that out myself. The vinegar would, I suppose, increase the shelf life of the pickle a bit.
  9. This is the way Tam-Brahms typically make green pepper pickle. This might not be the only way to make this pickle, of course.

If you pickle green pepper at home, too, I would love to know how you do it!

If you have never had pickled green pepper, I would urge you to try out this recipe!

What’s In My Shopping Bag?

These days, I turn into a sinner every time I go grocery shopping.

No, I’m not talking about the shop-lifting type of sinning, dirty minds!

Ever since I became a food blogger, I have begun to comb the shelves of departmental stores more thoroughly. This little bottle of juice or that packet of biscuits always tempts me, and I end up indulging those temptations of mine.

I am, commonly, not one to regularly use packaged, processed stuff but, I admit, my excursions to departmental stores do see me picking up some of exactly such stuff. The food blogger in me wants to try out these interesting products and write about them. These are, therefore, mostly, one-off purchases, for the purpose of trial, not for regular consumption.

Here are some such recent foodie discoveries of mine, little temptations that I have indulged in, while out grocery shopping. Find out how I fared with them – whether I liked them or not!

Bisleri’s Pinacolada and Spyci Cola

Sometime in 2016, Bisleri launched a few new flavours of soft drinks, including Pinacolada, Spyci cola, a Limca lookalike called Limonata, and a mango-flavoured drink called Fonzo. I recently picked up a couple of bottles of the Pinacolada and Spyci cola, to sample.

picmonkey-collage
On the left: Bisleri Pinacolada, on the right: Bisleri Spyci Cola

I found the Pinacolada strictly okay – it didn’t exactly bowl me over.

I loved the Spyci Cola, though. As the label on the bottle suggests, it is a ‘twisted cola’, cola with a hint of spice in it. I found the mix very interesting and different and delicious, something I wouldn’t mind having again at all. This is a big thing, you see, coming from someone who has given up on all kinds of aerated drinks for more than 2 years now.

I am now eager to try out the other newly launched flavours of soft drinks by Bisleri, too! I highly recommend you to try out the Spyci Cola as well.

Price: INR 15 per 200 ml bottle, which is quite reasonable.

Amul Choco Cracker

I am a huge fan of Amul’s Tropical Orange chocolate. Recently, I discovered another of Amul’s new chocolate-ey offerings, Choco Cracker, and promptly proceeded to fall in love with it, too!

027
Amul Choco Cracker

This is a milk chocolate that tastes just perfect. The little kid in me loved the way the chocolate squares ‘pop’ in your mouth, quite reminiscent of something called Magic Pop that we used to get back when I was a school-going girl.

Love! Highly recommended!

Price: INR 150 for a 150 gram bar, reasonable considering the good quality

Chef’s Basket Khow Suey Noodles

I usually give the ready-to-cook packages at the departmental stores a wide berth – I hate the chemical, artificial feel of the food they produce and I am fearful of the huge amount of preservatives they might come loaded with. I recently made an exception for a packet of ready-to-cook Khow Suey noodles by Chef’s Basket.

The packet said ‘No artificial colours, flavours or preservatives’ and I decided to believe it, just this once.

I liked the way the ingredients were packaged – everything that one would need to make the dish, including noodles and taste-maker, were packed in neat little pouches that could be easily opened. The package came with an easy-to-follow instruction list, and the end product was super easy to put together. I added my choice of vegetables to the dish, along with some tofu, and was pleased with the final product entirely. There was no artificial, chemical taste to the noodles; they tasted quite great, actually.

picmonkey-collage
On the left: Chef’s Basket Khow Suey noodles kit, on the right: The final product that I prepared

For someone like me, Khow Suey noodles from Burma and Northern Thailand are an exotic meal, and this is a great way of enabling one to prepare it at home, without too much of a hassle. Without a kit like this, I might never have gotten around to making a dish like this at home, I think.

Price: One box contains approximately 180 grams of noodles, is all-vegetarian, and cooks enough to serve one person. It is priced at INR 75 per kit, which, I think, is pretty reasonable.

Check out my review of Chef’s Basket’s Thai Green Curry And Jasmine Rice kit here.

Monaco Cheese Cracker Sandwich

A sandwich made of two salty Monaco crackers, with a cheese-y cream filling in between – what is to not love? I picked up a packet of these ‘sandwiches’ at a nearby grocery store, recently, and loved them to bits. Highly addictive!

dsc07918
Monaco Cheese Cracker Sandwich

Price: A 100-gram packet of these biscuits is priced at INR 30, good for the quantity and quality involved.

Shreya pickles

I had never heard of Shreya pickles before I spotted them at the little store selling unusual products (along with a lot of Patanjali stuff) near the Hwealth Cafe in HSR Layout, Bangalore. There were some really interesting variants – like wood apple, sweet lemon and turmeric pickle – and I absolutely had to pick a few of them up.

dsc08875
The Shreya pickles that I bought – bitter gourd, wood apple, sweet lemon, turmeric root and tamarind chutney

I loved every single one of the pickles I bought! They tasted homely, not dunked in oil or overloaded with chilly powder and salt, the way some store-bought pickles do. They tasted fresh and nice and delicious, with no artificial or chemical smell to them. The best thing about these pickles, I felt, is that they come in little packages that you can empty in a few days’ time, unlike those that come in big glass bottles that you buy, but then don’t seem to get over endlessly.

Apparently, these pickles are made in Pune, Maharashtra, in the Maharashtrian way of making pickles. Lip-smacking! I am so going to try out all the other delish stuff they have on offer! One grouse, though, is that the labelling is only in Marathi, a tad tough to read for people who aren’t fluent in Hindi. I wish that could be changed and English labelling also included, to make the product acceptable to a wider audience – I so vouch for their taste and the homeliness, otherwise!

Price: All of these packets of pickle were priced between INR 25 to INR 35, which is highly reasonable, considering the quality and taste involved.

That’s that for now, folks!

What have your little discoveries at the grocery store been like recently? Tell me all about them!

Disclaimers:

  1. I do not normally buy or recommend the buying of packaged, processed stuff, like I was saying in the beginning of the post. I do, however, get tempted by such products and, sometimes, give in to my temptations. Most of these products, though, are one-time buys and not items on my regular shopping list. I would urge you to use your own discretion before you buy these or similar products.
  2. The views expressed herein are entirely my own, not influenced by anything or anyone. I do not stand to receive any kind of gain by recommending any of these products to you.
  3. Each of the products mentioned above were purchased and paid for by me in entirety, personally.