For the uninitiated, Bai is a kind of soup that hails from the exotic north-eastern state of Mizoram. The state boasts of a number of indigenous leafy greens, many of which are unheard of outside – and several of these greens go into the Bai. Whatever vegetables are in season also find their way into the Bai. Some Rajah chillies (aka Bhut Jholokia or Ghost Pepper) and fermented mustard – both commonly used ingredients in Mizo kitchens – also form a part of this soup. If it is being served to non-vegetarians, pork sauce is also added. Very simple to prepare and very nutritious, bai is something you will typically find cooked across Mizo households.
Today, I present to you the recipe for Cauliflower Stalk Bai – bai made with the stalks of cauliflower – yes, you read that right! This is a vegetarian Mizoram Bai Recipe, which I have made with ingredients commonly available where I live.
I made the Cauliflower Stalk Bai following the recipe outlined by Eat Your Kappa, with a few small variations of my own. What struck me the most about the recipe was just how simple it was, how basic. Well, that is how most food in all of the North East is – simply cooked but hearty, using a few seasonal and local ingredients. Another thing that stuck with me about this recipe is the use of cauliflower stalks, which would otherwise have gone into the trash – keeping wastage in the kitchen minimal, another trait that is quite common in all of the North East.
To be honest, the Bai was quite bland for all of us at home. I had to add in a few condiments – pepper, soya sauce and a bit of tomato ketchup – for it to become acceptable to our city-dweller palates. That’s not how it was intended to be consumed, I’m sure, but that’s how it went.
Well, here is the Mizoram Bai Recipe, the way I made it.
1. Take the water in a thick-bottomed pan. Place it on high heat and bring to a boil.
2. Add in salt to taste and the soda. Mix well.
3. Add in the chopped cauliflower stalks, florets and leaves, as well as the chopped beans and potato. Also, add in the slit green chillies. Mix well.
4. Cook covered on medium flame till the vegetables are tender, but not overly mushy. This should take 15-20 minutes. Keep checking on the pan periodically, adding more water if the mixture feels like it is too thick, stirring intermittently. Taste and adjust salt if needed.
5. Now, add the cooked rice to the pan. Mix well.
6. Cook uncovered on medium flame for a couple of minutes more. Your Cauliflower Stalk Bai is ready!
**********
This recipe is for the Shhhh Cooking Secretly group that I am part of. Every month, a bunch of us food bloggers get paired together, with each pair exchanging two secret ingredients and cooking dishes from a particular part of the country. This month, we are all cooking from the North Eastern state of Mizoram.
For the challenge this month, I was paired with Mayuri of Mayuri’s Jikoni, who gave me the two secret ingredients of cauliflower and chillies. I decided to use these two ingredients to make this Mizoram Bai Recipe.
You get beautiful gooseberries in Bangalore right about now – big, fat, juicy ones that are bursting with flavour. I absolutely had to pick up some, while I was vegetable shopping recently. This lovely, lovely Tangy Carrot Salad With Gooseberry or Gajar Amla Salad is what happened to them!
The Indian gooseberry (also called Amla) is one of the richest sources of Vitamin C and antioxidants. Thanks to these properties, it helps in curing a number of minor ailments, flushing out toxins from the body, and also strengthens one’s immunity. Amla also aids in slowing down cellular degeneration and ageing, stimulates the heart, helps in improving eyesight, and prevents premature greying of hair. Low in sugar and high in fibre content, it is a berry you shouldn’t be missing out on. This is our very own local superfood, and a great one at that.
When Sangeeta Khanna wrote about this Gajar Amla Salad on her Instagram handle, I knew I had to try it out. Have I told you how much I adore this lady’s recipes? The author of Health Food Desi Videshi and Banaras Ka Khana, she is a treasure trove of beautiful recipes. Extremely knowledgeable and talented, Sangeeta Khanna is all about eating local, eating seasonal, eating fresh and eating right, philosophies that also resound with me. She has counselled a number of people on how to reverse various lifestyle diseases using just food – just how marvellous is that?! Anyhow, I found this salad of hers to be a brilliant way of getting all that goodness of amla into our systems, and it did turn out absolutely delicious!
The Gajar Amla Salad is tangy and refreshing, full of flavour and a treat to the tastebuds. It is super easy to make, with minimal effort and zero oil required! What’s more, it is low-fat, raw, vegan and gluten-free, too. It paired perfectly with the Mixed Vegetable RotiI served it with. This Tangy Carrot Salad With Gooseberry is definitely something you must try out too!
Here’s how I made the Gajar Amla Salad, following Sangeeta Khanna’s recipe to the T.
Ingredients (serves 2-3):
2 medium-sized gooseberries
Salt to taste
3 small carrots or 2 medium-sized ones
1 small onion
1 tablespoon finely chopped fresh coriander
2 green chillies or as per taste
Method:
1. Peel the carrots and grate them medium-thick. Transfer the grated carrots to a large mixing bowl.
2. Peel the onion and chop it finely. Add to the mixing bowl.
3. Grate the gooseberries finely. Add to the mixing bowl.
4. Chop the green chillies really fine. Add to the mixing bowl.
5. To the mixing bowl, add salt to taste and finely chopped coriander.
6. Mix all the ingredients in the mixing bowl, well. Serve the Gajar Amla Salad immediately.
Did you like this recipe? Do tell me, in your comments!
Did you know that idlis – that beloved breakfast of many across the globe – have a dedicated day, all to themselves? March 30 every year is celebrated as World Idli Day! I’m here today with a Kanchipuram Idli recipe for you guys, to mark the occasion. 🙂
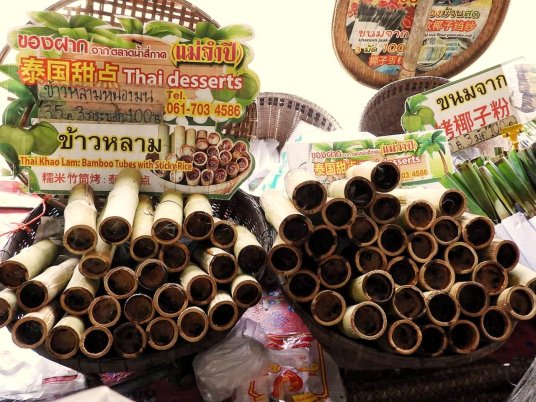
The town of Kanchipuram in Tamil Nadu is famous not just for the gorgeous silk sarees manufactured here, but also for the temple of Sri Varadaraja Perumal (Lord Vishnu) that it houses. For several scores of decades now, a special type of idli has been prepared at the temple as an offering to the Lord. This idli – traditionally cooked in a bamboo cylinder (called ‘kudalai‘ in Tamil) on a wood fire – is believed to be a favourite of Varadaraja Perumal. Referred to by various names like Kanchipuram Idli, Kanjeevaram Idli, Kudalai Idli (after the ‘kudalais‘ in which they are steamed), and KovilIdli (temple idli), this is one lovely-tasting confection for sure.
Today, the Kanchipuram Idli has become a staple in more or less every household, at least in Tamil Nadu. There are several different versions to the Kanchipuram Idli recipe – it is sometimes made with boiled rice (puzhungal arisi), sometimes with whole green moong (pacchai payaru), and with split moong daal (payathamparuppu) at other times. In her famous book Samaithu Paar (Cook & See), Smt. Meenakshi Ammal offers a Kanchipuram Idli recipe using just moong daal and urad daal, with no rice going into it. Yes, you heard that right – no rice. Making no-rice idli is not just a modern fad, this proves, but something that was in vogue even in 1950, when the cookbook was first published! Apparently, this is one very authentic recipe for Kanchipuram Idli, used in several. Tamilian households. Just how fascinating is all this history, eh? 🙂
I make Kanchipuram Idli following the maestro Meenakshi Ammal’s procedure to the T. They turn out brilliant, soft and fluffy, absolutely delicious and flavourful, a hearty and filling meal, perfect for diabetics and weight-watchers. In the restaurants and homes of Tamilnadu, these idlis are typically steamed in bowls made of banana leaves or mandara leaves (‘donnai‘ in Tamil). In the absence of both of these, I tend to cook my Kanchipuram Idlis in areca leaf bowls, commonly available in most Bangalore departmental stores. If you don’t have access to any of the above steaming vehicles, don’t fret – you can still cook the idlis in steel plates, little steel bowls or glasses, and they would still taste absolutely fantastic!
Now, without further ado, let’s check out the Kanchipuram Idli recipe or Kovil Idli recipe, a la Smt. Meenakshi Ammal.
Ingredients (makes 12-15 bigidlis):
1 cup split yellow moong daal
1 cup urad daal
Salt to taste
1 tablespoon finely chopped fresh coriander
A little ghee, for steaming the bowls
For the tempering:
2 tablespoons ghee
1 tablespoon chana daal
4 green chillies, chopped into large pieces
1 teaspoon cumin seeds
2 pinches of asafoetida
2 sprigs fresh curry leaves, roughly torn
1-1/2 teaspoon dry ginger powder
1 teaspoon black peppercorns
1 tablespoon roughly chopped coconut
2 tablespoons roughly chopped cashewnuts
Equipment needed:
Areca/banana leaf bowls for steaming the idli
Pressure cooker
Method:
1. Wash the moong daal and urad daal together under running water a couple of times, draining out all the water from them. Then, add in just enough fresh water to cover the daals. Let them soak for 2-3 hours, covered.
2. When the daals are done soaking, drain out all the water from them. Grind to a smooth batter in a mixer, stopping at intervals to add a little water and scrape down the sides of the mixer. Transfer the ground batter to a large vessel.
3. Add salt to taste to the batter. Mix well. Keep the batter covered in a warm place, undisturbed, for 8-10 hours or till it ferments well.
4. When you are ready to make the idlis, prepare the tempering. For this, heat the ghee in a small pan. Add in the chana daal, and fry on medium heat till it gets brown. Now, add the cashews to the pan, and fry till they turn brown too. Now, switch off the gas. Quickly add the green chillies, coconut pieces, black peppercorns, curry leaves, cumin, asafoetida and ginger powder. Give the ingredients a quick stir with a spoon, ensuring that they do not burn. The rest of the ingredients will get slightly cooked in the residual heat in the pan, and that is enough. Add this tempering to the fermented batter.
5. Add the finely chopped coriander to the fermented batter too. Mix the batter well. It is now ready to be used to make Kanchipuram Idlis.
6. Place about 1-1/2 cups of water in a pressure cooker bottom. Place the cooker on high heat and allow the water to start boiling.
7. Meanwhile, grease two of the leaf bowls with a little ghee. Fill the greased leaf bowls about halfway through with the batter.
8. Once the water in the pressure cooker bottom starts boiling, place a stand inside and place a colander on top of it. Place the two bowls with idli batter in the colander. Close the pressure cooker and steam for about 15 minutes without putting the whistle on.
9. Serve the cooked idlis hot with the leaf bowl intact, with chutney of your choice.
10. Replenish the water in the pressure cooker bottom. Prepare Kanchipuram Idlis from all the batter, in a similar way.
Notes:
1. You can also add in a couple of tablespoons of fenugreek seeds (sabutmethi or menthiyam) while soaking the moong daal and urad daal. This makes the idlis softer.
2. This Kovil Idli recipe uses split yellow moong daal and whole white urad daal. However, you can use whole green moong and split urad daal instead, too.
3. Make sure the batter is well fermented before using it to make the idlis.
4. The time the batter needs for fermentation would be different in different locales/weather. In hot weather, the batter might ferment much before 8-10 hours. In cold climes, one might need to leave the batter for over 12 hours to ferment.
5. Once the batter ferments, give it a good stir. You can make idlis with it immediately or keep it refrigerated for later use. If you plan to use the batter later, I would suggest doing the tempering just when you are ready to cook the idlis.
4. The fermented batter stays well in the refrigerator for 2-3 days.
5. Any leftover batter (after tempering) can be used to make kuzhipaniyaram.
6. If you are using refrigerated batter to make idlis, make sure you get it out of the fridge well in advance. The batter should be completely at room temperature when you begin to make the idlis.
7. Make sure the ingredients do not burn while tempering, as per the above Kovil Idli recipe. This will alter the taste of the idlis.
8. I used medium-sized areca bowls to steam the idlis, and could fit two into my pressure cooker at a time. You might be able to steam more idlis at a time if using smaller leaf bowls or steel glasses. If steaming in a steel plate, you might be able to fit in only one.
9. You will need to keep adding more water in the pressure cooker bottom in between steaming the idlis.
10. About 15 minutes is usually good to steam Kanchipuram Idlis. A toothpick inserted in the middle of the cooked idli should come out clean – that’s when it is done.
Did you like this recipe? Do tell me, in your comments!
*************
I’m sharing this recipe with the Foodie Monday Blog Hop. The theme for the blog hop this week is #IdliMedley, suggested by Mayuri of Mayuri’s Jikoni. wherein participants are cooking up a variety of no-rice idlis!
Check out the different types of no-rice idlis other members of the blog hop have come up with:
Have you ever tried out Murunga Elai Podi, a South Indian-style chutney powder made with moringa aka drumstick leaves? Extremely delish, extremely healthy, I tell you!
I have often waxed eloquent about the many health benefits that moringa possesses. Not only the leaves of the tree, but also the pods and flowers are edible, and all of them are extremely nutritious too. It is no wonder that moringa – murungai in Tamil – is considered a ‘super food’ the world over. Hence, moringa features regularly on our dining table, in various ways. Murunga Elai Podi ranks among the top favourite ways of our family to consume this wonder food!
I make this chutney powder following the same proceedure as that for my mom’s Thengai Podi. It is a burst of flavours – slightly sweet and tangy and spicy – and goes wonderfully well with steamed rice, idlis and dosas alike. Only 1 teaspoon of oil goes into it – isn’t that awesome?
Here is how I make the Murunga Elai Podi or Moringa Leaves Chutney Powder.
Ingredients (yields about 1-1/2 cups):
3 cups fresh moringa leaves (murunga elai)
1 teaspoon oil
1/4 cup chana daal (kadalai paruppu)
1/4 cup urad daal (ulutham paruppu)
1/4 cup sesame seeds (ellu)
1/2 cup fresh grated coconut (thengai)
A pinch of fenugreek seeds (menthiyam)
8-10 dry red chillies (vara milagai)
A small gooseberry-sized ball of tamarind (puli)
Salt to taste (uppu)
2 generous pinches of asafoetida (perungayam)
1/2 teaspoon turmeric powder
3-4 tablespoons of jaggery powder
Method:
Wash the moringa leaves well under running water a couple of times. Then, place in a colander and drain out all the water from them. Place on a cotton towel, and pat dry, then spread them out on another cotton towel and allow them to sun-dry for a couple of hours. They are ready to be used when completely dry, with no hint of moisture to them.
Remove all seeds and impurities from the tamarind. Keep aside.
Heat the oil in a heavy-bottomed pan. Add in the chana daal, urad daal, dry red chillies, sesame seeds and fenugreek seeds. Dry roast on medium heat till the daals begin to turn brown and emit a lovely fragrance. This should take 2-3 minutes. Take care to ensure that the ingredients do not burn.
Now, add the grated coconut to the pan, and roast on medium flame for a minute. Take care to ensure that the ingredients in the pan do not burn. Transfer all the roasted ingredients to a plate, and allow to cool down completely.
Add the dried moringa leaves to the pan. Dry roast on medium heat till the leaves shrink and become crisp. Transfer to the plate with the other roasted ingredients. Keep aside, and allow to cool down fully.
Break the tamarind roughly and add the pieces to the same hot pan. Without switching the gas on, dry roast the tamarind for a minute. It will get slightly crisp in the residual heat of the pan. Keep aside, and allow to cool down fully.
When all the roasted ingredients have completely cooled down, transfer them to a medium-sized mixer jar – the roasted moringa leaves, chana daal, urad daal, dry red chillies, sesame seeds, fenugreek seeds, coconut and tamarind. Add salt to taste, turmeric powder, asafoetida and jaggery powder. Mix the ingredients up. Grind to a coarse powder. Your Murunga Elai Podi is ready!
Allow the Murunga Elai Podi to cool down entirely, and then transfer to a clean, dry, air-tight bottle.
Notes:
Leave the bunch of fresh moringa leaves wrapped in newspaper or in a paper bag, overnight, at room temperature. By the next morning, most of the leaves would have fallen off the stem, ready to use. This is one of the easiest ways to use moringa leaves.
I use a mix of the long, shrivelled Bydagi chillies and the small, round, fat Salem Gundu chillies to make this Murunga Elai Podi. Bydagi chillies are relatively less spicy, while Salem Gundu chillies are quite hot. A mix of two evens out the taste of the podi for us.
You can leave out the tamarind and jaggery while preparing this Murunga Elai Podi. I do add them, because it suits my family’s taste buds.
Do ensure that the ingredients do not burn while roasting.
Make sure all the roasted ingredients have completely cooled down, before you use them in making the Murunga Elai Podi.
Make sure you grind the roasted ingredients coarsely and not make a fine powder. Coarsely ground podi tastes way better than the fine version.
I have used fresh coconut in making this podi. You can use dry coconut (kopparai) instead, too.
Adjust the quantity of tamarind, salt, dry red chillies and jaggery you use, depending upon personal taste preferences.
If stored and used hygienically, the Murunga Elai Podi stays well for 5-6 days at room temperature. In hotter climates, the shelf life might go down. Refrigeration will increase the shelf life further.
This Murunga Elai Podi can be consumed with hot steamed rice and ghee. It can also be served with idlis and/or dosas.
Did you like this recipe? Do tell me, in your comments!
Any destination we head to, the husband and I definitely make it a point to visit the local bazaars. A stop (or two, or three!) at the local markets is a great way of getting exposed to the culture and traditions of the place, at the very root level. And, of course, it teaches you a whole lot about the food of that region – the ingredients that the locals use, the ways in which they cook, their indigenous foods, et al. Thailand was no exception. That was how, one bright and sunny day during our recent holiday in Thailand, the two of us headed to Pattaya Floating Market, with the bub in tow. And, hey, this is a floating market – a market actually on water – and how do we not check out that?!
A group of tourists being rowed around the Pattaya Floating Market, in a small country boat
Internet-shaped impressions of the Pattaya Floating Market
The little reading I did on the Internet before we headed out to Thailand told me that if I was charmed by the idea of floating markets, the ones in Bangkok are what I should be visiting. All of Thailand used to commute via waterways in the olden times, trading in markets included. While transport in Thailand is presently largely by road, the waterways still exist, as do the floating markets. Bangkok has several of these floating markets, many of them as major tourist attractions, while a couple still operate as hard-core trading centres. Most Internetizens suggested visiting the Damnoen Saduak and Amphawa floating markets in Bangkok, and against going to the one in Pattaya. According to them, the Pattaya floating market is pure tourist trap, messy and filthy, a hotbed for scams of various types.
The entrance to the Pattaya Floating Market
As luck would have it, we never got a chance to visit any of Bangkok’s famed floating markets on our holiday. It just never happened! This left us hugely disappointed and, tourist trap or not, we decided to head to the Pattaya floating market, to get a feel of the place if nothing else. And you know what? We weren’t disappointed one bit. Agreed, the market is chaotic, there are some tacky things around, and that there are better ways to learn about Thai culture and heritage – but, we loved the Pattaya Floating Market!
Pattaya Floating Market left us with a vast range of emotions – happy, awe-struck, sad, angry, overwhelmed, all at the same time. Overall, though, it left us feeling enriched for having visited. We are glad we chose to visit the market, in spite of there being conflicting information about the place on the Internet. We are glad for the opportunity it gave us to get a wee bit closer to Thai culture and heritage, food and traditions.
Postcards from the Pattaya Floating Market
Let me tell you about the experiences that stood out most prominently for us, at the Pattaya Floating Market.
Food, food and more food
Whole frozen Thai mangoes being sold at the Pattaya Floating Market
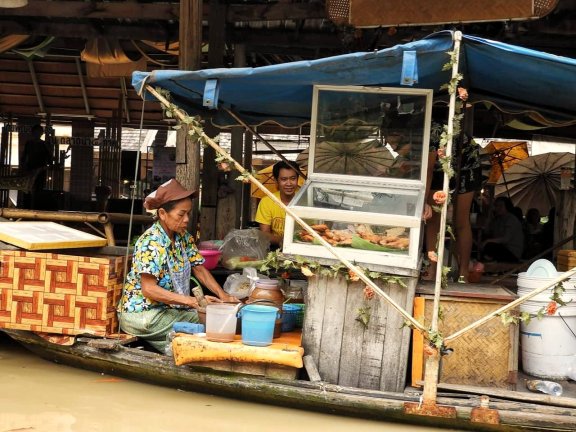
One of the things that strike you as you walk around the Pattaya Floating Market is the humongous amount of food that is on offer. Food being cooked and sold on boats, food stalls lining the water, fresh fruit, roasted chestnuts and sweet treats – there’s food, literally, everywhere!
One of the durian sellers caught in action at the Pattaya Floating Market
Fried octopus, various kinds of grilled fish, whole frozen mangoes, various traditional Thai desserts, palm fruit juice, snake fruit and durian, noodle hotpots, the most beautifully presented milkshakes and ice creams are some examples of the food we came across here. Some of the eatables here didn’t look very hygienically prepared, while some others were just fine – take your pick carefully if you decide to eat here. There wasn’t much on offer for vegetarians, though, apart from the milkshakes, ice creams and desserts.
Khao Lam, a traditional Thai dessert being sold at the Pattaya Floating Market
Dirty waters, but charming nonetheless
Charming as the Pattaya Floating Market is, one can’t help noticing that the waters on which it stands are far from clean. The waters are filthy and murky and, as we walked around, we kept wishing this part had been better maintained.
You can choose to explore the Pattaya Floating Market by boat or walk along the shopfront and check it out on foot
We chose to focus instead on the prettier sights the market had to offer, instead – the rows and rows of shops, some with rather interesting merchandise on sale, the big bus-like boats that ran on the water ferrying people around, the Thai Cultural Village tucked away within the market that offered us a glimpse into the real Thailand, a huge Thai water buffalo making the rounds of the market and posing for photographs, the ongoing dance and music shows, and artists at work busy making glow-in-the-dark paintings that you find all over Thailand.
A vendor selling snacks by the water, at the Pattaya Floating Market
The tall, tall, tall drag queens
Drag queens are everywhere in Thailand, and the Pattaya Floating Market is no exception. Standing on tall, tall, tall stilts, they welcome you at the entrance. They are dressed so gorgeously you can’t take your eyes off them! They are all smiles, posing candidly for cameras from across the globe.
The beautiful drag queens who welcomed us at the entrance to the Pattaya Floating Market
My heart hurt for them, these drag queens. Were they being forced to dress up and pose for pictures, thanks to poverty? Was the smile plastered on their faces just for the sake of tourists? Just how happy were they on the inside? Well, at least, they were living in a country that doesn’t make a big deal of it, that accepts people as they come.
Some interesting souvenirs
Most of the stuff up for sale at the Pattaya Floating Market is shiny and pretty, sure to catch your eyes. Crazy shoes and glamorous earrings, funky purses and dresses, Thai elephant statues and paper umbrellas, cute dolls and keychains are some of the stuff that is on offer – the same things you would come across anywhere else in Thailand too.
Traditional Thai dresses for little girls on sale at one of the stalls in the Pattaya Floating Market
We didn’t really shop here, thanks to the astronomical prices for stuff we were being quoted at every stall. All we bought were some little cute souvenirs to get back home with us, which we felt were reasonably priced.
An artist making a glow-in-the-dark painting, at the Pattaya Floating Market
Great photo ops
Colourful popsicles on sale on board a boat, at the Pattaya Floating Market
Touristy, commercial and a bit filthy as the Pattaya Floating Market was, we found it fascinating nonetheless. We were charmed by this and that, and ended up walking around the market for hours on end. We took countless pictures – I think we actually went a bit crazy here taking photographs. Who can resist, considering the innumerable gorgeous photo ops available here?
So many, many, many photograph-worthy nooks and corners here!
Every single lane you turn into is pretty, in a quaint sort of way. You would inevitably want to capture all of that in frames! If you love photography, the floating market is definitely not something that you should miss, I say.
A ‘hanging bridge’ at the Pattaya Floating Market, which made for a wonderful photo op!
The wonderful Thai Cultural Village
A show, at the Thai Cultural Village in the Pattaya Floating Market
A little makeshift village in the midst of the Pattaya Floating Market, the Thai Cultural Village offers a peak into real life in the country. There are live stations where you learn about the various types of dried food stuff available in Thailand, silk cultivation in the country, music and dance forms and, of course, Thai massage. For a first-time visitor to Thailand, this place can offer invaluable learning about the country under a single roof. Yes, quite touristy, but quite informative too if you look at it the right way.
A model Thai herbal bag used for massage, exhibited in the Pattaya Floating Market
All visitors to the Thai Cultural Village are treated to a little free-of-charge session of Thai massage. A hot cloth pouch filled with ancient Thai medicinal herbs is used, quite a common form of massage in the country. We found the massage quite relaxing and rejuvenating after our long, tiring walk around the market.
The plight of the long-necked Karen
The Karenni (also called the Karen or the Red Karen) are an ethnic minority tribe from Myanmar (Burma). They have a distinct dressing style of their own, including the wearing of several thin brass rings around their necks to make them appear long. For this reason, they are also called the Long-Necked Karen. Several hundreds of these Long-Necked Karen fled to neighbouring Thailand over the years, thanks to political unrest in their own country. As most of these Karen were illegal immigrants in Thailand, they are not official Thai citizens and opportunities for them stay limited. The Thai government has bestowed a couple of villages to the Karen (maybe considering the huge potential of these villages to become tourist attractions?), to make their own, to reside in and earn their living. These habitats of the Karen draw tourists by the horde – many interested in photographing the long-necked women and/or buying the various handicrafts that they make.
One of the long-necked Karen women we met in the Thai Cultural Village, Pattaya Floating Market. She knew little English, and communicated with us using hand gestures, but was happy to have her photograph taken.
The Karen villages are quite on the outskirts of Thailand and not very easy to access – at least not with the bub in tow – so we dropped the idea of visiting them. Personally, I’m quite conflicted about wanting to visit the Karen habitats and not wanting to. We were, however, happy to note that there were stalls by a couple of the Karen in Pattaya Floating Market’s Thai Cultural Village. We dropped by, and were thrilled to interact with them (a task that was not at all easy considering their extremely limited knowledge of English). It surely felt like we had stepped into a documentary by National Geographic! They happily posed for pictures for us, too.
Everything was going fine till we came across a little wooden enclosure, not unlike a pen in a zoo. A lone Karen child was walking around, 4 or 5 years of age, calling out to passing tourists and smiling at them. Many got out their cameras to take pictures. ‘Burmese refugee child!’, our guide cried out, excitedly. At that precise moment, my heart shattered into a million pieces and I lost all interest in the place or taking any more pictures.
Too much to take in
Various touristsy knick-knacks for sale at the Pattaya Floating Market
Like many indigenous markets around the world, the Pattaya Floating Market too is a bit too much to take in in a single visit. It gets overwhelming after a while – the crowds, the touristy-ness of it, the scale of the market. We kind of zoned out after some time, a plight brought about also by the fact that it was a supremely hot day and our little daughter was getting crankier by the minute. Thankfully, there are benches laid out here and there, and we took short breaks in the midst of checking out the market, which really helped refresh us. Please do bear this in mind when you decide to visit, too. I don’t think we managed to do justice to the market, in the few hours we were there. We probably need a few more visits, a more leisurely frame of mind, and more congenial weather to do so.
The bustling ‘food’ area in the Pattaya Floating Market. Literally scores of families were milling around here, lunching by the waters.
Thankfully, our drive to and from the floating market, our entry tickets and boat ride had all been arranged for beforehand by our hotel – I don’t know what we would have done if this hadn’t gone as smoothly as it did. I had read a number of stories on the Internet of tourists getting scammed here and being charged an exorbitant entrance fee, and was super scared! If you plan to visit the Pattaya Floating Market, I would suggest you do so via the tourism desk at your hotel too.
I hope you enjoyed this virtual journey through the Pattaya Floating Market, and that this post offered you helpful tips to plan your visit here too! Do let me know, in your comments!