Anarosher Chaatni| Pineapple Chutney, Bengali Style

A Bengali meal is incomplete without a chutney, especially so on festive occasions. Chutney (rather, ‘Chaatni‘ in the local language) is eaten at the end of a Bengali meal, as a dessert, rather than meaning it to be an accompaniment to the other dishes. It is literally licked off the plate – therefore the name ‘Chaatni‘. And why not? The Bengali Chaatni is, after all, a beautiful medley of flavours sweet and sour with just a hint of spice to keep it intriguing, raisins adding a lovely texture to it. Quite different from the South Indian chutneys we are so used to!

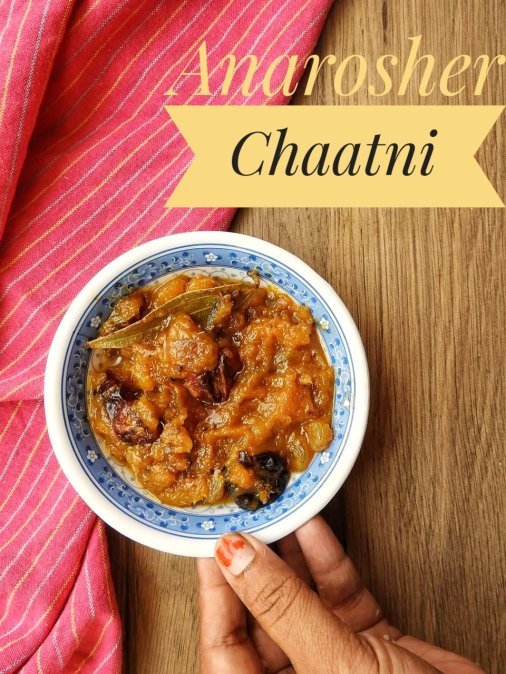
Bengali Chaatnis are also quite intriguing in the sense of what they are made up of. Often, a fruit – think tomato, dried dates, pineapple and mango leather – finds its way into a Chaatni. Then, there’s the one made using raw papaya, called Plastic Chaatni because it resembles shiny plastic in appearance. The recipe I share with you today is for Anarosher Chaatni, pineapple chutney Bengali-style.

We stayed at a hotel in the New Market area of Calcutta, on a holiday there, a few years ago. It was there that we encountered Chaatni for the first-ever time, and whole-heartedly fell in love with. My interest in Bengali cuisine piqued, I would ask the hotel staff about this dish and that. They were kind enough to enlighten me, and even teach me how to make this Anarosher Chaatni and the gorgeous Bengali Bhoger Khichuri.

I recently recreated this Anarosher Chaatni based on recollections of passionate foodie conversations with those hotel staff of a few years past. It was a huge hit, with everyone at home loving it to bits. It was licked clean within minutes – I kid you not! I served it alongside rotis and cabbage sabzi, and it made for a wonderful accompaniment. Spiced with panch phoron, this pineapple chutney, Bengali style, jazzed up our meal like no one’s business!

This chutney is such a simple affair, but an absolute treat to the senses! I have made it with minimal jaggery (rather than sugar) and oil. It is entirely plant-based, vegan and gluten-free by its very nature. Come to think of it, this low-oil Anarosher Chaatni would make for a relatively healthy vegan dessert treat as well!

Let us now check out the recipe for this Pineapple Chutney, Bengali Style, shall we?

Ingredients (makes 1 cup):

  1. 1 heaped cup of chopped ripe pineapple, thorns removed
  2. 2 teaspoons oil
  3. 1 teaspoon panch phoron or Bengali five-spice mix
  4. 2 small bay leaves
  5. 2 dried red chillies
  6. 1 tablespoon raisins
  7. A pinch of salt
  8. 1/4 teaspoon turmeric powder
  9. 2 tablespoons jaggery powder or to taste
  10. A dash of red chilli powder or to taste
  11. 1 teaspoon roasted cumin powder

Method:

1. Take the chopped pineapple in a large, wide vessel. Add in a little water. Place the vessel in a pressure cooker and cook for 3 whistles on high flame. Switch off gas and allow the pressure to come down naturally.

2. Allow the cooked pineapple to cool down fully. Then, grind it coarsely in a mixer, along with the water it was cooked in.

3. Heat the oil in a pan. Add in the panch phoron, dried red chillies and bay leaves. Let the ingredients stay in for a couple of seconds.

4. To the pan, add the coarse pineapple puree. Add salt, red chilli powder, turmeric powder, raisins and jaggery powder. Mix well.

5. Turn the flame down to medium. Cook the mixture on medium flame till the chutney thickens slightly, 3-4 minutes. Switch off gas when it is still quite runny, for it thickens further on cooling. Now, mix in the roasted cumin powder.

6. Allow the chutney to cool down fully before transferring it to a clean, dry, air-tight box. Store refrigerated.

Notes:

1. Panch phoron is a Bengali-style mix of five spices – cumin, mustard, fennel, fenugreek and nigella seeds. You can make your own panch phoron or buy a ready-to-use packet – it is commonly available in most departmental stores. I use a store-bought version that I am quite happy with.

2. A lot of Bengali families use sugar in their chaatni. I have used jaggery here, instead, to make the dish healthier.

3. Adjust the quantity of sugar/jaggery depending upon how sweet the pineapple is.

4. Adjust the quantity of red chilli powder, salt and other spices as per personal taste preferences.

5. For best results, use a ripe, juicy, sweet pineapple that is not overly sour. Make sure all thorns are removed before using the pineapple in the Anarosher Chaatni.

6. I have coarsely pulsed the cooked pineapple here, so I got a mix of puree and pieces of the fruit. This lent a very interesting texture to the chaatni. You could keep the pineapple pieces whole or make a fine puree, as you please.

7. Make sure the pineapple is cooked fully, before using it in making the chaatni.

8. Switch off the gas when the Anarosher Chaatni is still quite runny. It is supposed to be runny, and thickens a bit on cooling as well.

9. I have used refined oil to make the Anarosher Chaatni, as opposed to the pungent mustard oil that is typically used in most Bengali cooking.

******************

Foodie Monday Blog Hop

This post is for the Foodie Monday Blog Hop, a Facebook group that I am part of. Every Monday, a bunch of us food bloggers present dishes based on a pre-determined theme.

The theme this week is #BengaliFoodFest, wherein we are cooking dishes from the vast Bengali cuisine. The theme was suggested by Sujata Roy, who writes at Batter Up With Sujata.

I’m also sharing this recipe with Fiesta Friday #273. The co-host this week is Mollie @ The Frugal Hausfrau.

Rose Syrup| Home-Made Rose Syrup Recipe

I am here today with a home-made rose syrup recipe, one that is rather close to my heart, an inextricable part of my summer-time memories.

Like I have said many times on my blog before, the hot days of summer bring back lots of foodie memories for me. Holidays spent at my maternal grandparents’ place in Hyderabad. Sitting amidst a circle of cousins, eating the cool curd rice that my grandmother would place in our mehendi-decked hands. Grandma’s wonderful, wonderful home-made grape squash. Grandpa holding huge, ripe Banganapally mangoes in one hand and expertly cutting them into cubes with his other hand. Eating ice lollies from the streetside carts. Visiting the market to buy the choicest of raw mangoes. Getting raw mangoes cut by the kilos, seed and all, for the neighbourhood Telugu Aunty to turn into a fiery pickle. Small newspaper parcels of chips and the most delicious of onion pakoras that my grandfather would sneak in for me. The gorgeous vattalkozhambu and more kozhambu that grandmom would expertly make for me, with loads and loads of love. Munching on honey loops. Rice flour painstakingly cooked and passed through a press to make sevai for breakfast, for a truckload of people. Rose-scented jangris that my grandmom would have specially prepared for me, by a halwai in the neighbourhood. Bottles and bottles of my aunt’s chilled rose milk that she prepared using her special home-made rose syrup. … the list is endless.

Over the course of several hot afternoons, I learnt from my aunt the technique of making her fragrant rose syrup. Made from sweet-smelling roses, called Panneer Roja in Tamil, this syrup is free of any artificial colours or preservatives. I do add a bit of rose essence to the syrup I make, as the roses available these days don’t seem to have as strong a fragrance as I remember them having, all those years ago. It keeps for a good while, but is best used in a week to 10 days’ time. This home-made rose syrup makes for some awesome, awesome rose milk, of course, and also goes beautifully in lassi, juices, mocktails, falooda, rose milk, cakes, ice creams and other desserts.

Come, now, let’s check out the summer-special home-made rose syrup recipe!

Ingredients (makes about 2 cups):

  1. 25-30 edible roses (panneer roja)
  2. 2 cups + 1 cup water
  3. 2 tablespoons grated beetroot
  4. 1-1/2 cups sugar
  5. 1/2 teaspoon rose essence

Method:

1. Separate the rose petals from the stem. Discard the stems and transfer the petals to a colander. You should get about 2 tightly-packed cups of rose petals.

2. Wash the rose petals thoroughly under running water, a couple of times. Drain out all the water.

3. Meanwhile, in a pan, bring 2 cups of water to a boil. Switch off the gas when the water comes to a rolling boil. Add the washed and drained rose petals to the boiled water. Cover the pan and let the petals rest in the water for 8-10 hours or overnight.

4. After 8-10 hours, the rose petals would have released their colour and scent into the water. The petals would have become white. Filter out the rose petals and retain the rose water.

5. Take 1 cup of water in a pan and add the sugar to it. Place the pan on high flame. Add in the grated beetroot. Cook on high heat till the sugar is completely dissolved in the water. Then, reduce flame to medium and cook for 2-3 minutes, stirring intermittently.

6. Add the rose water we prepared earlier to the pan. Cook on medium heat for 2-3 minutes or till the syrup comes to a rolling boil. Switch off the gas and allow to cool completely.

7. Filter the rose syrup and discard the beetroot. Mix in the rose essence to the syrup.

7. Transfer the rose syrup to a clean, dry, air-tight bottle. Store refrigerated. Use as needed.

Notes:

1. Use only roses that are meant for culinary purposes.

2. Grow your own roses, buy organic ones or source them from reliable sources, so you are sure they have been grown hygienically and that they haven’t been given generous sprays of pesticide. Make sure they haven’t been sprayed with perfume too – that’s quite a common occurrence!

3. Make sure you wash the rose petals thoroughly before using them to make this syrup.

4. Adjust the quantity of sugar depending upon personal taste preferences.

5. Red food colour can be used in place of the grated beetroot. I prefer not doing so, though.

6. Often, the scent from organically grown or home-grown roses just isn’t strong enough. I therefore add a bit of rose essence to the syrup to balance out the fragrance. You may skip the essence if the roses you are using are fragrant enough.

7. Store the rose syrup in a clean, dry, air-tight bottle after it has fully cooled down. Keep refrigerated when not in use.

8. Make sure you use the syrup in a week to 10 days’ time, for best results. Refrigerated and used hygienically, it stays well for 15-20 days, though.

9. Some people add cloves, cardamom and/or lemon juice to the rose syrup. I haven’t.

Did you like this recipe? Do tell me, in your comments!

**************

I’m sharing this recipe with Fiesta Friday #273. The co-host this week is Mollie @ The Frugal Hausfrau.

Aamlicious: Rajdhani’s Mango Festival You Simply Must Not Miss

The moment summer sets in, most of us begin to dream of mangoes. The love of mangoes is what gets most Indians through the intense heat of summer. And who can blame us? Eating a mango is an unparalleled experience – be it the sweet and juicy, yellow-orange flesh of the ripe fruit or the lip-puckeringly sour raw mango. Using raw and ripe mangoes in various culinary confections is de rigueur in India in the months of summer. That’s what the Aamlicious festival at Rajdhani, Bangalore, is all about – the play of mangoes in various forms, dishes, textures, ingredients and flavours.

Aamlicious is a hugely anticipated affair at Rajdhani every year, and why not? The kitchen team comes up with a huge variety of dishes made with the mango, the ‘king of fruits’, each one surpassing the other. I had the pleasure of experiencing the Aamlicious feast at Rajdhani’s Indiranagar outlet a few days back, along with a few other foodies from the city, and ended up utterly awed by all of it.

fb_img_1555827849864724815688.jpg
The mango-licious thali we were served at Rajdhani’s Aamlicious festival. Isn’t that simply magnificent?

There is no better way to describe the mango-laden thali we were served, other than calling it ‘a veritable feast’. The Rajdhani team has come up with an astounding array of over 30 dishes with mango, mostly from the states of Gujarat and Rajasthan. Aam Ki Launji, Kairi Ka Panna, Aam Palak Patta Chaat, Raw Mango Muthia, Kairi Samose Ki Sabzi, Mango Pulao, Kesar Aam Thandai, Aam Jalebi, Aam Ras and Aam Basundi are just some examples of the stuff that is on offer. There’s a mind-boggling variety of mango-based appetisers, curries, daal, kadhi, drinks and desserts – what’s to not love?

Some of the appetisers we were served as part of the Aamlicious festival at Rajdhani. Check them out!

Mr. Sugata Sengupta, Corporate Chef – Rajdhani, spoke to us food bloggers about the sheer hard work that has gone into creating the thali for the Aamlicious festival this season. This feast has been designed after over a month of research, trials and testing, and the hard work surely shows!

A glimpse of the main course dishes that are part of the Aamlicious festival this year. Top Left: Kairi Samose Ki Sabzi, a unique offering; Top Right: Aam Ki Launji; Bottom Row (from left to right): Gol Amboliya, Rajashthani Kaju Aur Aam Ki Sabzi, Ker Sangri Amboliya, Gujarati Fajeto

I loved most of the ‘aam‘ creations on offer at Aamlicious, but I will share my top picks here.

Among the drinks, the Kesar Aam Thandai (a delicious mango twist added to the regular thandai) and Kairi Panna (a traditional Indian-spiced raw mango cooler) were brilliantly done. From the appetisers, the Kaccha Aam Na Muthiya (Gujarati steamed wheat-flour dumplings made with raw mango) tantalized my taste buds.

The Aam Ras (ripe mango pureed with milk and sugar) was delectable too, bringing back fond memories of hot summer afternoons spent lunching on it with pooris, back in Ahmedabad. The utterly delectable Kairi Samose Ki Sabzi (raw mango samosas cooked in a spicy-tangy gravy, based on a traditional Rajasthani recipe) was something very new to me. I also adored the Aam Ki Launji and Ker Sangri Amboliya too, both Rajasthani dishes made using raw mangoes.

Top: Kacchi Kairi Khichiya Masala Papad, a special type of rice-flour papad popular in Gujarat and Rajasthan. Bottom (from left to right): Marwari Kacchi Kairi Ki Biryani (biryani cooked with raw mangoes); Aam Pista Pulao (pulao made with pistachios and mango); the three drinks on offer – Aam Ras, Kesar Aam Thandai and Kairi Panna.

Both the mango-special desserts served to us bowled me over. Mango Jalebi Rabdi (jalebi stuffed with ripe mango and served with creamy rabdi) and Gulkand Paan Malpua Mango Rabdi (malpua made with ripe mango, served with rose jam and pureed betel leaves on top) were extremely well-done, supremely decadent and lip-smackingly delicious.

Top Left: Mango Jalebi Rabdi; Bottom Left: The king of fruits, crowned, and justly so!; Right: Gulkand Paan Malpua Mango Rabdi; all part of the Aamlicious festival at Rajdhani

This is one festival you don’t want to miss. Do check it out – it’s on till May 31 at all Rajdhani outlets in Bangalore! Please do note that the dishes are served on a rotational basis, so it is best to call them and check in case you are interested in a particular dish.

***************

I’m sharing this recipe with Fiesta Friday #273. The co-host this week is Mollie @ The Frugal Hausfrau.


Safed Dhokla| Gujarati White Dhokla Using Idli Batter

Today, I present to you the recipe for a Gujarati snack that goes by the name of Safed Dhokla (literally ‘white dhokla‘ in the local language). Before I get to the recipe, though, here’s a little rant.

Dhokla‘ and ‘Khaman‘ are perhaps the most misrepresented dishes in Indian cuisine. The terms are often used interchangeably, but the two dishes are definitely not the same. Both ‘Dhokla‘ and ‘Khaman‘ are Gujarati snacks which are cooked by way of steaming, but there’s a world of difference between them!

Let me explain.

Dhokla‘ is typically made using a rice-and-uraddaal batter. They are usually white in colour, and are generally not sweet.

Khaman‘ is made from gram flour (besan) or ground chana daal. They are yellow in colour, and can sometimes be sweet and sour.

When the basic ingredients used in the preparation of the two things are so different, you can imagine how different in taste they would be, right?

Now, there are several different versions of both – the ‘Dhokla‘ and the ‘Khaman‘. Different regions of Gujarat, different families, make them in different ways. I hope you got the basic differences between the two, though. On my blog, I have earlier shared the recipe for making instant Khaman using besan. I have also shared a recipe for Amiri Khaman, a chaat of sorts using leftover Khaman.

OK, rant over. Gyaan disbursed. Now, let me tell you about the Safed Dhokla I was about to tell you about.

Safed Dhokla, also called Idada or Idra, is one of the types of Dhokla commonly made in Gujarat, using idli batter. If you have idli batter on hand, it is a breeze to prepare these dhokla. They taste absolutely lovely, and are a highly nutritious snack to boot. Since they are steam-cooked, very little oil goes into them, making them perfect for weight-watchers. At the end of this post, I have suggested a few different variations to the Safed Dhokla that you can try out, so you get a different-tasting snack every time you make it! In the picture below is the most basic style of Safed Dhokla – tempered with just mustard seeds and fresh coriander. Safed Dhokla is a completely plant-based, vegan dish. In itself, this is a gluten-free dish as well.

Here’s the recipe for basic Safed Dhokla!

Ingredients (makes 10-12 dhokla):

  1. 2 cups well fermented and salted idli batter
  2. 1 tablespoon oil for tempering + a little more for greasing the steaming vessel
  3. 1 teaspoon mustard seeds
  4. Finely chopped coriander, as needed to garnish

Method:

  1. Firstly, grease the bottom and sides of a large, wide vessel well with some oil.
  2. Pour the fermented batter into the greased vessel, and keep it ready.
  3. Pour about 1-1/2 cups of water in a pressure cooker bottom and place it on high flame. When the water comes to a boil, place a stand inside the cooker and place the greased vessel with the batter on top of it. Close the pressure cooker lid. Steam on high flame for 10 minutes, without putting the whistle on. Switch off gas.
  4. Let the Safed Dhokla rest for 2-3 minutes more after switching off the gas, then take out the steaming vessel.
  5. Now, we will make the tempering for the Safed Dhokla. Heat a tablespoon of oil and add in 1 teaspoon of mustard seeds. Let them sputter. Pour this tempering evenly over the steamed dhokla. Garnish the dhokla with finely chopped fresh coriander as needed. Cut into pieces and serve hot or at room temperature.

Notes:

1. The idli batter should be thick and not watery, for best results.

2. Make sure the idli batter is well fermented before you begin making the Safed Dhokla.

3. Since the idli batter is already salted, we will not be adding salt to it again before making the Safed Dhokla.

4. Do not overcook the dhokla, otherwise they will become hard and rubbery. Just about 10 minutes after the water in the cooker has come to a boil is good.

5. I use homemade idli batter to make these dhokla. You can also use store-bought batter instead, too.

6. I steam the Safed Dhokla in a large, 7.5-litre pressure cooker.

7. If you so desire, you can add in 1/2 teaspoon of Eno Fruit Salt (plain) or baking soda to the batter just before placing it in the cooker for steaming. This makes sure the dhokla turn out very soft and fluffy. I usually don’t – well-fermented, fresh idli batter is enough to yield spongy dhokla.

8. For best results, make the Safed Dhokla within 2-3 days of grinding/buying the idli batter.

9. You can add about 1/2 cup of thick, sour curd to the idli batter and let it rest for 15-20 minutes before making the dhokla. I typically don’t do this.

Variations:

  1. You can add in some chopped green chillies and garlic cloves while grinding the batter. This will yield garlicky, slightly spicy dhokla that are super delicious!
  2. Add in a bit of asafoetida, some finely chopped green chillies, some fresh grated coconut and some sesame (til) to the tempering. This will make the dhokla even more flavourful.
  3. Just before placing the batter in the pressure cooker for steaming, drizzle some red chilli powder on top. This will add a zing to the dhoklas!
  4. You can also drizzle some black pepper powder on top, just before placing the batter in the pressure cooker for steaming.
  5. Some grated carrot and/or beetroot can also be added into the batter, to make the dhokla more nutritious.

***************

Foodie Monday Blog Hop

This recipe is for the Foodie Monday Blog Hop group that I am part of. Every Monday, a bunch of us food bloggers get together and cook dishes based on a pre-determined theme.

The theme this week is #OneSpiceIngredient, suggested by Sasmita of First-Timer Cook. Participants are sharing dishes that use only one spice ingredient. For the theme, I chose to share this Gujarati White Dhokla Recipe that I have tempered with just one spice – mustard.

I’m also sharing this recipe with Fiesta Friday #272. The co-hosts this week are Antonia @ Zoale.com.

Do try this recipe out some time! I’d love to know what you think about it!

Imli Ka Amlana|Refreshing Tamarind Summer Cooler

Would you like to know about a tangy, super refreshing drink that would be just perfect for the hot summer days that seem to be reigning the country right now? Yes? What if I tell you such a drink can be made in a very healthy way, and would require just a few minutes of your time to make at home? Sounds too far-fetched? Not at all!

Here’s presenting to you – Imli Ka Amlana, a summer-special beverage from the hot and arid land of Rajasthan. Traditionally made with tamarind pulp and sugar, this drink is a mix of tangy and sweet, spiced mildly. The Indian spices that go into it make this extremely flavourful, at the same time aiding one’s digestion as well. It is a yummy way to get all the health benefits that tamarind possesses into one’s system, I would say!

Imli Ka Amlana is typically served as part of a Rajasthani thali, and is also served in gatherings of friends and family on festive occasions. It is, after all, an apt way to digest all the heavy food that is consumed during such festivals!

I have made the Imli Ka Amlana with Kitchen D’Lite’s Tamarind Powder, a highly convenient substitute that saved me the hassle of soaking tamarind and extracting juice from it. For the uninitiated, Kitchen D’Lite offers a variety of powders made from dehydrated ingredients, without any preservatives, chemicals or artificial flavouring and colouring agents. They sent me packs of their Tomato Powder, Tamarind Powder, Garlic Powder, Ginger Powder, Green Chilli Powder and Red Onion Powder to test in my kitchen and, I dare say, I am loving them. The powders are great in quality and extremely fresh, and can be easily substituted for the real ingredient without guilt. They have a good shelf life too, of up to 1-1/2 years.

I also substituted the sugar that is generally used in the drink with jaggery powder, to make it healthier. I always have a ready stock of the other spice powders used in the Imli Ka Amlana – black salt, cardamom powder, black pepper powder and the like – so making it was such a breeze! I served it alongside a simple lunch of roti and sabzi, and it was such a huge hit!

Do try out the Imli Ka Amlana too and, I’m sure, you’ll be making it more than once. We surely will be!

Recipe Source: Adapted from Chef Sanjeev Kapoor

Ingredients (serves 2):

  1. 4 teaspoons Kitchen D’Lite tamarind powder
  2. 6 tablespoons jaggery powder
  3. 1/2 teaspoon black salt
  4. 1/2 teaspoon black pepper powder
  5. 1 teaspoon roasted cumin powder
  6. 1/2 teaspoon cardamom powder
  7. 2 cups chilled water
  8. 4-6 fresh mint leaves

Method:

  1. Grind the black salt, black pepper powder, roasted cumin powder and cardamom powder together till fine. Keep aside.
  2. Take the tamarind powder and the jaggery powder in a large mixing bowl. Pour in the chilled water. Mix till the tamarind powder and jaggery powder are dissolved completely in the water.
  3. Add in the powder we ground earlier. Mix well.
  4. Pour the Imli Ka Amlana into 2 serving glasses. Serve, garnished with fresh mint leaves that have been roughly torn.

Notes:

  1. In the absence of tamarind powder, you can use fresh tamarind instead. Soak a lemon-sized ball of tamarind in a little warm water, in that case, and extract a thick paste out of it. Use the tamarind paste the same way as tamarind powder, in the above recipe.
  2. Adjust the quantities of jaggery powder, tamarind powder, black salt, roasted cumin powder, black pepper powder, cardamom powder and water, as per personal taste preferences.
  3. You may use sugar instead of jaggery powder, in the above Imli Ka Amlana recipe.
  4. If you think there are impurities in the jaggery you use, do filter the water once after mixing it in. I use organic jaggery which is free of impurities, so I do not filter the water.
  5. For best results, grind the spice powder really fine.
  6. If you don’t have black salt, you can substitute it with regular table salt and add in some chaat masala instead. However, I would personally not recommend that – black salt has a unique fragrance and taste that works wonders to the flavour of the Imli Ka Amlana.
  7. If you so desire, you can add a dash of lemon juice to the Imli Ka Amlana, in addition to the tamarind.
  8. The Kitchen D’Lite products were sent to me free of cost, to sample in my home kitchen. The opinions expressed herein about the products are entirely my own, entirely honest, without any external influence. I really loved the products, and have been enjoying using them.
  9. In case you are interested in buying Kitchen D’Lite’s amazing products, they are available on Amazon.

Did you like the recipe? Do tell me, in your comments!

*************

I’m sharing this recipe with Fiesta Friday #272. The co-hosts this week are Antonia @ Zoale.com.