Bohra Gol Paani| Summer Beverage With Jaggery

Gol Paani is a special beverage popular among the Bohra Muslim community. It is made with all-natural ingredients, super flavourful and very refreshing. It is a wonderful thirst quencher, especially prepared for Iftaar in Bohra households during the month of Ramzaan. I have some really lovely memories involving Gol Paani, which I have learnt to make over the years. In today’s post, I am going to share with you all how to go about making it.

Utterly refreshing and delicious Gol Paani

What exactly is Gol Paani?

Like I was saying earlier, Gol Paani is a delectable and utterly refreshing beverage from the Bohra Muslim community. As the name suggests, there are two major ingredients used in this drink – ‘Gol‘ (aka jaggery) and ‘Paani‘ (aka water). Gol Paani is, basically, jaggery water with a few other ingredients added in to enhance its flavour. Jaggery contains a good amount of magnesium and iron, and is believed to help in improving intestinal health and maintaining normal body temperature in the summers.

Sabja seeds (also called ‘basil seeds’ or ‘tukmariya‘) are used in Gol Paani too, These seeds possess immense health benefits, including being rich in minerals and various vitamins, have anti-fungal and anti-microbial properties, and offer a cooling effect to the body. Sabja seeds need to be soaked in water for a little time to bloom, post which they can be used in the beverage – I have explained how to do this, in detail, in the recipe below.

Lemon juice and fresh mint leaves are used to add freshness to the drink. Several families also use a wee bit of black salt to add a unique flavour and fragrance to the Gol Paani.

Sweet memories with Gol Paani

In the year 2017, when I was big on attending various foodie events around the city, I had the opportunity to attend a cook-off by Chef Michael Swamy and Chef Aniket Das at Fairfield By Marriott. At the event, we were served a beautiful dark-coloured drink which was lemon-y and mint-y, just perfect for the hot weather we were facing at the time. I remember Chef Das telling us that the drink was Gol Paani, adapted from the family recipe of a Bohra Muslim team member of his. There was talk in the kitchen of Gol Paani doing the rounds of the family table, at the team member’s house, during Iftaar. This got Chef Das intrigued, and he went on to try out the beverage, deciding to serve it to us bloggers at the cook-off.

Later, in 2019, I enjoyed the experience of partaking of a huge Bohra-style thali by Rehana Nagaria of The Bohra Bohra Thaal, a provider of home dining experiences in Bangalore. Gol Paani was an integral part of the thali – Bohra food is typically high in calories and rich, and Gol Paani is served as a way to balance out all the richness. The dining service since closed down, but the memory of that Gol Paani lingered on.

The social media pages of The Bohra Bohra Thaal offer an authentic recipe for Gol Paani, and I adapted it to suit our requirements. It has been a part of our summer holiday treats for years now, along with my Home-Made Lemon Squash, Grape Squash, Kala Khatta Syrup, Nungu Sherbet, and Bonda Sherbet.

How to make Gol Paani

Making Gol Paani is an easy task, requiring but a few basic ingredients, as stated above. Here’s how to go about it.

Ingredients (serves 4-6):

1. 1 teaspoon sabja (basil) seeds

2. 1 cup jaggery powder

3. 4 cups water or as needed

4. A handful of fresh mint leaves + a few more for garnishing

5. About 1/4 teaspoon black salt

6. Juice of 1 lemon or as needed

7. Ice cubes, as needed

Method:

Top left and right: Step 1, Bottom left: Step 2, Right second and third: Step 3

1. Take the sabja seeds in a small cup and add in a little water. Let them soak till the drink gets ready.

2. Meanwhile, take the jaggery powder in a large mixing bowl. Add in the water. Mix well till the jaggery is completely dissolved in the water.

3. Take a handful of mint leaves in a small mixer jar. Grind along with a little water. Add this to the jaggery water.

Top left and right: Steps 4 and 5, Right second and third: Step 6, Bottom left: Step 7

4. Add in the black salt.

5. Add in the lemon juice.

6. The sabja seeds would have bloomed by now. Add them to the jaggery water too. Mix well, making sure all the ingredients are well incorporated together. Your Gol Paani is ready.

7. Transfer the Gol Paani into serving glasses. Add in some ice cubes into each glass, as well as some torn mint leaves. Serve immediately.

Related event: Shhh Cooking Secretly Challenge

I am sharing this recipe in connection with the Shhh Cooking Secretly Challenge, a group of passionate food bloggers that I am part of.

The members of the Shhh Cooking Secretly Challenge showcase recipes based on a pre-decided theme, every month. The central idea of the group is fun and very interesting. The group members are divided into pairs. Each pair exchanges two ingredients secretly, unknown to the rest of the members. Every pair uses their two secret ingredients to make a dish that fits into the theme for the month. Upon completion, each pair shares a picture of the finished dish in the group, and the members try to guess what two secret ingredients were used in each dish.

For the month of March 2023, Sasmita of First Timer Cook suggested that we all make summer beverages, considering it is getting hotter by the day everywhere. Check out the beautiful summery Sabja Lemonade that Sasmita has made for the theme!

I was paired with the talented Sujata ji of Batter Up With Sujata for the month. I gave her the ingredients ‘chaat masala‘ and ‘grapes’, using which she prepared this sugar-free Grape Watermelon Refresher. Sujata ji assigned me the ingredients ‘jaggery’ and ‘lemon’, which fit right into this Gol Paani, one of my family’s favourite summer beverages.

Dietary guidelines

This recipe for Gol Paani is completely vegan, suited to those following a plant-based diet. It is also entirely gluten-free.

It is free of refined sugar, but does contain a good amount of jaggery. I’m no health expert, but I would suggest using discretion while serving this drink to diabetics and people who are on a weight loss journey.

Tips & Tricks

1. Adjust the quantity of water, jaggery powder and lemon juice as per personal taste preferences.

2. I have used jaggery powder, which is easily available in several stores here in Bangalore. If you don’t have access to it, you can use regular jaggery blocks, crushed with a pestle.

3. Using jaggery that is lighter in colour will yield a beautiful-looking drink. I used dark brown-coloured country jaggery, which is why the drink is quite dark in colour. Irrespective of the colour of jaggery you use, I must say the drink does turn out fabulous – absolutely refreshing and delicious! For best results, use good-quality jaggery that is flavourful.

4. You may use regular salt in place of the black salt I have used here. However, the black salt does add a unique flavour and taste to the drink.

5. Make sure the jaggery is completely dissolved in the water, and all the other ingredients are well incorporated.

6. In my opinion, this drink is best prepared fresh and consumed soon after preparation.

7. If the jaggery you are using has impurities, make sure you strain the water after it has fully dissolved. Proceed to make the beverage only after the impurities are strained out.

Did you like this recipe? Do tell me, in your comments!

Ragi Semiya Upma| Instant Finger Millet Vermicelli

Ragi Semiya Upma is a delicious and easy-to-make breakfast dish, which is perfect on its own or along with some chutney. It refers to finger millet vermicelli cooked the South Indian way, instantly, without any prior preparation. It works well as a light dinner, too!

Ragi Semiya Upma

The health benefits of millets are well known. If you are thinking of incorporating more millets into your diet, Ragi Semiya Upma is an easy and flavourful way of doing so. It is a filling, hearty and satisfying dish.

You get several brands of ready-to-use ragi vermicelli these days – pick up a couple of packs of these, and putting together this upma is a matter of minutes. Sadly, though, some of these millet vermicelli packs contain refined flour (maida).

Today, let me take you through the process of making Ragi Semiya Upma.

Other recipes using ragi

Looking for other ragi-based recipes? There are a few on my blog, which might interest you. Take a look at my recipes for Ragi Roti, Ragi Onion Dosa, Thai-Style Ragi Vermicelli Salad, and Instant Ragi Kuzhi Paniyaram.

Ingredients used in Ragi Semiya Upma

While more elaborate versions are possible, the Ragi Semiya Upma we make at home is very simple, including only a few ingredients.

We use store-bought dry ragi vermicelli to make the upma. The one from Anil brand (shown in the picture below) works well for us. Ragi vermicelli is quite delicate, and one needs to handle it carefully so as to get the right texture of upma – non-sticky, soft and fluffy (see the ‘Tips & Tricks’ section of this post for details on how to achieve this).

Anil Ragi Vermicelli, the brand I use

Finely chopped onions are added in, as is a simple tempering of mustard, asafoetida and curry leaves. We use a couple of green chillies for some mild heat. Fresh grated coconut, coriander and lemon juice take the flavour quotient up by several notches.

How to make Ragi Semiya Upma

Here’s how to go about it.

Ingredients (serves about 4):

1. 1 pack of ragi vermicelli, about 180 grams

2. 2 medium-sized onions

3. 2-3 green chillies

4. 2 sprigs of curry leaves

5. 3/4 tablespoon oil

6. 3/4 teaspoon mustard seeds

7. 2 pinches of asafoetida

8. Salt to taste

9. 2 tablespoons fresh grated coconut

10. 2 tablespoons finely chopped coriander

11. Juice of 1 small lemon or to taste

Method:

Top left, centre and right: Steps 1, 2 and 3, Bottom left: Step 4, Bottom centre and right: Step 5

1. Take the ragi vermicelli in a large vessel. Add in enough cold water to cover it completely. Let it soak for 3 minutes.

2. Once the vermicelli is done soaking, transfer it to a colander. Let all the water drain out.

3. Take water in a steamer and set it on high flame. Grease the steamer plate and keep it ready.

4. In the meantime, peel the onions and chop them finely. Slit the green chillies length-wise. Keep the curry leaves handy.

5. When the water in the steamer has come to a rolling boil, keep the greased plate inside. Spread the drained ragi vermicelli evenly over the plate. Close the steamer. Let the vermicelli steam on high flame for 5 minutes, then switch off gas.

Top left and centre: Steps 6 and 7, Top right and bottom left: Step 8, Bottom centre and right: Steps 9 and 10

6. After 5 minutes, remove the steamed vermicelli and allow it to cool. When it has cooled down enough for you to touch comfortably, gently fluff it up with your hands.

7. Now, we will start preparing the Ragi Semiya Upma. Heat the oil in a pan. Add in the mustard seeds, and let them sputter. Add in the asafoetida and curry leaves. Let them stay in for a couple of seconds.

8. Add in the chopped onion at this stage. Turn the flame down to medium. Saute for 2-3 minutes or till the onions are cooked.

9. Add the fluffed-up ragi vermicelli to the pan now, along with the slit green chillies. Turn the flame down to low.

10. Add in salt to taste. Mix gently.

Top left and right: Steps 11 and 12, Bottom right: Step 13, Bottom left: Step 14

11. Saute on low flame for just about a minute, then switch off gas.

12. Mix in the fresh grated coconut and finely chopped coriander.

13. Mix in the lemon juice. Your Ragi Semiya Upma is ready.

14. Transfer the upma to serving plates. Serve immediately, on its own or with chutney. This Bangalore Hotel Style Coconut Chutney goes very well with the upma.

Dietary Guidelines

This is a completely vegetarian and vegan recipe, suited to people following a plant-based diet.

This upma is not gluten-free because the vermicelli includes refined wheat flour and also because asafoetida has been used in the tempering. Most Indian brands of asafoetida do contain wheat flour.

Do check the ingredients listed on the vermicelli package to ensure that they meet your dietary requirements.

I’m no health expert, but know that, considering the numerous health benefits they possess, millets are being touted as a great replacement for wheat and rice. However, if you are planning to consume millets regularly, it would be advisable to consult with a doctor and/or dietician before doing so. This is especially so if you have health issues.

Tips & Tricks

1. There are several brands of ragi vermicelli available in stores these days. I typically use the one from a brand called Anil (not sponsored). I have outlined above the way Anil ragi vermicelli needs to be cooked. If you are using another brand, cook the vermicelli as per the instructions on the package.

2. Do not soak the vermicelli for longer than the specified time or steam it for more than 5 minutes (as specified in the instructions on the package). This might cause the vermicelli to become soggy.

3. Allow the cooked vermicelli to cool down well, before using it to make upma. Using hot vermicelli will make the upma soggy.

4. I have used only onions in this upma. You may add in other vegetables if you so prefer. Carrot and peas are great additions.

5. Do not overcook the ragi vermicelli. Once the onions are cooked, the vermicelli needs to be mixed in on low flame and sauteed for just about a minute. Overcooking causes the vermicelli to turn hard.

6. Adjust the quantity of lemon juice and green chillies as per personal taste preferences.

7. I have used my Prestige Multi-Purpose Kadhai to steam the ragi vermicelli (not sponsored). You can even do the same using idli plates in a pressure cooker, without putting the whistle on.

8. Be generous with the onions – don’t skimp on them. Finely chopped and well-sauteed onions are what gives this upma a lovely flavour.

Did you like this recipe? Do tell me, in your comments!

Bangalore Hotel Style Coconut Chutney| Green Coconut Chutney

If you have eaten often enough at the small local restaurants – called ‘Darshinis‘ – that are spread across Bangalore, chances are you would have been served this delectable green-coloured coconut chutney along with your thatte idlis, open butter masala dosas, vadas or khara bath. This is one of the ways coconut chutney is made in Karnataka, sometimes with a tinge of sweet to it. I adore this chutney and, in today’s post, am going to share exactly how to go about making it.

Bangalore Hotel Style Coconut Chutney. Just how pretty is that green?!

What goes into Bangalore Hotel Style Coconut Chutney?

This chutney is a variation of the Basic Coconut Chutney recipe I had shared on the blog some time ago.

The Bangalore Style Coconut Chutney uses fresh grated coconut, fried gram (‘pottukadalai‘ in Tamil), green chillies and a bit of ginger. The green colour comes from the addition of fresh coriander (sometimes mint). Often, a dash of sugar or jaggery is added for a hint of sweetness. Lemon juice is used to gently sour the chutney.

The tempering is a simple one – mustard, asafoetida, curry leaves and dry red chillies in some oil.

It is best prepared fresh, and goes very well with ‘tiffin’ items like idlis, dosas, vadas and upma/khara bath. It is super easy to make, and you can customise the consistency as per your requirements (check the ‘Tips & Tricks’ section for this!).

How to make Bangalore Hotel Style Coconut Chutney

Here’s the detailed recipe.

Ingredients (makes about 1 cup):

1. 1/2 cup grated fresh coconut

2. 1/4 cup fried gram

3. 1/4 cup fresh coriander, roughly chopped

4. 1-1/2 green chillies, roughly chopped

5. A 1-inch piece of ginger, roughly chopped

6. Salt to taste

7. 1/2 tablespoon jaggery powder

8. Juice of 1/2 lemon or to taste

For tempering:

1. 1/2 tablespoon oil

2. 1/2 teaspoon mustard seeds

3. 2 pinches of asafoetida

4. 1 sprig of curry leaves

5. 2-3 dry red chillies

Method:

Top left and right: Steps 1 and 2, Below top right and bottom right: Steps 3 and 4, Bottom left: Step 5

1. Put together the basic ingredients needed for the chutney – grated coconut, fried gram, chopped coriander and green chillies, peeled and chopped ginger. Transfer them to a mixer jar.

2. To the mixer jar, add salt to taste and the jaggery powder. Add in just enough water to help with the grinding.

3. Grind everything together to a mostly smooth, slightly coarse mixture. Transfer to a serving bowl.

4. Add lemon juice. Mix well.

5. Now, we will prepare the tempering for the chutney. Heat oil in a small tempering pan. Add in the mustard, and allow to sputter. Reduce heat to low-medium and add in the asafoetida, curry leaves and dry red chillies. Mix. Let them stay in for a few seconds, without burning. Transfer the tempering to the chutney in the serving bowl, and mix well. Bangalore Hotel Style Coconut Chutney is ready – serve with ‘tiffin’ dishes like idli, dosa, vada or upma.

Other chutney recipes on the blog

You might be interested in taking a look at the other chutney recipes on my blog too.

Bombay Chutney is an interesting one, made with gram flour.

Palli Chutney is an Andhra-style chutney made using peanuts, and tastes absolutely delectable.

Sutta Kathrikkai Thogayal is a beautiful eggplant chutney with a rustic smoky flavour.

Kale Thogayal is a Tam-Brahm chutney using the very nutritious kale.

Pineapple Thogayal is a lip-smackingly delish chutney made with pineapple.

Momo Achar is a lovely Sikkim-style peanut chutney for momos.

Karonde Ki Chutney is a unique sweet-and-sour relish made with ‘karondas‘ (‘kalakkai‘ in Tamil).

Kale Angoor Ki Chutney is another sort of relish, made with black grapes.

Anarosher Chaatni is a Bengali-style chutney made using ripe pineapple.

Meethi Chutney is the sweet tamarind chutney that goes into different types of chaat.

Hari Chutney is the mint-y green chutney that is used in chaat, sandwiches and the like.

My friend and fellow food blogger Sujata ji has shared a very different and interesting recipe for Mint & Coriander Chutney – do take a look!

Is this chutney vegan and gluten-free?

This recipe for Bangalore Hotel Style Chutney is completely vegetarian and vegan. It is suited to people following a plant-based diet.

Most commercially available Indian brands of asafoetida do contain wheat flour. It is best to avoid asafoetida in the tempering, in case you wish to make this chutney gluten-free.

Tips & Tricks

1. Adjust the quantity of green chillies depending upon how spicy you want the chutney to be.

2. You may skip the jaggery powder if you don’t prefer it. However, I would highly recommend using it because of the lovely flavour it adds to the chutney.

3. Sugar can be used in place of the jaggery I have used here.

4. You may use a small piece of soaked and de-seeded tamarind while grinding the chutney, in place of the lemon juice. However, this might affect the colour of the chutney. I prefer using lemon juice.

5. Use just a little water, as needed, for grinding the chutney. Too much water will cause the chutney to become too watery. However if you want to keep the chutney runny, do add in more water by all means. Adjust the salt and spice level accordingly. We prefer keeping this chutney thickish – not too watery and runny, but not overly thick either.

6. We prefer grinding the chutney mostly smooth, just slightly coarse.

7. For a taste variation, substitute the fresh coriander used in the above recipe with fresh mint leaves. You could also use a mix of mint and coriander.

8. This chutney is best prepared fresh, just before serving. Any leftover chutney can be stored on a clean, dry, air-tight box, refrigerated, for 2-3 days.

Did you like this recipe? Do tell me, in your comments!

Payaru Kozhambu|Green Moong Gravy For Dosa And Rotis

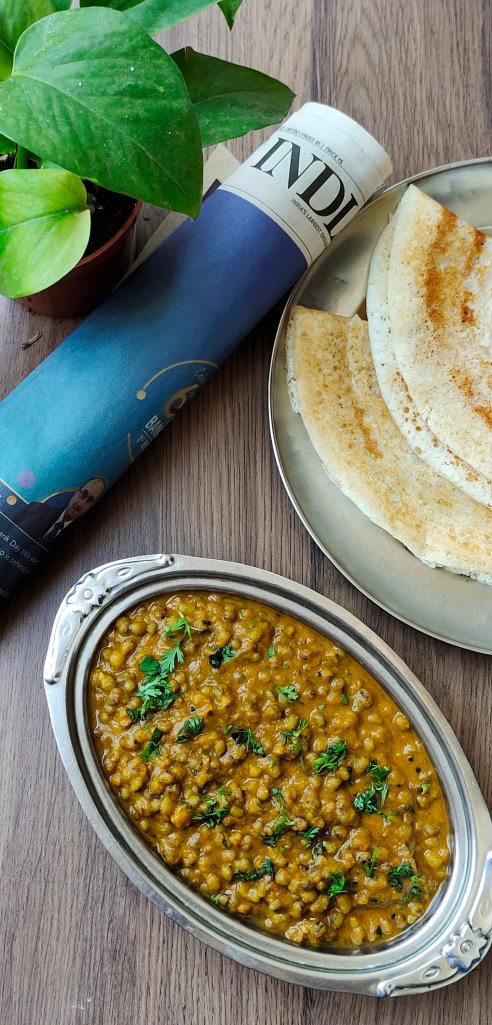
Payaru Kozhambu is a delicious and nutritious gravy made with whole green moong beans. It makes for a wonderful side to rotis as well as dosas.

Let me show you how we make this kozhambu at home.

Delectable Payaru Kozhambu, served with dosas

Looking for other accompaniments for idlis and dosas? Check out my recipes for Peanut Podi, Dosa Milagai Podi, Sutta Kathrikkai Thogayal, Vazhakkai Thol Thogayal, Pineapple Thogayal, Kale Thogayal, Bombay Chutney, Basic Coconut Chutney and Tomato Onion Gojju.

Ingredients used in Payaru Kozhambu

Whole green moong is the main ingredient used in this dish. Moong beans are known for their high protein content, which makes this kozhambu extremely nutritious. It is made using very little oil, too.

A freshly ground paste made of onion, tomato and coconut is added to the moong beans, which definitely gives the kozhambu a flavour boost. In addition, coriander powder, a bit of garam masala and jaggery are also added in for more oomph. The result is incredibly yum!

How to make Payaru Kozhambu

Making Payaru Kozhambu is not a very difficult proposition. It is a dish that can be put together in about 25 minutes, including hands-free time.

This is my aunt’s recipe. My aunt is a great cook, and I have learnt a lot from her, including this Masala Poori recipe and this one for Gojju Avalakki.

Here’s the Payaru Kozhambu recipe.

Ingredients (serves 4-6):

To grind:

1. 2 medium-sized tomatoes, chopped roughly

2. 1 small onion, chopped roughly

3. A 1-inch piece of cinnamon, pounded in a mortar and pestle

4. 2 cloves

5. 2 tablespoons of fresh coconut, grated or slivered

6. 2 tablespoons fresh coriander, chopped fine

7. A 1-inch piece of ginger, peeled and chopped

8. 5-6 cloves of garlic, peeled

Other ingredients:

1. 3/4 cup whole green moong

2. 1/2 tablespoon oil

3. 1/2 teaspoon mustard seeds

4. 1/2 teaspoon cumin seeds

5. 2 pinches of asafoetida

6. A sprig of fresh curry leaves

7. Salt to taste

8. 1/4 teaspoon turmeric powder

9. Red chilli powder to taste

10. 3/4 teaspoon coriander powder or to taste

11. 1/2 teaspoon garam masala or to taste

12. 1/2 tablespoon jaggery powder (optional)

13. 1 tablespoon finely chopped fresh coriander

Method:

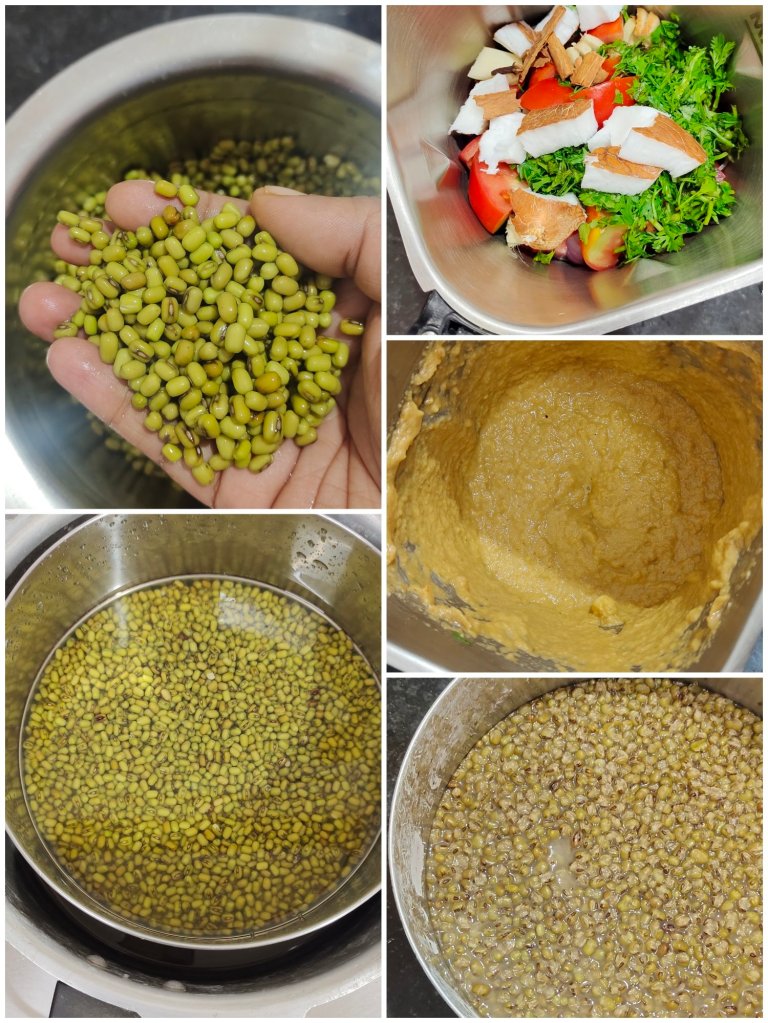
Top left: Step 2, Bottom left and right: Step 3, Top right and below: Step 4

1. Wash the whole green moong well under running water. Drain out all the water. Now, add in enough fresh water to cover the moong completely. Let it soak for at least 6 hours or overnight.

2. When the moong is done soaking, drain out all the water from it and discard. Transfer the soaked moong to a wide vessel and add in enough water to cover it completely.

3. Place the vessel in a pressure cooker. Pressure cook on high flame for 2 whistles. Let the pressure release naturally.

4. Meanwhile, take all the ingredients listed under ‘To grind’ in a mixer jar. Grind to a smooth paste. Keep ready.

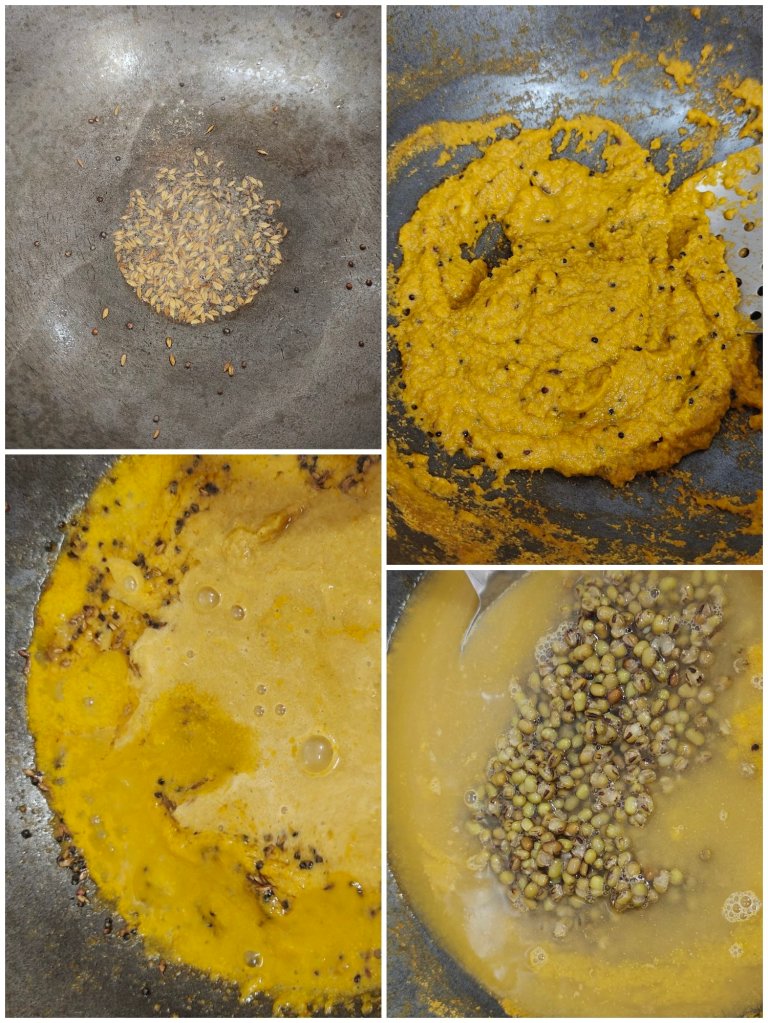
Left top and bottom: Steps 5 and 6, Right top and bottom: Steps 7 and 8

5. Once the pressure from the cooker has completely gone down, we will start making the Payaru Kozhambu. First, heat oil in a heavy-bottomed pan. Add in the mustard and let it sputter. Add in the cumin seeds, asafoetida and curry leaves. Let them stay in for a few seconds.

6. Add the paste we ground earlier, to the pan. Wash the mixer jar with about 1/4 cup of water and add this to the pan too. Turn the flame down to medium. Mix.

7. Let the paste cook on medium flame till the raw smell goes away completely, 7-8 minutes. Stir intermittently. The paste will thicken considerably by this stage.

8. Add in the cooked moong, along with the water it was cooked in. Add in about 3/4 cup of water or as needed to adjust the consistency of the Payaru Kozhambu. Mix well.

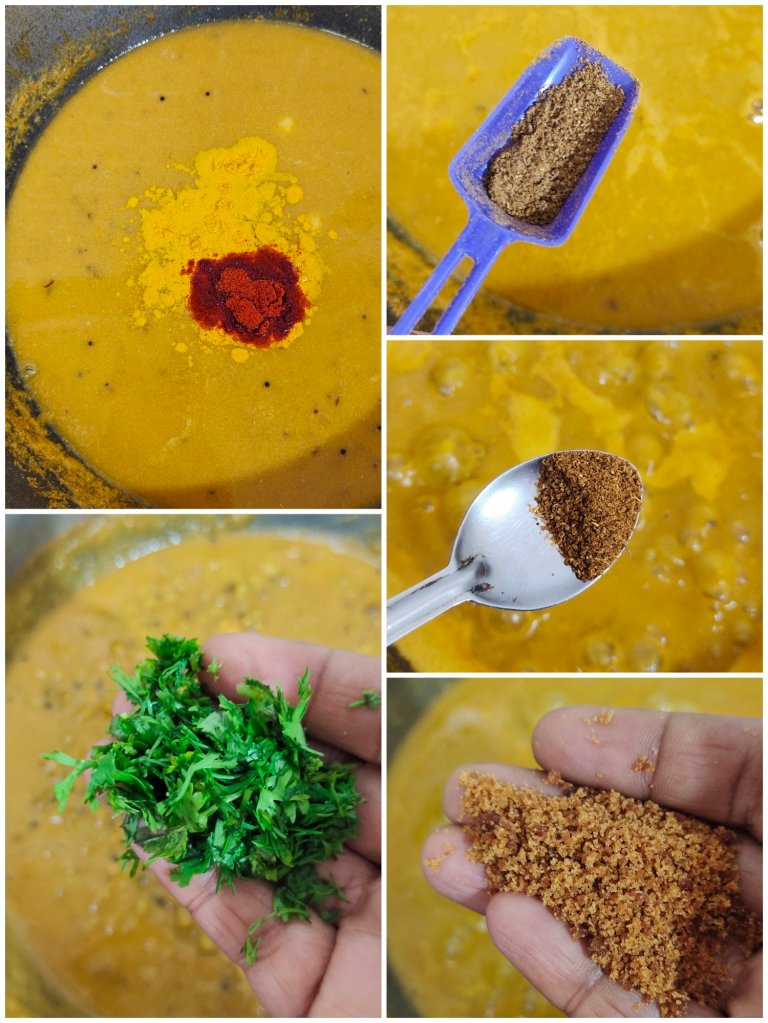
Top left: Step 9, Top right, below and bottom right: Step 10, Bottom left: Step 11

9. Add salt to taste, red chilli powder and turmeric powder. Mix well. Cook on medium flame for 3-4 minutes.

10. Now, add in the coriander powder and garam masala. Mix well. Allow the mixture to cook on medium flame for 3-5 minutes more or till it begins to thicken. Mix in the jaggery powder, if using. Switch off gas at this stage. Remember to keep the mixture on the runnier side as it thickens up with time.

11. Mix in the finely chopped coriander. Your Payaru Kozhambu is ready. Serve warm with rotis, idli or dosa.

Related Event: The Shhh Cooking Secretly Challenge

I’m presenting this recipe for Payaru Kozhambu in association with the Shhh Cooking Secretly Challenge. This is a foodie challenge run by a group of passionate food bloggers.

Members of the Shhh Cooking Secretly Challenge group showcase recipes based on a pre-determined theme, every month. The group members are divided into pairs, and each pair exchanges two ingredients secretly, unknown to the rest of the group. Each pair then uses these two secret ingredients to make a dish that fits into the theme of the month. A picture of the completed dish is then shared in the group by each pair of participants, and the other members try to guess what the two secret ingredients would have been. It’s fun, and a great learning experience!

The theme for February was ‘Protein-Rich Breakfast Dishes’, suggested by Renu of Cook With Renu. You guys have to check out the beautiful Indian-Style Spicy Tofu Scramble Renu has prepared for the challenge!

I was paired with Preethi, author of Preethi’s Cuisine, for the month. I gave her the ingredients ‘coriander’ and ‘chilli’, and she used them to prepare this unique Green Chickpea Mushroom Scramble. How lovely!

Preethi suggested I use the ingredients ‘cinnamon’ and ‘cloves’ in my dish, which fit right into this Payaru Kozhambu recipe I was planning on sharing on the blog for a long time anyway.

Is this Payaru Kozhambu vegan and gluten-free?

It is completely vegetarian and vegan, suited to people following a plant-based diet.

If you want to make this Payaru Kozhambu gluten-free, just skip the asafoetida used in the tempering. Most Indian brands of asafoetida contain wheat flour and are, therefore, best avoided when one is following a gluten-free diet.

Tips & Tricks

1. Adjust the quantity of water depending upon the consistency of the Payaru Kozhambu that you require.

2. You may skip the jaggery if you don’t prefer using it. However, using it does add a beautiful flavour to the dish.

3. I use home-made garam masala which is quite strong, so very little quantity is needed. Adjust the quantity you use as per personal taste preferences.

4. I have used home-made coriander powder here – I lightly roast coriander seeds, allow them to cool down fully, and then grind them to a powder. This can be made in small batches, stored in an air-tight bottle, and used as needed. Adjust the quantity you use as per personal taste preferences.

5. Do not overcook the moong. 2 whistles in the pressure cooker after about 6 hours of soaking is good.

7. Soaking the whole green moong is advisable to avoid flatulence and ensure even cooking. However, for some reason, if you haven’t been able to soak the moong, just pressure cook them with enough water to completely cover them for 7-8 whistles. This will work too.

8. I have used country (‘Nati’) tomatoes, which are quite sour. If you are using the ‘farmed’ variety, which isn’t sour, I would suggest adding a dash of lemon juice to the Payaru Kozhambu after it is cooked and ready.

Did you like this recipe? Do tell me in your comments!