A Lovely Afternoon With Sarah Todd, MasterChef Australia 2014 Finalist

I’m sure most foodies would know Sarah Todd, especially those who have been regularly following MasterChef Australia. For the uninitiated, Sarah Todd was the finalist at MasterChef Australia 2014, with a huge fan following from India, thanks to her attempting a few India-inspired dishes on the show. Recently, when The Little Black Book (LBB) – Bengaluru offered me a chance to participate in a masterclass with Chef Todd, I grabbed the opportunity with both hands. I’m so very glad I did – it turned out to be such a fun afternoon!

The event was held at Script, a concept kitchen and workshop venture by Godrej. This was my first time visiting Script, and I found it to be a charming venue, a must-visit for food enthusiasts in the city.

Chef Sarah Todd in a candid tete-a-tete with the audience at the masterclass

Sarah Todd’s career story is nothing short of inspiring. She became a model at the young age of 18, after which a decade-long career on the ramp followed. In the course of her work with brands like Hugo Boss, Pantene and Gucci, which entailed extensive travels across the globe, she began to develop a passionate love for food culture. In a candid moment at the masterclass, Sarah said, “One day, when I was still a model, I had to put up the exact same pose about 15 times, so the photographer could get the right shot. That was a sort of turning point in my life. It was then that I began to ask myself – ‘What am I doing with my life? Is this what I really want to do?‘”

The moment sparked some sharp introspection on Sarah’s part, and she decided she wanted to delve deeper into food. She went on to enroll herself at the famed Le Cordon Bleu, and trained in French cooking. For years, she worked as a chef, training alongside Michelin-star chefs. In 2014, she participated in MasterChef Australia, which, she claims, was another huge turning point in her life. She discovered herself, her cooking style, while at the show. She found that she leant more towards wholesome, healthy food that she could serve to her family, rather than elaborate meals that looked like magical masterpieces.

Apparently, Sarah’s love for Indian food began when she started dating Devinder Garcha, an Indian. While at MasterChef Australia, Sarah prepared a few Indian dishes, which earned her a fan following of over 50,000 Indians overnight. The next morning, when she logged into her social media, this had her completely stunned. She visited India soon after, in an attempt to figure it all out, and fell deeper in love with Indian food. She went on to open Antares, her restaurant in Goa, followed by another, The Wine Rack, in Mumbai. In the intervening years, Devinder and Sarah became parents to Phoenix, a lovely son. “I became all the more obsessed with food after becoming a mom. I wanted my son to taste everything, and I wanted to make everything myself. I wanted to know exactly what I was feeding him,” she said at the masterclass.

Left: Sarah, speaking about plating, at the masterclass. Right: The beatiful plating of the Citrus & Cocoa Tart (top) and Avocado Open Sandwich (bottom) that Sarah demonstrated at the masterclass

Sarah’s wonderful plating skills have always amazed. At the masterclass, she wowed everyone by demonstrating the beautiful plating of two dishes – a Citrus & Cocoa Tart and an Avocado Open Sandwich. “We eat with our eyes first. If you are presented the exact same dish in two different plates – one just dumped on the plate, and the other presented artistically – I can guarantee you will eat more of the latter. Presentation is of considerable importance,” she said at the masterclass.

Any kind of food can be presented artistically. Anyone can do it. You need to break free of the shackles in your mind first. Just let loose, and let your creativity rein in, while you are plating,” said Sarah.

Taste is just as important as presentation,” Sarah said. “For me, a dish just cannot just look very pretty, but be lacking in flavour. It has to be bursting with flavour, too!,” she added.

Chef Sarah Todd, demonstrating the preparation of two wholesome salads at the masterclass

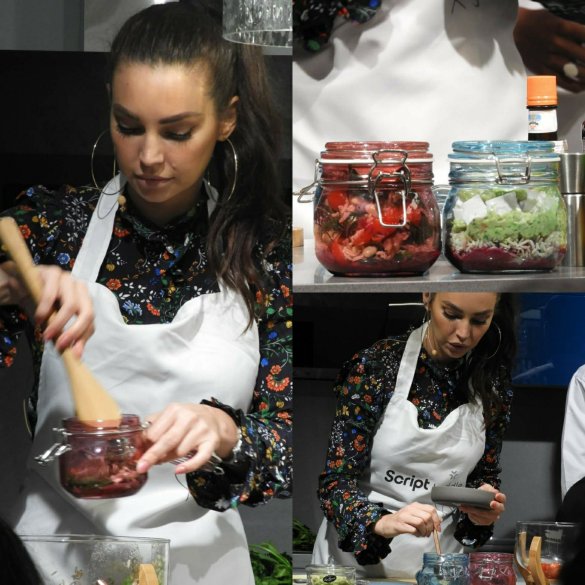
At the masterclass, Sarah demonstrated the making of two wholesome salads in jars, perfect for busy-workday lunches.

She spoke of how a cook needs to take care of three core things for a dish to be successful – flavours, textures and presentation. “A great dish has to have a variety of flavours, to keep the eater interested – sweet, sour, saltiness, spiciness and some umami, everything has to be in balance. There have got to be at least a couple of different textures to the dish. Lastly, of course, it has to be presented beautifully,” she said.

img_20180430_100203305399378.jpg
Chef Sarah Todd demonstrating the preparation of two salads-in-a-jar that can be filling meals in themselves

Speaking about her bond with India at the masterclass, Sarah said, “India is special. Indian food is so diverse, so amazing! I am constantly awed by the foods that I go on discovering in India – every new place I visit in this country, I end up with a new favourite food. There’s so much yet for me to learn, to discover. It is tough for me to point out just one favourite Indian food!

She spoke of how she does not want either Antares or The Wine Rack to be categorised as ‘an Australian restaurant’. “I want to cook Indian food, giving it my personal touch,” she said. “I can’t ever dream of competing with authentic Indian food, the way it has been cooked in Indian families over generations. How can one ever compete with that?! I want to take Indian food, and make it my own. I see I am making a difference that way, too,” she said at the masterclass.

I cook with the special, indigenous ingredients of the region, at both my restaurants. I make sure the ingredients are seasonal and procured fresh. Indian cuisine has a whole lot of wonderful ingredients that I am discovering – it is such a fun cuisine to be creative with!,” Sarah said.

She then went on to demonstrate the making of a fruity non-alcoholic drink, just perfect for hot summer days, at the masterclass.

Chef Sarah Todd demonstrating a fruity summer drink, at the masterclass

All through the masterclass, Sarah’s personality shone out. What a humble, down-to-earth, friendly and warm person!

The question-and-answer session with the audience at the end of the masterclass was what I enjoyed the best. It gave me a glimpse of the feisty, determined side of Sarah, the brains and talent behind the pretty face, the humane side of her that is trying to overcome her own shortcomings, the mommy in her, the career woman in her who is trying to make a difference in a world dominated by men.

All in all, it was a lovely afternoon, shared with fellow food enthusiasts from across the city. A fun time was had by everyone, I’m sure.

Now, I can’t wait to get to reading Sarah Todd’s blog and trying my hands at some of her recipes!

Idli Masala| How To Use Leftover Idlis

What do you do when you have a few idlis left over? I usually end up using them the next day to make Idli Upma or Chinese-Style Idli. Sometimes, I go ahead and make Idli Masala – a delicious confection spiced with pav bhaji masala, loaded with veggies, served with a generous dose of cheese.

Here’s how to use leftover idlis to make some delish Idli Masala, my way.

Ingredients (serves 1):

  1. 4 day-old idlis
  2. Salt, to taste
  3. 1/2 teaspoon turmeric powder
  4. Red chilli powder, to taste (optional)
  5. 2 teaspoons sugar (optional)
  6. About 1-1/2 teaspoon pav bhaji masala, or to taste
  7. 1 tablespoon oil
  8. 1 medium-sized onion
  9. 1 small capsicum
  10. 1 small carrot
  11. 2-3 green chillies
  12. 1 cube Amul processed cheese
  13. 2 pinches of asafoetida (hing)
  14. 1 teaspoon mustard seeds (rai)
  15. 1 teaspoon cumin (jeera)
  16. 1 teaspoon sesame seeds (til)
  17. A dash of lemon juice, or to taste
  18. A few stalks of fresh coriander leaves

Method:

  1. Crumble the idlis. Keep aside.
  2. Now, we will prepare the veggies to use in the Idli Masala. Peel the onion and chop finely. Chop the capsicum finely. Slit the green chillies length-wise. Peel the carrot and grate it medium-sized. Chop the coriander finely. Keep aside.
  3. Grate the cheese finely. Keep aside.
  4. Heat the oil in a pan. Add the mustard seeds, and let them pop. Now, turn the flame to low-medium, and add the cumin, asafoetida, green chillies and sesame seeds. Let them stay in for a couple of seconds, ensuring that the ingredients do not burn.
  5. Add the chopped onion and capsicum and the grated carrot to the pan. Cook on medium flame till the vegetables are cooked, but still retain a bit of a crunch.
  6. Add the crumbled idlis to the pan, along with salt to taste, red chilli powder and sugar (if using) and pav bhaji masala. Mix well. Cook on medium flame for about 2 minutes, stirring intermittently.
  7. Switch off the gas, and add in the lemon juice and the finely chopped coriander leaves. Mix well.
  8. Transfer the idli masala to serving plates. Serve garnished with grated cheese.

Notes:

  1. Skip the red chilli powder entirely if you want the idli masala to be only mildly spicy.
  2. You can add in any other veggies of your choice – finely chopped beans, tomato, cabbage, mushrooms, cauliflower, broccoli, zucchini would be great additions. Here, I have used just a couple of vegetables that I had handy in my refrigerator.
  3. Use day-old leftover idlis for best results. If you are using freshly made idlis, chill them in the refrigerator for a couple of hours before beginning to make this idli masala.
  4. Using the sugar is purely optional, but I would suggest adding it. It gives a lovely, rounded flavour to the idli masala. You can use raw cane sugar instead of refined sugar.
  5. Chana masala or garam masala can be used in place of pav bhaji masala, too.

You like? I hope you will try this recipe for Idli Masala too, and that you will love it as much as we do!

*****************

Foodie Monday Blog HopThis recipe is for the Foodie Monday Blog Hop. The theme for this week is ‘Working With Leftovers’.

I’m also sending this post to Fiesta Friday – 221, co-hosted this week by Jenny @ Dragonfly Home Recipes.

Haryana-Style Aloo Chutney Pulao

For the recipe I am going to tell you about today, Haryana-Style Aloo Chutney Pulao, I have to give thanks to the Shhhhh Cooking Secretly Challenge Facebook group that I am part of. Have I told you how much I love this group? Every month, the members of the group form pairs, and every pair exchanges two secret ingredients. Every month, every member has to cook something from one Indian state’s repertoire, using the two ingredients allotted to her. Then comes fun time – everyone posts a picture of their dish in the group, and the other members try to guess the secret ingredients that they have used! Being the passionate traveller that I am, I love the chance that this challenge offers me to explore the food of different parts of India – albeit virtually.

The theme for this month’s Shhhhh Cooking Secretly Challenge is Haryanvi cuisine or food from the state of Haryana. I have never had the chance to visit Haryana but, as always, I was thrilled with this opportunity to get closer to the rich diversity of food that is present in India. Carved out of Punjab in the year 1996, the cuisine of Haryana has a lot of Punjabi influences (but of course!). The people of the state are a good mix of urban and rural, with a strong focus on agriculture. Haryana is a land that is rich in milk, desi ghee and other dairy products, and this reflects in the diet of the Haryanvis as well. The food of this state is robust and hearty, and prepared without much fuss. Apparently, Haryana is called ‘the land of rotis‘, thanks to the Haryanvi’s predilection to consume a variety of flavourful and healthy flatbreads. Bajra Aloo Roti, Besan Ki Roti, Bhura Roti Aur Ghee, Hara Dhania Cholia, Kair Sangri Ki Sabzi, Methi Gajar, Kachri Ki Chutney, Rajma Chawal, Mixed Daal, Bajra Khichdi, Alsi Ki Pinni, Daal Pinni and Atte Ka Halwa are some of the most popular dishes from the state of Haryana.

I was paired with Priya Suresh this month, who allotted me two ingredients – ‘potatoes’ and ‘mint’. A bit of reading online later, I zeroed in on this recipe by Master Chef Sanjeev Kapoor for Aloo Chutney Pulao. I made the pulao with quite a few variations of my own, and the result was fantabulous! I must say, the Aloo Chutney Pulao turned out absolutely flavourful, and was a huge hit at home. I’m so glad to have discovered this dish that is so very simple to make!

Here is how I made the Haryana-Style Aloo Chutney Pulao.

Ingredients (serves 4):

Major ingredients:

  1. 1 cup rice
  2. Salt, to taste
  3. 1/2 teaspoon turmeric powder
  4. 5-6 tablespoons of spicy green chutney, or as needed (See notes)
  5. Juice of 1/2 lemon, or to taste (optional)

Veggies:

  1. 2 medium-sized potatoes
  2. 1 medium-sized onion
  3. 1/4 cup shelled green peas
  4. 1 small capsicum
  5. 1 small carrot
  6. 6-7 beans

For the tempering:

  1. 1 teaspoon ghee/oil
  2. A 1-inch piece of cinnamon
  3. 3-4 green cardamom
  4. 3-4 cloves
  5. 2 small bay leaves
  6. A pinch of asafoetida

Method:

First, we will cook the rice.

  1. Wash the rice thoroughly under running water, a couple of times. Drain out all the excess water.
  2. Pressure cook the rice with 2.5 cups of water, for 3 whistles. Let the pressure release naturally.
  3. Once the pressure has completely gone down, let the rice cool down entirely, then fluff it up with a spoon. Keep aside.

Then, we will partially cook the veggies required to make the Aloo Chutney Pulao.

  1. Peel the potatoes and chop into cubes.
  2. Peel the carrot and chop into cubes.
  3. Remove strings from the beans. Chop into large-ish pieces.
  4. Peel the onion and chop finely.
  5. Chop the capsicum into large-ish pieces.
  6. Place all the vegetables except the onion – potatoes, carrot, beans, capsicum and green peas – in a large container and add about 2 tablespoons of water. Pressure cook for 2 whistles. The vegetables should be cooked, but still retain a bit of their crunchiness. Let the pressure release naturally, and the vegetables cool down entirely.

Now, we will prepare the Aloo Chutney Pulao.

  1. Heat the ghee or oil in a pan. Add in the piece of cinnamon, cardamom, cloves, bay leaves and asafoetida. Let them stay in for 2 seconds, ensuring they do not burn.
  2. Add the chopped onions to the pan. Cook on medium flame till the onions begin to brown.
  3. Now, keeping the flame medium, add the cooked vegetables – the potatoes, beans, carrot, capsicum, green peas.
  4. Add in the cooked and fluffed-up rice, salt to taste, turmeric powder and the green chutney. Mix well, but gently.
  5. Taste and adjust seasonings, if needed.
  6. Allow to cook on low-medium flame for 2-3 minutes, stirring intermittently.
  7. Switch off gas and mix in the lemon juice (if needed). Serve hot with raita of your choice.

Notes:

  1. I have used Sona Masoori rice to prepare this Aloo Chutney Pulao. You can use any variety of rice you prefer.
  2. While pressure cooking the rice, adjust the rice:water ratio depending upon how grainy or soft you want the pulao to be. Using the above measurements yielded just the perfect pulao for us.
  3. I have used Chef Sanjeev Kapoor’s recipe for Aloo Chutney Pulao as the base, but have made several variations of my own. The recipe might not be authentic, but I am glad to have gotten a bit more closer to Haryanvi cuisine than I was earlier! And, hey, we loved it!
  4. The way I make spicy green chutney has been outlined in this post.
  5. I’m sending this post to Fiesta Friday – 221, co-hosted this week by Jenny @ Dragonfly Home Recipes.

Why don’t you try this Aloo Chutney Pulao recipe out too?

Did you like the post? Do let me know, in your comments!

Palak Daal Khichdi| Spinach Khichdi With Popular Essentials

This Palak Daal Khichdi is a great way to sneak in some of those gorgeous (not to forget highly nutritious) spinach leaves into one’s diet. The khichdi is super simple to put together, yet highly flavourful and satisfying. The pretty green of this Palak Daal Khichdi will make it alluring to kids and adults alike!

I have used Rozana Sona Masouri rice from Popular Essentials to make this khichdi, which cooked beautifully and easily. Instead of sticking to just moong daal to make the palak daal khichdi, I used Popular EssentialsPancharatna Daal (a blend of 5 different types of lentils) to make it even more nutritious. The tomato puree and home-made garam masala I used added a whole lot of flavour to the khichdi, as did the garlic-dry red chillies-cumin-mustard-asafoetida tempering. You have to try this recipe out!

Not only is this Spinach Khichdi quite healthy, but it is also super easy to make. It is perfect for busy week days or lazy weekends when you want to eat a hearty meal, but want to make just one dish. Serve it piping hot, maybe with a dollop of ghee on top, with plain curd or any raita of your choice!

Here is how to make Palak Daal Khichdi or Spinach Khichdi.

Ingredients (serves 5-6):

Major ingredients:

  1. 1 cup Popular Essentials Rozana Sona Masouri rice
  2. 1/2 cup Popular Essentials Pancharatna Daal
  3. Salt, to taste
  4. 1/2 teaspoon turmeric powder
  5. 1 tablespoon garam masala, or to taste
  6. Red chilli powder, to taste (optional)
  7. 1 tablespoon oil

Veggies:

  1. 1 small carrot
  2. 1 medium-sized onion
  3. 1/4 cup shelled green peas
  4. 1/4 cup shelled fresh pigeon peas
  5. A few big florets of cauliflower
  6. 1 small capsicum
  7. 4-5 pieces of baby corn

For the tempering:

  1. 1 tablespoon oil
  2. 1 tablespoon ghee
  3. 1 teaspoon mustard seeds
  4. 1 teaspoon cumin seeds (jeera)
  5. 2 pinches of asafoetida (hing)
  6. 3 dry red chillies
  7. 5-6 cloves garlic

To grind into a paste:

  1. A generous fistful of spinach (palak) leaves
  2. 2 green chillies
  3. A 1-inch piece of ginger
  4. 2 medium-sized tomatoes

Method:

Let us first grind the paste that we will use in making the khichdi.

  1. Chop the tomatoes into cubes.
  2. Peel the ginger and chop into small pieces.
  3. Clean and wash the spinach thoroughly, and chop it roughly.
  4. Chop the green chillies finely.
  5. Grind the chopped tomatoes, ginger, spinach and green chillies into a paste, in a mixer, using a little water. Keep aside. You should get roughly 2 cups of this paste.

Now, prepare the veggies that we will use.

  1. Peel the carrot and chop into batons.
  2. Chop the onion length-wise.
  3. Keep the shelled pigeon peas and green peas handy.
  4. Chop the cauliflower florets into medium-sized pieces.
  5. Chop the capsicum into medium-sized pieces.
  6. Chop the baby corn into medium-sized pieces.
  7. Keep the onion as is. Pressure cook the carrot, shelled pigeon peas and green peas, baby corn, capsicum and cauliflower florets with very little water, for 2 whistles. Let the pressure release naturally.

Now, we will cook the rice and pancharatna daal.

  1. Wash the rice and pancharatna daal a couple of times in running water.
  2. Drain out all the excess water.
  3. Pressure cook the rice and pancharatna daal with 2 cups of the spinach and tomato paste we prepared earlier + 2 cups of water. Give it 5 whistles. Let the pressure release naturally.

Then, we will proceed to make the khichdi.

  1. Mash the cooked rice and pancharatna daal slightly. Keep aside.
  2. In a pan, heat 1 tablespoon of oil, and add in the finely chopped onions. Saute on medium flame till they start turning brown.
  3. Now, add in the cooked veggies, rice and pancharatna daal.
  4. Add 1 cup of water (or as needed), salt to taste, garam masala, red chilli powder (if needed) and turmeric powder. Mix well.
  5. Let everything cook on medium flame for 2 minutes.

Meanwhile, we will prepare the tempering.

  1. Peel the garlic and chop it finely. Keep aside.
  2. Heat the oil in a pan. Add in the mustard seeds, and let them pop.
  3. Add in the cumin and the asafoetida. Let them stay in for a couple of seconds.
  4. Now, add in the chopped garlic and the dry red chillies. Let them stay in for a couple of seconds, on low flame. Switch off gas.

Now, we are ready to serve the khichdi.

  1. Mix in the tempering with the cooked khichdi, gently but thoroughly.
  2. Serve hot, with raita of your choice or plain curd.

Notes:

  1. If you don’t have pancharatna daal, you can substitute it with moong daal.
  2. I cooked the rice and pancharatna daal separately, the veggies separately too, and then proceeded to make the khichdi. This helps in avoiding over-cooking of the veggies. If you want to, you can cook all of it together in a pressure cooker.
  3. Adding the tempering at the end adds a beautiful depth of flavour to the Palak Daal Khichdi. I would totally recommend this.
  4. I have used home-made garam masala in making this khichdi, just 1 tablespoon since it is quite fresh and more fragrant than store-bought versions. If you are using store-bought garam masala, you might want to use slightly more.
  5. This post is brought to you in collaboration with Popular Essentials, a brand which has a number of grocery essentials under its belt. The opinions expressed in this post are entirely my own, not influenced by anything or anyone. I really liked the samples of Popular Essentials’ Rozana Sona Masouri Rice and Pancharatna Daal that I was sent – the packaging of both products was well done, they cooked well and tasted lovely too. I think the prices of these products is pretty reasonable, too, considering their good quality – 5 kg of the rice costs INR 305 and 500 grams of the daal costs INR 65. Popular Essentials’ products are currently available on most major online platforms like Amazon.
  6. I’m sending this post to Fiesta Friday – 221, co-hosted this week by Jenny @ Dragonfly Home Recipes.

Did you like the recipe? I hope you will try this Palak Daal Khichdi out, and that you will love it as much as we did!

A Delightful Healthy Meal At Enerjuvate, Koramangala

Bored of the regular cream- and spice-laden food that a whole lot of restaurants serve? Head to Enerjuvate Studio & Cafe for a lovely change from the usual!

The husband and I visited Enerjuvate’s relatively new branch in Koramangala recently, for a menu tasting. We returned completely sated after an utterly delightful meal, our taste buds tingling with the various fusion foods we sampled here. The best part – all the food we had was as healthy as it could be, cooked fresh. Our tummies felt light and unburdened after the meal, which we loved!

Concept

Enerjuvate is a pretty space, a studio cum store cum cafe. There are several workshops conducted here on a regular basis, at the studio. The store stocks a variety of healthy products ranging from almond butter, different types of tea and pure honey to various home decor articles. The little boutique at Enerjuvate sells a wide range of products prepared by women entrepreneurs – from clothes and jewellery made from recycled plastic and moss (yes, you read that right!) to all-natural cosmetics.

fb_img_1524293631711-012056889212.jpeg
Some of the articles on display at the Enerjuvate boutique, Koramangala

The menu at the Enerjuvate cafe is quite eclectic – it is a mix of many different cuisines, Indian and international. The cafe serves all-vegetarian food, cooked fresh without any artificial flavouring or colouring agents and preservatives. Ingredients like cornflour, refined flour and refined sugar are avoided, as is deep frying. Think momos made with jowar flour, papri chaat made with baked ragi pooris, hot-and-sour Asian gravy served with cooked millets instead of rice, desserts made with honey or cane sugar. We found the menu to be quite extensive – with a variety of soups, beverages and tea; a huge selection of entrees, wraps, pasta and pizza; quite a few healthy desserts and combo platters. Here, you will find several options for people who choose to go dairy-free, gluten-free or dairy products-free. There are quite a few Jain alternatives on the menu as well.

Enerjuvate was first launched in Jayanagar, in early 2017. After successfully creating a loyal clientele for itself at Jayanagar, a second branch opened up in Koramangala a few months later.

Location, ambience and decor

The Koramangala outlet is located in the bustling 4th Block, and wasn’t very tough to locate. The place has a quaint, charming vibe to it, both from the outside and inside.

The outside sitting area is simply beautiful, done up with fairy lights, ideal for breezy summer evenings and cold winter afternoons.

fb_img_1524293463154-01552154525.jpeg
Part of the outdoor sitting area at Enerjuvate, Koramangala

The inside is pretty too, with quirky but classy decor. Carefully chosen quotes and artifacts deck up the ceiling and walls.

fb_img_1524293591819-011498931254.jpeg
The decor at Enerjuvate, Koramangala

Go up a quirky decorated staircase and you will reach another cute sitting area, adorned by a bookshelf and more of those lovely artifacts. There’s a little balcony with just two seats too, upstairs, just perfect for a date night, looking out at the world go by.

Food and drinks

We started our meal with samples of a few of Enerjuvate’s signature beverages and a couple of their healthy starters.

img_20180421_155904336108543.jpg
Top left: Carrot Ginger Ale, Coco Mojito, and Almond Mylk Thandai; Top right: Kombucha samplers; Bottom left: Aloo Papri Chaat; Bottom right: Summer Salad (seasonal)

We absolutely loved the Coco Mojito, a twist on the traditional virgin mojito, made with tender coconut water, pineapple and mint, sweetened with cane sugar. It was so delectable! The other drinks weren’t meant for our taste buds – we couldn’t appreciate these as we are not a big fan of vegetable-based smoothies or fermented pro-biotic beverages.

The Aloo Papri Chaat was absolutely lovely, and I couldn’t resist hogging on it! The chaat was made with baked ragi pooris and, therefore, quite healthy. The spice levels, the chutney, the sweetness and tanginess – everything – was on point.

The Summer Salad, a seasonal special made with spiralised raw mango and cucumber, with a simple honey-lemon dressing was gorgeous, too. Slurpalicious!

fb_img_1524293535732-01980811238.jpeg
Thai DIY Paan at Enerjuvate, Koramangala

The next starter that was presented to us – Thai DIY Paan – completely blew our minds away. What a flavour bomb this was! My taste buds are still tingling with the burst of flavours it filled my mouth with. Served with toasted peanuts and coconut, Enerjuvate‘s in-house tangy tamarind chutney, chillies, sprouts, ginger, onions and lemon wedges, it is fun to make these lettuce wraps the way you want to. It is all healthy, too, to boot! In Thailand, apparently, this is a street food called Meeang Krung, and is made with betel leaves instead of lettuce. We would urge you to try this dish out at Enerjuvate – highly recommended!

Top left: Veggie Zoodle Bowl; Top centre: Asian-style chilli vegetables with millets; Top right: Potato Wedges Platter; Bottom: Momo Tasting Platter

Next up came a couple of their large platters – the Potato Wedges Platter and the Momo Tasting Platter.

The Potato Wedges Platter was lovely, very well done, with sweet potato and potato wedges baked to perfection, sprinkled with a generous dose of herbs. This is served with beetroot hummus and salsa.

We have mixed feelings about the Momo Tasting Platter, which included an assortment of healthy momos made with flours like wheat, ragi and other millets. The fillings were quite interesting – potato, spinach and corn, Asian noodles and the like. While I loved the fillings of these momos, I found the outer shell to be quite thick, unlike the paper-thin maida-based momos that are commonly available on the streets. That said, we do greatly appreciate the fact that these momos are made the healthy way, without any maida. The sauces served with the momos too are made in-house, fresh and healthy, without any preservatives or artificial flavouring or colouring agents.

We then went on to try samplers of two of Enerjuvate’s main course. We loved the Veggie Zoodle Bowl – zucchini noodles cooked beautifully, livened with herbs, perfectly spiced. The Asian-Style Chilli Vegetables was delish too – vegetables cooked the Asian way, but healthily, served with cooked millets instead of rice. This was such a delight to eat!

The Enerjuvate Loaded Pizza!

The Enerjuvate Loaded Pizza we were served next was sheer pleasure to eat. True to its name, it was loaded with toppings. The base – made with millets – was very well done, and the marinara sauce on it was quite flavourful. It was served with Enerjuvate’s signature pumpkin sauce (Gross? No way! The sauce was so delish, we were licking our fingers! We didn’t even know that it was pumpkin sauce, BTW, till we were told!). This is another dish we would highly recommend you to try at Enerjuvate!

Thai DIY Soup at Enerjuvate, Koramangala

We also tried out a couple of the soups. The Thai DIY Soup had an interesting concept – lemongrass soup served in a cute mug with assorted toppings, for you to add in the way you please. The taste and texture of the soup didn’t charm us, though.

The Thukpa Twist – Tibetan thukpa made with healthy flat ragi noodles – didn’t bowl us over either.

Left: Lemon (n)ice cream!; Top right: Choco Mocha Cups; Bottom right: Sizzling Brownie, at Enerjuvate, Koramangala

We ended our meal with samples of some of Enerjuvate’s desserts, every single one of which was brilliant and utterly blew us away!

The Lemon (N)ice Cream – a preservative-free vegan ice cream made with coconut milk – was so refreshing and lovely. We loved this to bits! If you can get hold of this at Enerjuvate, please don’t miss it!

The Choco Mocha Cups are, again, vegan. These little chocolate cups filled with coffee-flavoured cashew cream were sheer bliss. Yumminess overload!

The Sizzling Brownie was simply beautiful too, with vegan vanilla ice cream served atop a chocolate ragi brownie! This one comes highly recommended too!

All of these desserts were made with zero refined sugar. Can you guess? We surely couldn’t!

Price

A meal for two at Enerjuvate, Koramangala, will set you back by INR 800, approximately. We think this is a steal, considering the charming ambience, the quality and deliciousness of the food, and the fact that it is all cooked fresh and healthy, with utmost care.

In hindsight

The husband and I thoroughly enjoyed ourselves at Enerjuvate. We loved most of the food we tried out, in the midst of that pleasing ambience. Neither of us can wait to go back here and try out more from their vast menu!

Please do visit too – I’m sure you won’t regret it!

Have you been to Enerjuvate? What are your favourites here? Do tell me, in your comments!