Dal Ka Shorba| Indian-Spiced Lentil Soup

If you are looking for a simple but hearty soup that’s hugely satisfying on a winter day, I have just the right thing for you. I’m here today with the recipe for Dal Ka Shorba, an Indian-style soup.

Dal Ka Shorba or Indian-Spiced Lentil Soup

What is Dal Ka Shorba?

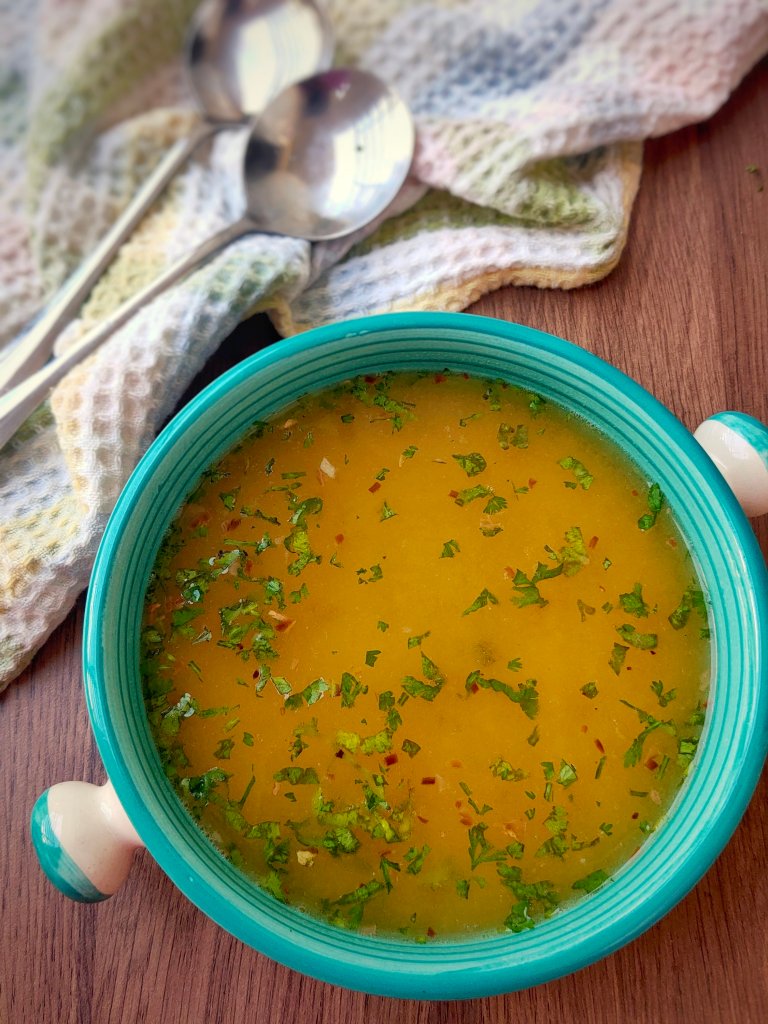
Dal Ka Shorba – also called Dal Shorba – refers to a soup made using lentils, spiced the Indian way. It is full of protein, warm and comforting and delicious. I make mine with toor dal and give it a burnt garlic tempering to make it extra special.

I have had the pleasure of tasting Dal Ka Shorba at several North Indian restaurants, and I especially love the one at Moti Mahal. The recipe I have shared here is inspired by these restaurant versions, tried and tested several times over and toned down to just the way my family and I like it.

Why you should try out this Dal Ka Shorba

– It is super easy to make. Once the lentils are cooked, it takes bare minutes to put the soup together.

– This soup needs the bare minimum of ingredients, all easily available in a typical Indian kitchen. There are no fancy or processed ingredients in there – only clean and humble everyday ones.

– Like I was saying earlier, this Dal Ka Shorba is full of protein. It is very nutritious and hearty.

– It is a completely vegetarian and vegan recipe, suited to those following a plant-based diet. It is gluten-free as well.

– This soup manages to be light and appetising in spite of the addition of lentils. It makes for a great addition to a North Indian-style meal.

– It’s delicious! All of us at home absolutely love it, especially the touch of burnt garlic in it. It is so much more than the water left over from cooking lentils.

How to make Dal Ka Shorba

Here is how I make it.
Ingredients (serves 3-4):

  1. 1/2 cup toor dal
  2. 1/2 tablespoon oil
  3. 4-5 cloves of garlic
  4. A 1-inch piece of ginger
  5. 3/4 to 1 cup of water
  6. Salt to taste
  7. 1/2 teaspoon freshly ground black pepper or to taste
  8. Juice of 1/2 lemon or to taste
  9. 1 tablespoon finely chopped fresh coriander or to taste

Method:

1. Wash the toor dal thoroughly under running water. Drain out all the water and place in a wide vessel.

2. Add in enough fresh water to cover the toor dal completely. Place the vessel in a pressure cooker. Pressure cook for 7-8 whistles on high flame or till the dal is well cooked. Let the pressure release naturally.

3. Once the pressure from the cooker has completely gone down, get the cooked toor dal out. Mash it well with a buttermilk churner, to give it a smooth consistency. Keep aside.

4. Peel the ginger and garlic cloves. Chop very finely. Chop the coriander finely. Keep aside.

Top left and right: Steps 1 and 2, Above leftmost bottom and leftmost bottom: Step 3, Bottom right: Step 4

5. Heat the oil in a pan, and add in the chopped ginger and garlic. Turn the flame down to medium. Cook on medium flame for a minute or till the garlic gets brown. Take care to ensure that it does not burn.

6. At this stage, still keeping the flame at medium, add the cooked and mashed toor dal to the pan. Also add in water, as needed to adjust the consistency of the mixture. I used a little more than 3/4 cup of water.

7. Add in the salt and freshly ground black pepper. Mix well.

8. Cook everything together on medium flame till the mixture comes to a boil. Then, reduce flame even further and simmer the mixture for a minute more. Switch off gas.

9. Mix in lemon juice and chopped coriander. Your Dal Ka Shorba is ready. Ladle into bowls and serve immediately.

Top left and right: Steps 5 and 6, Above leftmost bottom and leftmost bottom: Steps 7 and 8, Bottom right: Step 9

#HotPot theme at Shhh Cooking Secretly Challenge

I’m sharing this recipe for Dal Ka Shorba in association with the Shhh Cooking Secretly Challenge.

The Shhh Cooking Secretly Challenge is a group of enthusiastic food bloggers who share recipes based on a pre-determined theme every month. Each month, the group members are divided into pairs, and every pair exchanges two ingredients unknown to the rest of the group. These two ingredients are used by each pair to cook the dish that fits the group’s monthly theme.

It was my turn to suggest a theme for the group this month and, considering it is winter, I chose #HotPot or dishes that are best served piping hot. I was paired with Sasmita of First Timer Cook for the month, and she assigned to me the two secret ingredients of ‘pepper’ and ‘lemon’, and I decided to use them in this beautiful Dal Ka Shorba.

I gave Sasmita ‘curry powder’ and ‘lemon’ as secret ingredients. You guys must definitely check out the wonderful Roasted Cauliflower Soup recipe she has developed using these ingredients!

Tips & Tricks

1. You can use ghee or butter instead of the oil I have used here.

2. The garlic can be omitted, if you don’t prefer to use it.

3. Make sure you chop the ginger and garlic really fine, for best results. You may even julienne the ginger.

4. Make sure the toor dal is well cooked before proceeding to make the soup.

5. Adjust the quantity of lemon juice, salt and pepper as per personal taste preferences. Black pepper powder can be used instead of the freshly ground pepper – that said, I would highly recommend the freshly ground pepper.

6. Adjust the quantity of water depending upon how thick you want the soup to be. I prefer keeping it only slightly thick – not overly so – and not very watery.

7. You can add a dash of roasted cumin (jeera) powder to the soup too. I usually don’t.

Did you like this recipe? Do tell me, in your comments!

Aloo Methi| Punjabi Potato & Fenugreek Curry

You guys probably already know of my love for winter produce, especially fresh methi or fenugreek greens. The gorgeous methi available this time of the year gives me a high – yes, I’m that kind of crazy. 😀 Today, I’m going to share with you all the recipe for one of my most favourite things to use fenugreek in, Aloo Methi.

Aloo Methi Ki Sabzi

What is Aloo Methi?

Aloo Methi, also called Aloo Methi Ki Sabzi, is a dry curry made using potatoes and fenugreek greens. It is quite a popular winter specialty in North India, especially Punjab and Delhi.

I have had the pleasure of trying out this curry several times, on trips to Delhi, and I find it absolutely lovely. The bitterness of fenugreek is beautifully offset by the potatoes, and the end result is this delicious confection that wins hearts.

Aloo Methi makes for a great accomplishment to rotis and parathas, while I also love it as a side to rice and Gujarati Dal.

A closer look at my version of Aloo Methi

There are a few different versions to the curry, and this is mine.

This is a rather simple dish to prepare, but one that needs care and caution and patience. Many use pressure-cooked potatoes to make this curry, but I find starting with uncooked potatoes gives it better texture. Using uncooked potatoes reduces the risk of the Aloo Methi turning into a gloopy mess.

In many families, the fenugreek leaves and potatoes are cooked together. The greens are added in when the potatoes are almost cooked. However, I prefer cooking the two separately – this makes sure both the potatoes and fenugreek are done just right, neither undercooked nor overdone. The time taken for cooking does increase when you use raw potatoes, though.

You can use any oil of your preference to make the Aloo Methi. Mustard oil is often used, which gives the curry a pungent smell and beautiful flavour. However, regular refined oil works just as well. I have used Idhayam Mantra groundnut oil here, which I think went very well.

I relatively lesser oil. There’s just enough oil used here to cook the potatoes through without sticking to the bottom of the pan.

Some use kasoori methi (dried fenugreek leaves) to make this curry. However, I prefer using only fresh fenugreek in season. The fresher the greens, the better the curry tastes.

In many Punjabi families, I understand Aloo Methi is a very simple affair with only the most basic of spices being used. I, however, love to add in a bit of garam masala, some jaggery and amchoor (dried mango powder). I feel these additions take the taste of the Aloo Methi to a whole new level.

How to make Aloo Methi

Here is how I go about it.

Ingredients (serves 3-4):

  1. 7-8 medium-sized potatoes
  2. A small bunch of fenugreek greens aka methi, about 1-1/2 cups when finely chopped
  3. 2 tablespoons + 1/2 tablespoon oil
  4. 1 teaspoon cumin (jeera) seeds
  5. 2 pinches of asafoetida
  6. 2-3 dry red chillies
  7. Salt to taste
  8. 1/4 teaspoon turmeric powder
  9. Red chilli powder to taste
  10. 1 teaspoon garam masala or to taste
  11. 1 teaspoon amchoor powder
  12. 1 teaspoon jaggery powder

Method:

1. Wash the potatoes and the fenugreek leaves thoroughly, to remove any traces of dirt from them. Place the leaves in a colander and let all the water drain away.

2. Chop up the fenugreek leaves finely. Keep aside. I had 1-1/2 cups of the greens when finely chopped.

3. Peel the potatoes and chop them into cubes. Keep aside.

Top left and right: Steps 1 and 2, Bottom left and right: Step 3

4. Heat 1/2 tablespoon oil in a heavy-bottomed pan. Add in the chopped fenugreek leaves. Turn the flame down to medium, and add in a bit of salt.

5. Saute the fenugreek leaves on low-medium flame for 3-4 minutes. When they shrink in volume and are completely cooked, switch off gas. Transfer the cooked fenugreek leaves to a plate and keep aside.

6. Now, heat the remaining 2 tablespoons of oil in the pan. Add in the cumin seeds, asafoetida and dry red chillies. Allow these ingredients to stay in for a couple of seconds.

7. Reduce the flame to low and add in the chopped potatoes. Mix well.

Top left and right: Steps 4 and 5, Above leftmost bottom: The methi leaves are cooked and ready, Leftmost bottom: Step 6, Bottom right: Step 7

8. Cook the potatoes on low flame for about a minute.

9. Add in salt to taste and the turmeric powder. Mix well. Let the potatoes cook on low flame for 8-10 minutes or till they start getting tender. Stir intermittently, to prevent sticking to the bottom of the pan.

10. At this stage, add in the red chilli powder. Mix well. Allow the potatoes to cook for 5-7 minutes more or till they are almost done. Stir intermittently.

Top left and right: Steps 8 and 9, Bottom left: Step 10, Bottom right: The potatoes are almost done

11. Now, add in the jaggery powder and garam masala. Mix well.

12. Add in the amchoor powder and the cooked fenugreek leaves. Mix well.

13. Cook on low flame for 3-4 minutes more for everything to get well integrated together. Stir intermittently. Your Aloo Methi is done!

Top: Step 11, Bottom left and right: Steps 12 and 13

Tips & Tricks

1. Do not use too much fenugreek, as it might make the curry bitter. The above quantities work just perfectly for us.

2. As stated in the post, you can use any oil of your preference to make the Aloo Methi.

3. Make sure you use a heavy-bottomed pan to make the curry, in order to prevent burning. Cook on low flame to ensure that the potatoes are evenly done.

4. The bit of jaggery added to this curry adds in a whole lot of taste to it. It does not make the curry overly sweet, but balances out the other flavours beautifully. I would not recommend skipping it.

5. You may use chana masala in place of the garam masala used here, or a mix of both. Adjust the quantity as per personal taste preferences.

6. Adjust the quantity of red chilli powder and amchoor powder as per personal taste preferences.

7. Be careful while adding the salt. Remember that we are salting the fenugreek leaves and potatoes separately.

8. Do not add in any water while cooking the potatoes. Cook uncovered.

9. You may chop the potatoes as large or small as you prefer. I like chopping them into small cubes for this curry.

10. This is a completely vegetarian preparation, one that is vegan as well. It is suitable to those following a plant-based diet. This is a no-onion, no-garlic recipe too.

11. To make this recipe gluten-free, simply skip the asafoetida used in the tempering. Most Indian brands of asafoetida do contain wheat flour to a lesser or greater extent and are, therefore, best avoided when one is following a gluten-free diet. However, if you can find 100% gluten-free asafoetida, you can definitely use it.

12. I have used home-made garam masala and store-bought amchoor powder in this curry, both of which are vegan and gluten-free. However, if you are using store-bought spice powders, please do check the ingredient list to make sure they suit your dietary requirements.

Did you like this recipe? Do tell me, in your comments!

One Pot Kale Khichdi| Moong Dal Khichdi With Kale

I haven’t seen kale being used much in Indian recipes; it is mostly used in things like soups, salads, stir-fries and chips. That’s mainly because kale is not available all that commonly in India. The scene is fast changing, though. With the advent of farms like Orinko and Namdhari’s, many ‘exotic’ veggies and fruits – kale included – are becoming available in parts of India. Did you know that kale lends itself very well to Indian dishes? I have been experimenting with it, and have been very pleased with the results! I shared the recipe for Kale Thogayal a while ago, and now, here’s presenting to you all Kale Khichdi!

A low-down on this Kale Khichdi

This is a very simple khichdi made using moong dal, rice and Tuscan kale from Orinko Farms. It is made using a few everyday ingredients that are regular finds in a typical Indian kitchen.

This Kale Khichdi is a one-pot dish that can be put together in a matter of minutes. I make it in a large pressure cooker – just get all the ingredients ready, add them to the pressure cooker, allow to whistle, and… it’s done! This is the perfect go-to recipe for busy weekdays.

It is homely and comforting, food for the soul when had piping hot. Drizzled with some ghee, it’s a beauty.

#OnePotWonder At Foodie Monday Blog Hop

I’m sharing this recipe with the Foodie Monday Blog Hop, which is a group of enthusiastic food bloggers showcasing recipes based on a pre-determined theme, every week. The theme this Monday is #OnePotWonders, and all of us are sharing interesting recipes that can be cooked in a single pot, in a jiffy.

Archana ji, the very talented author of The Mad Scientist’s Kitchen, was the one who chose this theme. The One-Pot Vegan Jambalaya she has cooked up for the theme is bomb! Can’t wait to try it out!

How to make Kale Khichdi

Here’s how I make it.

Ingredients (serves 4-5):

  1. 1 cup rice
  2. 1/4 cup moong dal
  3. A handful of kale leaves, 2 cups when finely chopped
  4. 1 medium-sized onion
  5. 1 medium-sized tomato
  6. A 1-inch piece of ginger
  7. 5-6 cloves of garlic
  8. 1/2 tablespoon oil
  9. 1/2 teaspoon mustard seeds
  10. 1/2 teaspoon carom seeds (ajwain)
  11. 1/2 teaspoon cumin seeds
  12. 2 pinches of asafoetida
  13. 7 cups water
  14. Salt to taste
  15. Red chilli powder to taste
  16. 1/4 teaspoon turmeric powder
  17. 3/4 teaspoon garam masala or to taste
  18. 3/4 tablespoon jaggery powder or to taste
  19. Ghee, as needed to drizzle over the khichdi (optional)

Method:

1. Wash the kale leaves thoroughly, remove the thick stem from the centre and discard. Chop the leaves finely. I had 2 cups of chopped kale.

2. Peel the ginger and garlic cloves. Chop roughly.

3. Grind the ginger and garlic together to a paste, using a little water. Keep aside.

4. Peel the onion and chop finely. Chop the tomato finely too. Keep aside.

5. Wash the rice and moong dal together, thoroughly. Drain out the water. Keep ready.

Left top, centre and bottom: Steps 1, 2 and 3, Bottom right: Step 4, Top right: Step 5

6. Now, we will start preparing the Kale Khichdi. Heat the oil in a pressure cooker base. Add in the mustard, and allow it to sputter. Then, add in the carom seeds, the cumin and the asafoetida. Let them stay in for a couple of seconds.

7. Add in the onions, and turn the flame down to medium. Saute on medium flame for a minute.

8. Add in the chopped kale. Saute on medium flame for a minute.

9. Add in the ginger-garlic paste we prepared earlier. Saute on medium flame for a few seconds.

10. Add in the washed and drained rice and moong dal. Saute on medium flame for a minute.

Top left and right: Steps 6 and 7, Left centre and bottom: Steps 8 and 9, Bottom right: Step 10

12. Now, add in 7 cups of water.

13. Add in the chopped tomatoes.

14. Add in the salt and turmeric powder.

15. Add in the garam masala.

16. Add in the jaggery powder. Mix well. Taste the water and adjust salt or seasonings as needed.

17. Now, close the pressure cooker and put the whistle on. Turn the flame up to high. Allow 4 whistles on high flame. Let the pressure release naturally. Once the pressure has gone down completely, your Kale Khichdi is ready. Mix it up well and serve hot with raita of your choice, plain curd, papad and/or pickle. Drizzle a little ghee over the khichdi while serving (if using).

Top left and right: Steps 12 and 13, Centre left and right: Steps 14 and 15, Bottom left and right: Steps 16 and 17

Is this Kale Khichdi vegan and gluten-free?

This is a completely vegetarian preparation that is gluten-free as well. Skip the drizzling of ghee on top, as suggested in the above recipe, to make it vegan or plant-based.

Tips & Tricks

1. I have used Sona Masoori rice here. You can use any variety you prefer.

2. Adjust the salt, red chilli powder, garam masala powder and jaggery powder as per personal taste preferences. You may use green chillies instead of the red chilli powder, too.

3. I would personally not recommend skipping the jaggery powder. The jaggery does not make the khichdi overly sweet, but rounds off the other flavours beautifully.

4. Chana masala can be used in place of the garam masala.

5. The above method yields a well-cooked, soft khichdi that is just perfect for us. Feel free to increase or decrease the amount of water you use or the number of whistles you allow, depending upon the consistency you require.

6. I have used an 8-litre pressure cooker to make this Kale Khichdi.

7. Make sure the pressure has completely gone down before opening the cooker.

8. If the khichdi feels dry after the pressure releases, you can add in some more water, adjust salt and seasonings and simmer it for a couple of minutes. This will adjust its consistency.

9. Do not use too much of kale, as it can make the khichdi bitter.

10. Fenugreek (methi) or spinach (palak) greens make for great substitutes for the kale in this recipe.

11. I have used Tuscan kale – also called ‘Dinosaur Kale’ – to make this dish. You may use any other variety of kale too.

12. You may change the proportions of rice and moong dal, as per your taste preferences. The above quantities work perfectly for us.

Did you like this recipe? Do tell me in your comments!

Paneer Paratha| Flatbread With Cottage Cheese Filling

The weather in Bangalore has been just perfect for piping hot parathas, and I have been making them quite often. Parathas are a great way to make use of all the gorgeous winter produce that’s available in abundance at the moment. I love how versatile they are too – you can make just about any filling for them. Parathas are a meal all on their own, hearty and filling, and I don’t have to worry about making a side dish to go with them. Today, I’m going to share with you all the recipe for Paneer Paratha, a family favourite, the way I make them.

Yummylicious Paneer Parathas!

What exactly is a Paneer Paratha?

For the uninitiated, it refers to a flatbread cooked on a thick pan. The outer covering is made using whole wheat flour, stuffed with a paneer or cottage cheese filling. The filling is usually flavoured with Indian spices like garam masala, amchoor and red chilli powder. I add in some chana masala to the filling too, because we love the flavour it imparts.

Paneer Parathas – any paratha, actually – tastes best when served straight off the pan. A pat of white or yellow butter, curd, pickle and/or raita make for some great accompaniments to it. We love having them with some quick-pickled onions and/or green chutney.

How to make Paneer Paratha

Here is how I make them.
Ingredients (makes about 6):

For the outer covering:

  1. 1-1/2 cups wheat flour
  2. Salt to taste
  3. 1/2 tablespoon oil

For the filling:

  1. 200 grams paneer
  2. Salt to taste
  3. 2 pinches of asafoetida
  4. 1/4 teaspoon turmeric powder
  5. Red chilli powder to taste
  6. A handful of fresh coriander leaves
  7. A handful of fresh mint leaves
  8. 3/4 teaspoon chana masala or to taste
  9. 1/2 teaspoon garam masala or to taste
  10. 3/4 teaspoon amchoor powder

Other ingredients:

  1. Oil, as needed to make the parathas
  2. Wheat flour, as needed for dusting

Method:

1. We will start by making the dough for the outer covering of the parathas. Take the wheat flour in a large mixing bowl, and add in the salt. Mix well. Now, adding water little by little, bind into a soft, pliable dough. When done, add in the oil and knead for a couple of minutes. We will let the dough rest, covered, till we are ready to make the parathas.

2. Next, we will prepare the filling for the parathas. Crumble the paneer in a large mixing bowl. Add in salt and red chilli powder to taste, turmeric powder, chana masala, garam masala and amchoor. Chop the coriander and mint leaves finely and add them in too. Mix all the ingredients well together. Your paneer stuffing for the parathas is ready. Keep aside for later use.

Top left and right: Step 1, Centre and bottom column: Preparing the paneer filling

3. Now, we will start making the parathas. When the dough has rested for at least 15-20 minutes, divide it into about 6 equal parts. Roll each part into a ball, and keep ready. Meanwhile, place a thick pan on high flame and allow it to get nice and hot.

4. Dust one of these dough balls in some wheat flour and place it on a flat surface. Roll it out into a circle that’s not too thin.

5. Place 3-4 tablespoons of the paneer filling in the centre of the dough circle. Gather the edges together and cover the filling completely with the dough. If there’s any excess dough on top, pinch it out.

6. Press the filled dough gently between your palms, then dust it with wheat flour and place it on the flat surface. Roll it out into a circle that is neither too thick nor too thin. When the pan is hot enough, place the paratha in the centre and drizzle some oil around it. Reduce flame to low-medium. Cook on low-medium flame for 1-2 minutes or till the paratha is done on the bottom, then flip it over. Cook for 1-2 minutes on low-medium flame the other side too, or till done. You may spread some oil on the paratha if you want – I usually avoid it. When well cooked on both sides, transfer the Paneer Paratha to a serving plate. Serve hot.

7. Prepare parathas out of all the dough in a similar manner.

The various stages in the making of a Paneer Paratha

Tips & Tricks

1. I have used store-bought paneer here. You can use a home-made version if you so prefer. If using refrigerated paneer, let it come to room temperature first before starting to crumble it.

2. You may skip the chana masala in the filling and use only garam masala instead. I prefer a mix of chana masala and garam masala.

3. Adjust the quantity of salt, red chilli powder, garam masala, chana masala and amchoor powder as per personal taste preferences.

4. The dough should be pliable and soft, but not very sticky, for best results.

5. While making each paratha, keep the rest of the dough covered to prevent it from drying out.

6. For best results, use a thick pan to cook the parathas. Cook the parathas on low-medium flame, making sure they are well done on both sides.

7. You may add some kasoori methi or carom (ajwain) seeds to the filling. I usually skip these ingredients.

8. You may use as much or as little oil as you prefer, to cook the Paneer Parathas. I use regular refined oil. You may use butter or ghee to cook the parathas instead, too.

9. This is a completely vegetarian recipe, but it is NOT vegan or plant-based because of the use of paneer. It is not gluten-free either.

10. This is a no-onion, no-garlic recipe.

Did you like this recipe? Do tell me, in your comments!

Indian Masala Vegetable Quesadillas

Quesadillas are delightful things, especially when had straight off the pan on a cold winter day. When they are home-made, they can be made in a healthy, guilt-free manner too. Today, I’m sharing the recipe for Indian-Style Vegetable Quesadilla, a huge favourite at home.

Indian-Style Vegetable Quesadilla

What is a quesadilla?

A quesadilla, an integral part of Mexican cuisine, refers to a tortilla filled with a delectable stuffing. It would not be wrong to state that the quesadilla is a type of sandwich where the outer covering is traditionally made of corn and the filling with spiced meat or vegetables and just enough cheese to hold it all together. Often, the filled quesadilla is cooked on a griddle, for it to crisp up and for the cheese to melt.

Modern versions of the quesadilla include varied and fancier fillings and, often, oodles of cheese. Many have also started making the outer covering with flour (maida).

A closer look at this Indian-Style Vegetable Quesadilla

This is an Indianized version of a quesadilla, my take on the dish heavily influenced by Indian cuisine. You could call it a fusion of Indian and Mexican styles. I’m not claiming that this is an authentic quesadilla recipe, but I definitely do know that it tastes absolutely lovely!

I have tried to keep the quesadilla as healthy as possible. I have used whole wheat flour to make the outer covering, with very little oil going into the filling. There’s just a bit of cheese used in there, to make the dish interesting and fun.

These quesadillas are rather easy to put together, if you have all the ingredients at hand. If you are making these for a kids’ party or get-together, you can make the outer covering and filling beforehand and then assemble the quesadillas just before serving.

#KidsTreats on Foodie Monday Blog Hop

I’m sharing this recipe with the Foodie Monday Blog Hop.

The Foodie Monday Blog Hop is a group of passionate food bloggers who share recipes based on a pre-determined theme, every Monday. The theme this week is #KidsTreats, wherein all of us are showcasing how to make relatively guilt-free indulgences for children.

Swaty, the very talented author of Food Trails, suggested the theme for the week. While on the topic of healthy treats for kids, I’m absolutely loving these very nutritious Gluten-Free Sattu Cookies that Swaty has made using oats and jaggery. So unique!

How to make Indian-Style Vegetable Quesadillas

Here’s how I make them.

Ingredients (makes 6-7):

For the outer covering:

  1. 1-1/2 cups wheat flour
  2. Salt to taste
  3. 3/4 tablespoon oil

For the filling:

  1. 1 medium-sized onion
  2. 1 medium-sized Delhi carrot
  3. A small piece of cabbage, about 1/2 cup when chopped
  4. 1/2 of a small red capsicum
  5. 1/2 of a small yellow capsicum
  6. 1/4 cup finely chopped cauliflower
  7. 1/4 cup finely chopped broccoli
  8. 1/2 tablespoon oil
  9. Salt to taste
  10. 1/4 teaspoon turmeric powder
  11. Red chilli powder to taste
  12. 1-1/2 teaspoons Singapore curry powder or to taste (See notes)
  13. 1/2 tablespoon jaggery powder or to taste
  14. 1 teaspoon amchoor powder or to taste
  15. 1 tablespoon finely chopped fresh coriander

Other ingredients:

  1. A few tablespoons of oil or as needed
  2. 3 cubes of cheese

Method:

1. We will start by making the dough for the outer covering of the quesadillas. Take the wheat flour in a large mixing bowl and add in the salt. Mix well. Adding water little by little, bind into a soft, pliable dough. When the dough is ready, add in the oil and knead well for about 2 minutes. Then, let the dough sit undisturbed, covered, till it is time to make the quesadillas.

2. Next, we will prep the vegetables required for the quesadilla filling. Chop the onion, broccoli and cauliflower finely. Cut the yellow capsicum, red capsicum and cabbage into strips. Peel the carrot and cut into sticks.

3. Grate the cheese and keep it ready.

Top left and right: Step 1, Bottom left and right: Steps 2 and 3

4. Next, we will prepare the filling for the quesadillas. Heat the oil in a heavy-bottomed pan, and add in the prepared vegetables. Turn the flame down to medium and saute the veggies for about a minute.

5. Add salt and turmeric powder. Mix well. Saute for a minute more.

6. Now, add red chilli powder to the pan, along with the Singapore curry powder. Mix well. Continue to saute on medium flame till the vegetables are cooked but still retain a bit of a crunch.

Top left and right: Steps 4 and 5, Bottom left and right: Step 6

7. Add in the amchoor powder and jaggery at this stage. Mix well and saute on medium for a couple of seconds. Switch off gas.

8. Mix in the finely chopped coriander. The vegetable filling for the quesadillas is ready. Allow this filling to cool down fully.

9. Meanwhile, prepare the outer covering for the quesadillas and keep them ready. Start by placing a thick pan on high flame, and allowing it to get hot enough while the quesadilla covers are rolled out. Out of the dough we prepared earlier, make 6-7 equal-sized balls. Place one on a flour-dusted surface and roll it out into a disc that is neither too thick nor too thin – much like a plain paratha. Place this disc on the hot pan, reduce the flame to medium, drizzle a little oil around the disc and let it cook till done on the bottom. Now, flip over and cook on the other side too. Transfer to a plate when done. Prepare quesadilla covers out of all the dough, in a similar fashion.

Top left and right: Step 7, Bottom left and right: Steps 8 and 9

10. When you are ready to serve the quesadillas, get the same pan nice and hot. Then, reduce flame to low-medium, place a prepared quesadilla cover on it. Place a generous amount of the vegetable filling on one half of the cover.

11. Sprinkle some grated cheese on top of the filling.

12. Close the cover to form a semi-circle. Cook on low-medium heat for a couple of seconds on both sides, for the quesadilla to get crisp and for the cheese to melt. Transfer to a serving plate when done, and serve hot. Prepare all the quesadillas in a similar fashion.

Top: Step 10, Bottom left and right: Steps 11 and 12

Tips & Tricks

1. Unlike an authentic quesadilla made using corn flour, I have used whole wheat flour here. You could also try using other healthier flours too, gluten-free if you want them to be.

2. You can use any vegetables of your choice, to make the filling. I have used the veggies I had on hand.

3. I have used home-made Singapore Curry Powder to flavour the filling. You can make your own, or use garam masala or chana masala instead.

4. Tomato ketchup or mayonnaise can be used in the quesadillas, if you so prefer. Here, I haven’t. Click here for my recipe for home-made tomato ketchup.

5. I have used cubes of Amul cheese here. You may use any other cheese of your preference, instead. Use as much or as little as you prefer.

6. You can make the filling and the whole wheat rotis in advance. The quesadillas can be assembled and heated up just before serving. Remember to cook them on a low-medium flame after filling them, so they crisp up nicely without burning.

7. I like adding a bit of jaggery to the filling, as it rounds off the other flavours nicely. You may skip it if you so prefer, but I would suggest using it.

Did you like this recipe? Do tell me in your comments!