Shevgyacha Shengachi Bhaji| Maharashtrian Drumstick Curry

Shevgyacha Shengachi Bhaji is a delicious drumstick curry from the state of Maharashtra. It is a gravy-based dish that goes very well with both rotis and rice.

When we visited some Maharashtrian family friends of ours in Indore some time ago, the hostess had prepared Shevgyacha Shengachi Bhaji for lunch. I fell in love with it at first bite, and immediately asked her if she could teach me the recipe. She was generous enough to do so, and now, this curry has become a staple at our dinner table too. I absolutely love this fact about my kitchen – how the food I cook on an everyday basis is a reflection of our families and memories, the changing seasons, our travels, the people we meet, the shows we watch, and the books we read. 🙂

Full of the goodness of drumsticks, Shevgyachi Shengachi Bhaji tastes beautiful. It has the robust flavour and fragrance of goda masala, the quintessential spice blend that you will find in several Maharashtrian kitchens. It is spicy (though we adjust the spice level to match our tastes), with just a hint of sweetness and sourness. Today, I am going to share with you all how to make this traditional Maharashtrian curry – do try it out some time and I am sure you will love it too! It is the season for drumsticks right now, and the markets are flooded with them – there’s no better time than now to make this dish.

Shevgyacha Shengachi Bhaji, served with rotis

Looking for other recipes using moringa? Check out this Saragva Ni Kadhi, a Gujarati curd-based dish, and this Shevgyacha Shengachi Amti, a Maharashtrian dal, both made using moringa pods. This Murunga Poo Poriyal from Tamilnadu uses moringa flowers. Murunga Keerai Rotti, Murunga Keerai Adai and Murunga Elai Podi are great ways to make use of the nutrition-packed moringa leaves.

Ingredients used in Shevgyacha Shengachi Bhaji

Drumsticks or moringa pods (called ‘shevgyacha shenga‘ in Marathi) are the main ingredient in this curry. You will need 5-6 big ones, fresh and full of meat.

There are different ways to make Shevgyacha Shengachi Bhaji, the ingredients used undergoing changes in different households. The recipe I am sharing today is based on what I learnt from our family friend, the way they make it at their place.

We start out by cooking the drumsticks in some water, along with some salt and turmeric powder. Then, they are cooked some more in tamarind extract. The tamarind isn’t exactly a common addition in this curry, apparently, but our family friend uses it and so do I – I rather love the sourness it adds to the dish.

A paste is made using onions, ginger, garlic and tomatoes, with a little dried coconut and fried gram. The drumsticks are cooked with this paste for a while, with goda masala, a dash of jaggery for flavour, and some red chilli powder.

Many Maharashtrian families use kanda-lehsun masala – a dry blend of onion, garlic, ginger, dry coconut and other spices – in this dish. Our hostess suggested leaving it out if one does not have ready access to it, and I followed her advice.

Shevgyacha Shengachi Bhaji recipe

Here is how to make this curry. There are quite a few stages involved in the making of this dish, but the preparation is definitely not difficult.

Ingredients (serves 4-6):

1. 5 drumsticks

2. A small piece of tamarind

3. 1 medium-sized onion

4. 2 medium-sized tomatoes

5. A 1-inch piece of ginger

6. 5-6 garlic cloves

7. 2 tablespoons dessicated coconut

8. 1 teaspoon fried gram (‘pottukadalai‘ in Tamil)

9. 1/2 tablespoon + 1/2 tablespoon oil

10. Salt to taste

11. 1/2 teaspoon turmeric powder

12. 3/4 teaspoon cumin seeds

13. 2 pinches of asafoetida

14. Red chilli powder to taste

15. 3/4 teaspoon coriander powder

16. 2 teaspoons goda masala or to taste

17. 1/2 tablespoon jaggery powder or to taste

18. About 1 cup water or as needed

19. 1 tablespoon finely chopped coriander

Method:

Top left, centre and right: Steps 1, 2 and 3, Centre row, left, centre and right, bottom left: Step 4, Bottom right: Step 5

1. Soak the tamarind in boiling hot water for 10-15 minutes, for it to soften. Allow it to cool down enough to handle.

2. Remove the ends of the drumsticks and chop them into 2-inch pieces. Keep ready.

3. Now, we will prepare a paste that’s needed to make the curry. Peel and chop the ginger, garlic cloves and onion finely. Chop the tomatoes finely. Keep the dessicated coconut and fried gram ready.

4. Heat 1/2 tablespoon oil in a heavy-bottomed pan. Add in the chopped onion, ginger and garlic. Saute on medium flame for 2-3 minutes or till the onion starts browning. Now, add in the chopped tomato, along with a little salt and water. Saute on medium flame for 4-5 minutes or till the tomatoes are cooked and mushy. Add in the dessicated coconut and fried gram at this stage, and saute on medium flame for a minute. Switch off gas. Allow all the sauteed ingredients to cool down fully.

5. When completely cool, transfer all the sauteed ingredients to a mixer jar. Grind to a smooth paste. Keep aside.

Top left and right: Steps 6 and 7, Centre left and right: Steps 8 and 9, Bottom left and right: Steps 10 and 11

6. Using a little water, extract all the juice from the tamarind. Keep aside.

7. Heat 1/2 tablespoon oil in a heavy-bottomed pan. Add in the cumin seeds and asafoetida, and allow them to stay in for a couple of seconds. Then, add in the chopped drumsticks along with a little salt, turmeric powder and water. Mix well.

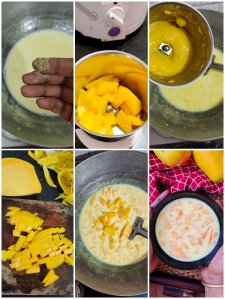
8. Turn the flame down to medium. Cook covered for 5-7 minutes or till the drumsticks are cooked through. You will need to uncover the pan intermittently to check on them, adding more water if needed. The drumsticks are done when they aren’t bright green any more and you are easily able to split them open with your fingers, as shown in the picture above (Centre row, left).

9. Once the drumsticks are cooked, add the tamarind extract to the pan. Mix well. Cook uncovered for 3-4 minutes.

10. Now, add the onion-tomato paste to the pan. Wash the mixer jar using about 1/2 cup of water, and add it to the pan. Mix well and cook on medium flame, uncovered, for 2-3 minutes.

11. Add salt and red chilli powder to taste. Mix well.

Top left and right: Step 12, Centre left and right: Step 13, Bottom left and right: Steps 14 and 15

12. Add goda masala and jaggery powder. Mix well.

13. Add in about 1/2 cup of water at this stage, or as needed to adjust the consistency of the gravy. Mix well. Cook on medium flame for 4-5 minutes or till the gravy thickens. Stir intermittently. Switch off gas when the gravy has thickened up, but is still slightly runny. Remember that it will thicken up further with time.

14. Mix in the finely chopped coriander. Your Shevgyacha Shengachi Bhaji is ready.

15. Serve the Shevgyacha Shengachi Bhaji warm along with rotis or rice.

Dietary guidelines

This Shevgyacha Shengachi Bhaji is made with minimal oil. It does contain jaggery, but you may skip it if you do not prefer using it.

This is a completely vegetarian and vegan recipe, which is suitable for people following a plant-based diet.

If you want to make this curry gluten-free, skip the asafoetida used in the tempering. Most Indian brands of asafoetida contain wheat flour and are best avoided when one is following a gluten-free diet. However, if you can find 100% gluten-free asafoetida, do go ahead and use it.

Tips & Tricks

1. Don’t overcook the drumsticks. Cook them till just done. They will cook further in the gravy.

2. Adjust the amount of water you use, depending upon the consistency of the gravy you require.

3. Do use the goda masala for that authentic Maharashtrian flavour. Do not substitute it with Punjabi garam masala – that has a completely different flavour profile. I have used home-made goda masala here.

4. You will be adding salt at different stages. Make sure you don’t add too much, or the gravy will become too salty.

5. I have used store-bought dessicated coconut here. You can grate a whole dry coconut (kopra) too, and use the shavings in the gravy. I prefer using only dessicated coconut in this recipe for the authentic taste. However, in a pinch, I think fresh grated coconut should work as well.

6. Adjust the quantity of tamarind as per personal taste preferences.

7. Adjust the quantity of red chilli powder depending upon how spicy your goda masala is.

8. Keep the gravy slightly runny because it tends to thicken up over time. If it gets too thick , before serving, add in a splash of water to loosen it and heat it up gently.

Did you like this recipe? Do tell me in your comments!

Mambazha Payasam| Aam Ki Kheer

Mambazha Payasam is a delicious kheer made using ripe mangoes, one of the best ways to use the fruit in the summer months. It is an easy-peasy dessert to make, too.

The season for mangoes is here, and I plan to use the ‘King of Fruits’ in as many dishes as possible. Mambazha Payasam (Tamil) or Aam Ki Kheer (Hindi) is one of my most favourite desserts using mangoes. Today, let me share with you all the recipe for this kheer, the way I make it.

Do try it out for the upcoming Tamil New Year or Vishu. I’m sure you will not be disappointed.

Mambazha Payasam or Mango kheer
Mambazha Payasam or Aam Ki Kheer

I have shared several other delightful recipes with ripe mangoes on my blog so far. You might want to take a look at them too.

Mambazha Pulissery| Mambazha Sambar| Fajeto| Mango Kesari| Ripe Mango Dip| Chilli & Mango Grilled Cheese Sandwich| Stuffed Mango Kulfi| Mango & Hung Curd Parfait| Mango Bruschetta| Ripe Mango Hummus With Sriracha| Mango Lassi| Fruit Custard

Kalyani’s Thai Yellow Mango Curry sounds so very delicious, I’m surely going to try it out this summer!

A look at the ingredients used

Mambazha Payasam is made by cooking milk till it reduces and thickens, after which ripe mangoes are mixed into it. Check the detailed recipe given below to understand how to go about this without the milk splitting.

Milk and mangoes are the two major ingredients in this payasam. Full-fat, dairy-based milk is preferred. The slow cooking of the milk renders it creamy and delicious and, along with ripe mango, it makes for a heavenly summer dessert.

Regular refined sugar is used to sweeten the payasam. A bit of saffron is added in for colour, as well as cardamom powder for flavouring.

Mambazha Payasam Recipe

I prepare the Mambazha Payasam on the lines of the Kheer Komola i.e. Bengali Orange Kheer that I had shared some time ago. That is another beautiful fruit-based payasam, you all!

The detailed recipe for Mambazha Payasam follows.

Ingredients (serves 4-6):

1. 1 litre full-fat milk

2. 6 tablespoons sugar or to taste

3. A pinch of saffron

4. 1/2 teaspoon cardamom powder

5. 2 medium-sized ripe mangoes

Method:

How to make Mambazha Payasam
Top left and right: Steps 1 and 2, Below top right: Step 3, Bottom right: Step 4, Bottom left: Step 5

1. Take the milk in a heavy-bottomed pan. Place it on high flame.

2. Allow the milk to come to a boil, then reduce heat to medium.

3. Add in the sugar. Mix well.

4. Drop in the saffron strands into the milk.

5. Continue to cook on medium heat till the milk reduces in volume to about half. You will need to stir intermittently to prevent sticking to the bottom of the pan. Scrape down the cream that forms on the sides of the pan, using a spatula, back into the milk. In 15-20 minutes, the milk would have reduced. Switch off gas at this stage.

How to make Mambazha Payasam
Top left: Step 6, Top centre and right, bottom left and centre: Step 7, Bottom right: Step 8

6. Mix in the cardamom powder. Now, allow the milk mixture to cool down completely.

7. When the milk mixture has cooled down fully, peel the 2 ripe mangoes. Chop the flesh of one into small pieces and add it to the milk. Chop the flesh of the other mango to pieces, grind coarsely in a mixer jar (or use your hands to make a rough puree) and add this to the milk too. Mix well. Your Mambazha Payasam or Aam Ki Kheer is ready.

8. Chill the kheer for at least a couple of hours in the refrigerator before serving.

Dietary guidelines

This kheer is made using milk from the dairy and is, therefore, NOT vegan. Vegans can use plant-based milk instead, I think, though I have never tried that out in this recipe.

This Mambazha Payasam is naturally gluten-free.

It uses refined sugar and is a high-calorie dessert, and is meant for occasional consumption in small amounts only, especially for people with diabetes and weight-watchers. I have not tried making this particular dessert with any alternative sweetener.

Tips & Tricks

1. Adjust the quantity of sugar you use depending upon how sweet the mangoes are.

2. Use mangoes that are completely ripe, sweet, fragrant and juicy. Do not use fibrous varieties of mango. Banganapalli and Kesar are my favourite varieties to use in this kheer.

3. The Aam Ki Kheer will thicken up upon cooling, so make sure you switch off the flame when it is still on the runnier side.

4. If the kheer gets too thick, you may dilute it using some boiled and cooled milk.

5. Use full-fat milk for best results. I have used Nandini full-cream milk here.

6. You can use a mixer to puree one mango or do the same using your hands. For best results, make a coarse puree – do not make a fine paste.

7. This Aam Ki Kheer is best prepared fresh and consumed on the same day of preparation.

8. Make sure you use a heavy-bottomed pan to cook the kheer.

9. This kheer tastes best after chilling for at least a couple of hours. Please plan ahead and schedule the preparation accordingly.

10. Allow the milk mixture to cool down completely before adding the mango to it, otherwise it might split.

11. I prefer using fresh ripe mangoes when in season. However, if you don’t have access to fresh mangoes where you live, you can use canned.

Did you like this recipe? Do tell me, in your comments!

Tomatillo Chutney| Mexican Husk Tomato Chutney

Tomatillo Chutney is a flavourful dip, South Indian style. It is a unique chutney made with the tomatillo fruit, a nice change from the usual varieties of chutneys we make regularly. I served it with idlis and dosas, and my family loved it to bits.

Read on to know more about the tomatillo and how to make this chutney.

Yummy Tomatillo Chutney

Tomatillos are not green tomatoes!

Native to Mexico, the tomatillo refers to a small green fruit enclosed in a papery husk. Also called ‘Mexican Tomatoes’ or ‘Mexican Husk Tomatoes’, tomatillos can be eaten raw or cooked. They are very sour, and cooking helps in reducing their tartness to some extent.

Tomatillos are quite a commonly used ingredient in Mexican cuisine, but not very easy to come across in India. When I found them at Namdhari’s some time ago, I knew I had to get them home to experiment. I was thrilled with the Tomatillo Chutney I made with some of the fruit – other experiments are underway!

How pretty are these tomatillos!

Tomatillos might look like small green tomatoes, but both are different. Tomatillos come with a husk which needs to be removed and discarded, while that is not so in case of tomatoes. Unripe tomatoes are green, and they turn red upon ripening – however, tomatillos continue to stay firm and green even when they ripen. Tomatillos are more tart than tomatoes, too. From what I have read and understood, both tomatoes and tomatillos belong to the same family, though.

Ingredients used in Tomatillo Chutney

I have prepared this Tomatillo Chutney on the lines of the Green Tomato Chutney that is popular in Andhra Pradesh. It needs just a few ingredients and is very simple to make, but turns out very delicious. I will also share the recipe for the Andhra-style Green Tomato Chutney on my blog soon.

Tomatillos are the star ingredient of this chutney. To even out their tartness, I have used onions, ginger, garlic and green chillies. Some jaggery has also been used.

A handful of fresh coriander is added in, to perk up the colour of the chutney as well as for extra flavour.

I kept the tempering for this Tomatillo Chutney simple – just some mustard, asafoetida and curry leaves.

Tomatillo Chutney recipe

Here’s how I made it.

Ingredients (serves 4-5):

1. 4 tomatillos

2. 1 medium-sized onion

3. A 1-inch piece of ginger

4. 4 cloves of garlic

5. 2 green chillis

6. A handful of fresh coriander

7. 1/2 tablespoon + 1/2 tablespoon of oil

8. Salt to taste

9. 1/2 tablespoon jaggery powder or to taste

10. 1/2 teaspoon mustard seeds

11. 2 pinches of asafoetida

12. 1 sprig of curry leaves

Method:

Top left and right: Steps 1 and 2, Centre left: Step 3, Centre right and bottom left: Step 4, Bottom right: Step 5

1. First, we will prep the tomatillos. Remove the outer husk and discard. Wash the tomatillos well to get rid of the waxy film on them. Then, cut the tomatillos into quarters.

2. Peel the ginger, garlic and onion and chop them up roughly. Chop the coriander and green chillies finely. Keep these prepared ingredients ready.

3. Heat 1/2 tablespoon oil in a pan. Add in the chopped onion, ginger and garlic. Turn the flame down to medium. Saute on medium flame for 2-3 minutes or till the onions start browning.

4. Add in the chopped tomatillos at this stage, followed by a little salt. Mix well.

5. Add a little water to the pan. Cook on medium flame for 4-5 minutes or till the tomatillos turn mushy.

Left top and bottom: Steps 6 and 7, Right top and centre: Step 8, Right bottom: Step 9

6. Add in the chopped coriander and green chilles at this stage. Mix well. Saute on medium heat for about a minute, then switch off gas.

7. Allow the mixture to cool down completely.

8. When the mixture has cooled down fully, transfer it to a mixer jar. Add in the jaggery and adjust the salt. Add a little more water if needed. Grind to a mostly smooth, slightly coarse chutney. Transfer the chutney to a serving bowl.

9. Now, we will prepare the tempering for the chutney. Heat 1/2 tablespoon oil in a small tempering pan. Add in the mustard, and let it sputter. Add in the asafoetida and curry leaves. Let them stay in for a couple of seconds, then switch off gas. Pour this tempering over the chutney in the serving bowl. Your Tomatillo Chutney is ready to serve, along with idlis, dosas, upma, vadas, rotis and the likes.

Dietary guidelines

This Tomatillo Chutney recipe is completely vegetarian and vegan. It is suited to people following a plant-based diet.

To make this chutney gluten-free, skip the asafoetida used in the tempering. Most Indian brands of asafoetida contain wheat flour and are, therefore, best avoided when following a gluten-free diet. However, if you find 100% gluten-free asafoetida, do go ahead and use it.

This recipe for Tomatillo Chutney contains very little oil and zero coconut. It is made using onions and garlic, but you can also skip these ingredients if you do not prefer adding them (see the ‘Tips & Tricks’ section of this post for details).

Tips & Tricks

1. Do not use more than the specified number of tomatillos. They are very tart, and this can make the chutney very sour. It is for this reason that no tamarind or other souring agents are used in the making of this chutney.

2. Adjust the number of green chillies you use as per personal taste preferences.

3. You may skip the jaggery if you do not prefer using it, but I strongly recommend adding it. The jaggery rounds off the other flavours beautifully.

4. If you do not prefer using onion and garlic, you may skip them. However, in that case, you might want to add in about a tablespoon of peanuts and some sesame seeds to add some bulk to the chutney and even out the tartness of the tomatillos. A little bit of fresh coconut can also be used.

5. You may add in some mint leaves along with the coriander. This also gives a lovely taste to the chutney.

6. Do not add too much water while grinding the chutney. Add just enough to help in the process of grinding.

7. We prefer keeping this Tomatillo Chutney mostly smooth, only slightly coarse. However, you can keep the texture as per your personal preferences.

8. Sesame oil (‘nalla ennai‘ in Tamil) tastes best in this chutney. However, if you don’t have it, you may use any other oil of your choice.

9. You may also add in a ripe red tomato, along with the tomatillos. This also adds a beautiful flavour to the chutney.

10. The same kind of chutney can be made using green (unripe) tomatoes. You might have to add in a little tamarind in that case.

11. Any leftover chutney can be transferred to a clean, dry, air-tight box. Refrigerated, it stays for 3-4 days.

Did you like this recipe? Do tell me, in your comments!