Sigappu Keerai Kootu| Red Amaranth Greens In Lentil Gravy

A crucial part of Tamilian cuisine, kootu refers to a mildly spiced dish cooked using vegetables and lentils. Kootu is most often made using mixed vegetables or leafy greens, along with moong dal, though there are variations from one family to another. Coconut may or may not be used in kootu, though most commonly it is.

Today, I am sharing our family recipe for Sigappu Keerai Kootu or kootu made using red amaranth greens.

A closer look at Sigappu Keerai Kootu

Like I was saying earlier, this kootu is made using the very nutritious red amaranth greens (called ‘sigappu keerai‘ or ‘sengeerai‘ in Tamil). This recipe uses moong dal and a freshly ground coconut paste, which takes the flavour quotient quite high.

It is made without any onion or garlic and is, hence, suitable for consumption on festivals and other auspicious occasions. It wouldn’t be wrong to term this as a Sattvic dish i.e. food made using fresh, seasonal produce sans refined products, genetically modified ingredients, not overly spiced or fried. Speaking of Sattvic food, I am absolutely loving the many interesting recipes my fellow blogger Poonam has on her blog. Her Achari Aloo post has my heart!

This Sigappu Keerai Kootu is a simple, rustic dish at heart but ultimate comfort food. Pair this kootu with some steaming rice and melted ghee, and it is food nirvana!

If you are considering including more red amaranth in your diet, you should check out this delicious pulav I used it in!

How to make Sigappu Keerai Kootu

Here is how we go about it.

Ingredients (serves 4-6):

1. A big bunch of red amaranth greens (sengeerai or sigappu keerai), about 3 cups when chopped

2. 1/2 cup moong dal

3. 1/2 cup fresh coconut pieces

4. 2 teaspoons cumin seeds

5. 4 dry red chillies or as per taste + 2 more for tempering

6. 1/2 tablespoon + 1/2 tablespoon oil

7. 1 teaspoon mustard seeds

8. 2 pinches of asafoetida

9. Salt to taste

Method:

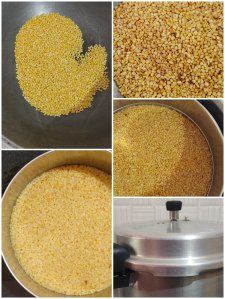
1. Wash the red amaranth greens thoroughly under running water, to remove any dirt from them. Place in a colander and let all the water drain out. Similarly, wash the moong dal well and drain out all the water from it.

2. Take the washed and drained moong dal in a wide vessel. Add in just enough water to cover the dal. Place the vessel in a pressure cooker. Pressure cook on high flame for 4 whistles or till the moong dal is completely cooked and soft. Let the pressure release naturally.

3. In the meantime, chop the red amaranth greens finely. I had about 3 cups of greens when finely chopped. Keep ready.

4. When the pressure from the cooker has completely gone down, get the cooked moong dal out. Mash the dal thoroughly. Keep it ready.

5. Take the fresh coconut pieces in a small mixer jar. Add in 4 dry red chillies (broken roughly) and the cumin seeds. Grind to a slightly coarse paste, using a little water. Keep aside.

6. Now, heat 1/2 tablespoon oil in a heavy-bottomed pan. Add in the finely chopped red amaranth, along with a bit of salt. Saute for a minute, then add a little water.

7. Cook the red amaranth for 4-5 minutes on medium flame or till it is completely cooked. If the water dries out, add some more.

8. When the greens are cooked through, add in the cooked and mashed moong dal, salt to taste and the ground coconut paste. Also, add about 3/4 cup water or as needed to adjust the consistency of the dish. Keep the flame at medium only. Mix well.

9. Cook everything together on medium flame till it starts bubbling, 3-4 minutes. Reduce the flame further and simmer for a minute more. Switch off gas at this stage.

10. Now, we will prepare the tempering. Heat 1/2 tablespoon oil in a small tempering pan. Add in the mustard seeds and allow them to sputter. Turn down the flame to low and add in the asafoetida and 2 dry red chillies. Let the ingredients stay in for a few seconds, taking care not to burn them. Add this tempering to the greens-lentil mixture we prepared earlier. Cover and keep for a few minutes, then your Sigappu Keerai Kootu is ready to serve. Serve it hot or at room temperature, with rice.

Is this recipe vegan and gluten-free?

This Sigappu Keerai Kootu is completely vegetarian and vegan, suited to those following a plant-based diet.

This recipe is not entirely gluten-free because of the use of asafoetida. Most Indian brands of asafoetida contain some amount of wheat flour, so they are best avoided when one is following a gluten-free diet. If you want to make this dish gluten-free, simply skip the asafoetida used in the tempering here. However, if you can find 100% gluten-free asafoetida, you can definitely go ahead and use it.


Tips & Tricks

1. Any greens can be used in place of the red amaranth I have used here. Use the same proceedure for the other greens.

2. Adjust the quantity of dry red chillies as per personal taste preferences. I have used 4 mildly spiced Bydagi chillies here. This kootu is supposed to be mildly spiced.

3. Adjust the quantity of coconut and moong dal as per personal taste preferences.

4. Some people pressure cook the greens and moong dal together. We saute the greens separately, as we prefer not to overcook them.

5. We don’t usually use turmeric powder in this kootu, but you may if you prefer it.

6. A little urad dal and a sprig of curry leaves can be used in the tempering too. We usually don’t.

7. Adjust the quantity of water you use, depending upon the consistency of the kootu you require.

8. Make sure the moong dal is well cooked, before using it in making the kootu.

9. Keep the Sigappu Keerai Kootu slightly runny. It thickens up after cooking, with time.

Did you like this recipe? Do tell me, in your comments!

Turnip Poriyal| South Indian Turnip Curry

Turnip Poriyal refers to a South Indian-style stir-fry made using turnips (duh!). Today, I am going to share with you all our simple family recipe for this delicious poriyal.

Turnip Poriyal, Tamilnadu style

Turnips in South Indian cooking

Turnips (aka ‘shalgam’ in Hindi) possess a pungent smell and slightly sharp taste, similar to radishes. Stir-frying them does away with most of the pungency, and the resultant poriyal is quite delicious. If you haven’t tried Turnip Poriyal yet, you should – most people would find it difficult to guess the vegetable used in the dish, if they haven’t seen it being made. 😊 Turnips are full of health benefits, as this Healthline article suggests, and this poriyal is a great way to use them.

I have seen turnips being commonly used in kurma, sambar and vegetable biryani in South India, apart from poriyal. This Turnip Poriyal is a family favourite, and we love having it with rice and rasam or sambar.

The purple and white turnips that I used. Ain’t they pretty?!

I have used the purple-and-white variety of turnip to make this poriyal. Here in Bangalore, we mostly get the similar, green knol-khol or kohlrabi, also called German Turnip. The purple-and-white one is available only occasionally. I love to cook with the purple-and-white turnips, considering they are much more easier to peel and chop than the green ones. So, when I found them at the vegetable shop recently, I absolutely had to get some! They looked so stunningly beautiful that I just had to shoot them before cooking. 😁

What goes into this Turnip Poriyal?

This is a very simple stir-fry that requires only a few ingredients. I use minimal oil to make it.

There is a basic tempering of mustard, asafoetida, green chillies and curry leaves. This poriyal turns out mildly spiced, because green chillies are the only ingredient used to introduce heat.

Like most South Indian poriyal varieties, there is a generous amount of grated coconut added to this one too. This, along with the bit of jaggery I use, adds a whole lot of flavour to the dish.

How to make Turnip Poriyal

Here is how to go about it.

Ingredients (serves 2-4:

1. 2 medium-sized turnips, roughly 3 cups when peeled and chopped

2. 2 green chillies

3. 1 sprig of curry leaves

4. 1/2 tablespoon oil

5. 3/4 teaspoon mustard seeds

6. 2 pinches of asafoetida

7. Salt to taste

8. 3/4 tablespoon jaggery powder or to taste

9. 1/2 cup fresh grated coconut

10. 1 tablespoon finely chopped coriander

Method:

Top left and right: Steps 1 and 2, Below top right: Step 3, Bottom right and left: Steps 4 and 5

1. Chop off the tops and ends of the turnips. Peel them.

2. Chop the peeled turnip finely. Also slit the green chillies length-wise and keep them ready.

3. Heat the oil in a heavy-bottomed pan. Add in the mustard seeds and let them sputter. Then, add in the asafoetida, slit green chillies and curry leaves. Let them stay in for a couple of seconds.

4. Now, add the chopped turnip to the pan, along with a little water and a bit of salt. Mix well. Turn the flame down to medium.

5. Cover and cook on medium flame for 3-4 minutes or till the turnip starts getting tender. Uncover intermittently to stir. If the water has dried up, add a bit more.

Left: Step 6, Right top and bottom: Step 7

6. When the turnip is about 80% done, add salt to taste and jaggery powder. Add some more water if needed. Cover again and continue to cook on medium flame for 3-4 more minutes or till the turnip is completely done. Stir intermittently.

7. When the turnip is done and all the water has dried up, add in the grated coconut. Mix well. Cook everything together for a minute, then switch off heat. Your Turnip Poriyal is ready. Garnish with the finely chopped coriander.

Is this Turnip Poriyal vegan and gluten-free?

The above recipe is completely vegetarian and vegan, suited to those following a plant-based diet.

It is not gluten-free because of the addition of asafoetida. Simply skip the asafoetida used in the tempering, in case you want to make this dish gluten-free. Most Indian brands of asafoetida contain wheat flour to a lesser or greater extent and are, therefore, best avoided when one is following a gluten-free diet.

Tips & Tricks

1. I have used purple-and-white turnip here. You may use the more commonly available German Turnip (also called knol-khol or kohlrabi) instead. You can use radishes to make poriyal in a similar manner, too.

2. You may skip adding the jaggery, but I personally recommend using it. It helps cut down the pungency of the turnip to a great extent, and makes the poriyal very flavourful.

3. Adjust the quantity of coconut you use as per personal taste preferences. Use fresh, grated coconut for best results.

4. You may add a couple of dry red chillies to the tempering too. Here, I haven’t.

5. We don’t usually add turmeric to this poriyal, as we prefer keeping it white. You may use turmeric, if you prefer it.

6. Do not add too much water while cooking the turnip. Just add a few tablespoons to help with the cooking process. Cook covered.

Did you like this recipe? Do tell me in your comments!

Pasi Paruppu Payasam| Moong Dal Kheer

The festive season is now in full swing in India. We just celebrated Varamahalakshmi Pooja, Onam and Raksha Bandhan, and Janmashtami is just around the corner. Today, I’m going to share with you all the recipe for Pasi Paruppu Payasam, a delicious kheer you can prepare for the upcoming festivities.

Pasi Paruppu Payasam or Moong Dal Kheer

Janmashtami, in different parts of India

Janmashtami, the birthday of God Krishna, is celebrated with great aplomb in most parts of India.

In Gujarat, where I grew up, it is customary to offer Dhania Panchajeeri as prasad on the occasion of Janmashtami. Milk, ghee and butter are also common offerings as it is believed that baby Krishna absolutely adored dairy products. The same goes for poha aka beaten/flattened rice. Many observe a fast on the day of the festival, only consuming dishes like Sabudana Khichdi, Rajgira (amaranth) pooris and no-onion, no-garlic aloo sabzi (called ‘farali‘ in Gujarati and Hindi).

In South India too, dishes made using poha (‘aval‘ in Tamil) and/or liberal amounts of milk, butter and ghee are offered as prasad on the occasion of Janmashtami. Various other sweets and savouries are also prepared for the festival, like vada, seedai, thattai, murukku, appam, laddoo and different types of Payasam (kheer). In case one is unable to prepare an elaborate spread, navaneetam (white butter mixed with sugar) and sukku vellam (jaggery mixed with dry ginger powder) are the simplest of prasad one can offer.


What is Pasi Paruppu Payasam?

Pasi Paruppu Payasam is a festive sweet delicacy quite common in Tamilnadu, Kerala and Karnataka. It refers to kheer made using moong dal (‘payatham paruppu‘ or ‘pasi paruppu‘ in Tamil). It is a super easy dessert that even a beginner cook can ace. It is an extremely delicious thing, too! No wonder it finds pride of place on our dining table on many a festive occasion! 😊

We prepare Pasi Paruppu Payasam without milk, with freshly ground coconut added in for flavour and creaminess. Mom adds raisins and cashewnuts fried in ghee, but I have skipped that in a bid to make the payasam vegan. Jaggery is used in this payasam instead of refined sugar.

So, this particular Pasi Paruppu Payasam is not just simple to make and delish, but also completely vegan (plant-based) and gluten-free. What more do you need from a sweet dish, eh?

How I make Pasi Paruppu Payasam

Here is how I go about it.

Ingredients (serves 4):

1. 3/4 cup moong dal

2. 1 cup jaggery

3. 3/4 cup fresh grated coconut

4. 10-12 cashewnuts

6. 1/2 teaspoon cardamom powder

Method:

Top left and right: Steps 1 and 2, Below top right: Step 3, Bottom right: Step 4, Bottom left: The moong dal is cooked and ready

1. Dry roast the moong dal on medium flame in a heavy-bottomed pan for about 2 minutes or till it becomes fragrant. Switch off gas.

2. Immediately transfer the roasted moong dal to a plate. Allow it to cool down completely.

3. Transfer the roasted and cooled moong dal to a wide vessel. Add in 2 cups of water.

4. Place the vessel in a pressure cooker. Pressure cook on high flame for about 4 whistles or till the moong dal is completely cooked. Let the pressure release naturally.

Top left and right: Steps 5 and 6, Bottom left: Step 7, Below top right and bottom right: Step 8

5. When the pressure has fully gone down, get the cooked moong dal out. Mash it well.

6. Transfer the mashed moong dal to the same heavy-bottomed pan we used earlier. Place on medium flame and allow to cook for 2-3 minutes. Stir intermittently.

7. Now add the jaggery to the pan. Continue to cook on medium flame for 2-3 more minutes. Stir intermittently.

8. Meanwhile, grind the grated coconut to a paste, along with a little water. Keep it ready.

Top left: The moong dal and jaggery mixture coming together, Top right and below: Steps 9 and 10, Bottom right: Step 11, Bottom left: Step 12

9. When the moong dal and jaggery mixture has started to thicken and come together, add in the ground coconut paste. Mix well.

10. Cook for about 2 minutes more on medium flame or till the mixture thickens to the consistency you require. Switch off gas.

11. Mix in the cardamom powder.

12. Chop up the cashewnuts roughly. Toast them lightly in a small pan till they turn crisp, taking care not to burn them. Add the toasted cashewnuts to the pan. Mix well. Your Pasi Paruppu Payasam is ready to serve. Serve it hot or at room temperature, as per personal taste preferences.

Other festival recipes on the blog

There are several festival-special recipes on my blog already.

You might want to visit my recipes for Pottukadalai Maa Laddoo, Verkadalai Ladu, Walnut Laddoo, Carrot Payasam, Semiya Payasam, Aval Payasam, Oat Milk Payasam, Elaneer Payasam, Nei Payasam, Rava Kesari, Pineapple Kesari Bath, Strawberry Kesari Bath and Vella Payaru.

Speaking of festival recipes, I’m completely in love with Narmadha’s Madurai Special Bhai Ice Cream! Can’t wait to try it out.


Tips & Tricks

1. Roast the moong dal carefully, ensuring that it does not get burnt. Roast it on a medium flame, just enough to make it fragrant. Some people skip this step and pressure cook the moong dal directly, but I prefer roasting it first.

2. Use a heavy-bottomed pan for best results.

3. I have used organic jaggery here, which does not have any impurities. If the jaggery you are using has impurities, dissolve it in a little warm water first, filter out the impurities and then add it to the pan. The colour of the Pasi Paruppu Payasam depends upon the colour of the jaggery you use.

4. Sugar can be used in place of the jaggery. We have always used jaggery in this Payasam in our family, and I prefer to do so. Adjust the quantity as per your family’s taste preferences.

5. Ready-to-use coconut milk can be used in place of the freshly ground coconut I have used here. You can also filter out the coconut residue and use just the milk in the payasam – I prefer using all of it.

6. If you are not averse to ghee, you may fry some raisins and cashewnuts in it and add this to the payasam, at the very end, when it is done cooking. Do not do this if you want the payasam to be vegan, though.

7. I have used ready-to-use powdered jaggery here. If you are using a jaggery block, powder it before beginning of make the payasam.

8. I powder a few tablespoons of green cardamom in my small mixer jar, along with their skins, store this in an air-tight jar and use as needed. Alternatively, you could use store-bought cardamom powder.

9. You can keep the consistency of the Pasi Paruppu Payasam as thick as you prefer. Remember to switch off the gas when it is still a bit runny, as it thickens up with time.

10. Some families add in milk to the payasam, to make it richer and more flavourful. If you are using milk, add it at the very end, after the payasam has been taken off the heat. Use boiled and cooled milk so that it doesn’t curdle in the presence of the jaggery used.

Did you like this recipe? Do tell me, in your comments!

Spongy Soft Aval Dosai| Poha Dosa

This Aval Dosai recipe yields the softest of dosas, extremely delicious ones at that. It is a slight deviation from the way we usually make dosa batter, something I learnt from my aunt years ago and fell in love with at first bite.

Aval Dosai aka Poha Dosa

What is Aval Dosai?

These are dosas that have aval (Tamil for poha, aka ‘flattened rice’ or ‘beaten rice’) added to the batter. The poha makes the dosas very, very soft and adds to their taste as well.

These dosas go beautifully with any sort of accompaniment really – Coconut Chutney, Milagai Podi, Udupi Sambar or this Aati Kachina Thakkali Kozhambu. They stay soft for hours, even when packed in a box, which makes them perfect for school/office lunch packs, picnics or any sort of travel.

What goes into the Aval Dosai batter?

The batter for these dosas is made using a mix of the fat rice that is commonly called ‘idli rice’ and the thinner variety used for regular cooking, which is called ‘raw rice’. I have used Sona Masoori raw rice here.

Urad dal and some fenugreek (methi) seeds are added to the batter too, both of which contribute to the fluffiness of the dosas. Then, there’s the aval (poha or flattened rice) that goes in too, as mentioned above, with a couple of green chillies for flavour.

The rice and lentils are soaked, then ground together and fermented, just like regular dosa batter. This is, therefore, not an instant dosa recipe. To make the Aval Dosai, a couple of ladles of the batter are poured on a hot pan, which is cooked covered.

How to make Aval Dosai?

Here is how I go about it.

Ingredients (makes about 15 dosas):

  1. 1 cup idli rice
  2. 1 cup raw rice
  3. 1/2 cup urad dal
  4. 1/2 teaspoon fenugreek (methi) seeds
  5. 1/2 cup beaten rice (aval or poha)
  6. Salt to taste
  7. 1 green chilly (optional)
  8. Oil, as needed to make the dosas

Method:

Top left: The rice, poha, urad dal and fenugreek seeds, soaked and drained, Top right and centre row: The batter being ground, Bottom left: The batter, ground and ready, Bottom centre: The batter being salted, Bottom right: The batter, set aside for fermentation

1. Wash the idli rice and raw rice well under running water. Drain out all the excess water. Add in enough fresh water to cover the rice fully. Soak for 8-10 hours or overnight.
2. Similarly, soak the urad dal and fenugreek seeds together.
3. Soak the beaten rice or poha separately for an hour or so.
4. When everything is done soaking, drain out the water.

5. Grind the urad dal and fenugreek seeds first, along with the green chilly (chopped, if using) and the soaked poha. Use a little water to help with the grinding, as needed. When ground to a smooth batter, transfer to a large vessel.
6. Now grind the boiled rice and raw rice smoothly. Add a little water, as needed, to grind. Transfer to the same large vessel.
7. Add salt to the batter and mix well with your hands. Let it sit covered, undisturbed, in a warm place for 5-6 hours or till it ferments.

Top: The fermented batter, Bottom left and right: The Aval Dosai being prepared

6. Once the batter ferments, mix gently. It is ready to make dosas. You can either use it to make dosas immediately or keep it refrigerated for later use.
7. When you want to make the dosas, get a thick pan nice and hot. Then reduce the flame to medium, and place about 2 ladlefuls of the batter on the centre of a hot pan. Do not spread out the batter. Just spread some oil around it, and cook the dosa covered for a minute on medium flame. Then flip the dosa and cook uncovered on the other side. Done! Serve hot (preferably) or at room temperature, with any accompaniment of your choice.

8. Prepare dosas from all the batter in the same way.

Are these dosas vegan and gluten-free?

Yes, absolutely!

They are completely vegetarian and vegan, suited to those following a plant-based diet. They are entirely gluten-free as well.

Other dosa varieties on the blog

There are several other dosa varieties on the blog already, which you might be interested in checking out – Masala Erra Karam Dosa| Masala Dosa| Rava Dosa| Mysore Masala Dosa| Thavala Dosai| Broccoli Masala Dosa| Paneer Masala Dosa| Spring Dosa| Instant Ragi Onion Dosa| Oats Dosa| Open Butter Masala Dosa

Speaking of dosas, I’m a huge fan of the healthy versions that Kalyani of Sizzling Tastebuds whips up, with ingredients like millets, red rice and Rajamudi rice. See, for instance, this Ragi & Foxtail Millet Dosa, with zero rice – I’m so going to try this out soon!

Tips & Tricks

1. Adding the green chilly to the batter is completely optional. Feel free to skip it if you do not prefer using them. It does add a lovely flavour to the dosas, though.

2. I have used 1 cup each of idli rice and raw rice (Sona Masoori) here. You may use any variety of raw rice.

3. I have used whole white urad here. Split urad can be used instead, too.

4. I have used the thin variety of poha here. You may use the thicker variety instead, too.

5. Do not forget to mix the batter using your hands, after salting it. This helps in kick-starting the process of fermentation.

6. Make sure the batter is well fermented before proceeding to make the Aval Dosai.

7. This batter yields best results when it is not spread out and is cooked covered on one side. You may use an iron pan, a cast iron one or a non-stick pan, as you prefer.

8. Unused batter can be refrigerated for upto 3 days, for best results.

9. I have not tried making idlis using this batter, but I have a feeling they would turn out well too.

10. Add just enough water while grinding. Remember that the batter should be moderately thick in consistency – neither overly thick nor too watery.

Did you like this recipe? Do tell me, in your comments!

Baked Beans| How To Make Baked Beans From Scratch

Baked beans spell out ‘holidays’ to me. Over years of travelling, I have come to expect baked beans as part of the breakfast buffet at most resorts. A bite of warm toasted bread dipped into the saucy goodness of baked beans and the feeling hits me – ‘I’m on a holiday!’ 🙂 I do love myself a well-made bowl of the beans, oh so comforting.

My craving for baked beans extends beyond holidays and breakfast buffets at resorts, though, so I taught myself to make them from scratch at home. Ready-to-use tins from departmental store shelves aren’t really my thing. I made some baked beans recently, because the chilly weather in Bangalore warranted it, and I’m here to share my recipe for the same. Interested? Read on!

Home-made baked beans from scratch

What are baked beans?

‘Baked beans’ refers to a delicious dish that is made using dry beans, cooked in a rich tomato sauce. Traditionally, the beans would be parboiled, then baked in the tomato sauce for a long time, allowing the flavours to seep in – this is where the dish gets its name from. Baked beans as we know them are believed to have been popularised in the USA by Heinz in the 1800s, though its actual origins might date far before this.

As the popularity of the dish increased beyond borders, many different versions emerged. Today, different countries make baked beans in their own way, with different types of beans and other ingredients being used. Cooking techniques also underwent a change. The cans of beans commonly available in supermarkets today (like Heinz) are not baked, from what I understand, but go through a steaming process. They can be eaten hot or at room temperature, preferably with toasted bread, while some also like eating it on its own.

My version of baked beans

The recipe I am sharing today is a stove-top one, developed after several trials and errors. This is a vegetarian version, unlike the several non-vegetarian variants of baked beans eaten throughout the world. It is not vegan (plant-based), but it is gluten-free. Also, while the USA and UK typically use white beans (aka navy beans or haricot beans) in this dish, I have made it using the more ubiquitous black-eyed peas. I have also used very Indian ingredients in my version, as well as dried Italian herbs for seasoning.

I’m definitely not claiming that this is an authentic recipe. It is something I put together based on the ingredients listed on ready-to-eat tins and from my experiences eating the dish at hotels several times over. The black-eyed peas (also called ‘cowpeas’) make for a great (and cheaper) substitute for white beans, and I think the dish tastes just as lovely made at home as the ones I have had while on vacations.

Monsoon treats for the Shhh Cooking Secretly Challenge

I am sharing this recipe in association with the Shhh Cooking Secretly Challenge.

The Shhh Cooking Secretly Challenge is undertaken by a group of passionate food bloggers, who share recipes based on a pre-determined theme every month. Group members are paired together every month, with each pair exchanging two ingredients secretly. These two ingredients are then used by each pair to create a dish that fits the month’s theme.

The group theme for July was ‘Monsoon Treats’, wherein members are sharing dishes that are best eaten hot during the rainy season. It was Shobha ji, author of Shobha’s Food Mazaa, suggested the theme the month. I am loving the healthy Drumstick Soup that Shobha ji has shared for the theme – can’t wait to try it out!

For the July theme, I was paired with Mayuri ji, the very talented blogger behind Mayuri’s Jikoni. She prepared this beautiful Warm Mexican Corn Salad for the theme. Mayuri ji suggested that I use tomato and garlic to create my dish, and I decided to use them to make my beloved Baked Beans.

How to make baked beans from scratch

Here is how I go about it. It is a simple proceedure that does not require too much time.

Ingredients (serves 3-4):

1. 1 cup dry black-eyed peas

2. 4 medium-sized tomatoes

3. 1 medium-sized onion

4. 5-6 cloves of garlic

5. A finger of butter

6. 1-1/2 tablespoons cornflour

7. Salt to taste

8. Red chilli powder to taste

9. 3/4 tablespoon jaggery powder

10. Dried Italian herbs as needed

11. 2 tablespoons tomato ketchup

Method:

Top left and right: Steps 1 and 2, Below top right: Step 3, Bottom left and right: Step 4

1. Soak the black-eyed peas in enough water for 8-10 hours or overnight. When they are done soaking, drain out all the water from them.

2. Transfer the drained black-eyed peas to a wide vessel. Add in about 1-1/2 cups of water – the level of the water should be about an inch higher than the peas. Place the vessel in a pressure cooker. Pressure cook on high flame for about 4 whistles. Let the pressure release naturally.

3. Peel the garlic cloves and onion. Chop the garlic and onion finely. Keep aside.

4. Chop the tomatoes roughly. Grind into a fine puree. Keep aside.

Top left: Step 5, Bottom left and top right: Step 6, Below top right: Step 7, Bottom right: Step 8

5. Take the cornflour in a small cup and add in about 2 tablespoons of water. Mix to make a lump-free slurry. Keep aside.

6. Heat the butter in a heavy-bottomed pan. Add the finely chopped onion and garlic. Saute on medium flame till the onion starts browning.

7. Add in the tomato puree, still keeping the flame at medium. Add in a little salt. Cook on medium flame for 4-5 minutes or till the raw smell of the tomatoes goes away. Add salt and red chilli powder to taste.

8. Add in the cooked black-eyed peas, along with the water they were cooked in.

Top left and right: Steps 9 and 10, Below top right: The baked beans thickened up, Bottom left and right: Step 11

9. Add jaggery powder. Mix well. Cook on medium flame for about 2 minutes.

10. Add in the cornflour slurry, stirring constantly. Continue to cook on medium flame for 2-3 more minutes or till the mixture thickens. If it gets too thick, add a little water. Switch off gas when the mixture is still a little runny, as it thickens up further later.

11. Mix in the dried Italian herbs and tomato ketchup. The Baked Beans are ready. Serve hot with toasted bread.

Tips & Tricks

1. I have used black-eyed peas, also called cowpeas, instead of the white beans typically used in this dish. Some varieties of black-eyed beans cook really fast, while some take longer. You might need to experiment with cooking times to figure out exactly how long. These beans I had took 4 whistles on a high flame after overnight soaking.

2. Remember that the beans need to be cooked through but not overly mushy. Overcooked beans might spoil the taste of the dish.

3. You may use fresh black-eyed peas (or any other variety of beans) instead of the dried ones I have used here. In that case, no soaking is required. Just cook the fresh beans directly.

4. I have used country (Nati) tomatoes here, instead of the ‘farmed’ version. I like the light sour taste they impart to the dish. If you don’t find country tomatoes, you may use regular farmed ones instead.

5. I have used onions here, instead of which you may use onion powder. I prefer finely chopped onions.

6. I have used red chilli powder here, instead of which you may use paprika (or smoked paprika). Adjust the quantity you use as per personal taste preferences.

7. I have used dried Italian herbs by Keya as we love it in this dish. To make an Indianised version, you may add a bit of roasted cumin and coriander powder or a dash of garam masala. Some even add in soya sauce or Worcestershire sauce, both of which I don’t use.

8. Sugar can be used instead of the jaggery I have used here. Adjust the quantity as per personal taste preferences.

9. Do remember that the mixture continues to thicken up even after the cooking stops. Hence, switch off gas when the mixture is still on the runnier side.

10. I have used home-made tomato ketchup here. You may use a store-bought version instead. Adjust the quantity you use as per personal taste preferences.

11. Use oil instead of butter to make this dish vegan (plant-based).

12. I have used cornflour here to thicken the baked beans. I think wheat flour would work just as well, though I have never tried that out. Do not use wheat flour if you want to create a gluten-free dish.

Did you like this recipe? Do tell me, in your comments!