PinStove: Home-Cooked Food At Your Doorstep

Imagine this situation.

You’ve been quite busy. Now, you are extremely tired and stressed out. Or you are unwell. And hungry. You are in no mood to cook, but you want something warm and nice to eat. What would you do? Order in from the nearest restaurant?

How would you feel if someone offered you comforting home-cooked food then? That is precisely where PinStove comes in.

What is PinStove?

PinStove, a very new entry in the foodie world in Bangalore, is a food delivery app with a difference. They offer doorstep delivery of fresh, home-cooked food at a nominal delivery charge. You get to choose the dishes you want to order, from any of the home cooks in your immediate surroundings.

How does PinStove work?

PinStove works on building relationships with home cooks across Bangalore (and Trivandrum, the only other place where these services are available, as of now). These home cooks can display the food they want to sell on the PinStove app, which are usually available at very reasonable rates. Main course for lunch and dinner, snacks, desserts, breakfast as well as bakery items are on offer on PinStove.

As a user, this is what you need to do, to order from PinStove:

  1. Download the app on your phone.
  2. Set your location.
  3. The home cooks in their network in your vicinity will show up. Choose the chef you want to work with and the food you would like delivered.
  4. Confirm the order. At a flat rate of INR 35, you can get the home-cooked food of your choice delivered to your home. You will be shown the approximate time it would take for the food to reach your place. You also have the option of pre-booking your meal.

My experience with PinStove

I ordered food twice from PinStove, from two different home chefs, at two different times.

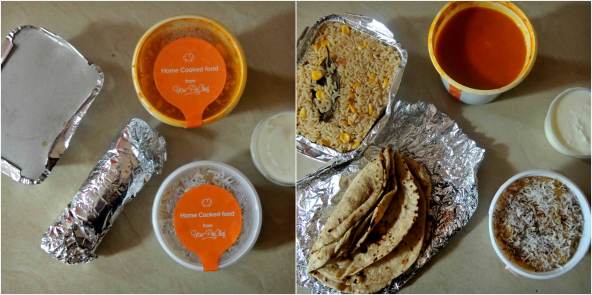
The first time, I ordered lunch – phulka rotis, mutter paneer, corn pulao and sheera. All the food was delivered piping hot to our place, well packed, well within the specified time limit.

The phulkas were a tad thicker than the ones we are used to, but still, definitely not bad. The mutter paneer was a little watery, but the taste was lovely. The corn pulao was beautiful, very well done. The curd that accompanied the pulao was thick, but a tad sour. The sheera was lovely, both in looks and taste, garnished with dry fruits and nuts and dried coconut flakes.

The food was definitely homely, a far cry from the greasy, creamy stuff you get in restaurants usually.
BeFunkyCollage
Left: The lunch that we ordered from PinStove, the first time; Right: That’s what the phulka rotis, curd, mutter paneer, corn pulao and sheera looked like

The second time over, I ordered some evening snacks – onion pakoras and sabudana khichdi. By the time the food reached my place, some of the packages had opened, food had spilt and gotten mixed up. The sabudana khichdi had been packed while really hot, and had got congealed into one big mass. We could salvage only very little food from that order – a real bummer when you are hungry and tired.

There were issues with the packaging, maybe, or the food got jolted a bit too much during the delivery – I am not sure. I wish such issues are resolved.

DSCN1109
The food that arrived all mixed up, the second time around

My thoughts about PinStove

  1. The app is a little cumbersome to use. I had to fidget with it to place an order initially, but then I got the hang of it. That could be because the platform is very new. In time, I hope the interface is worked upon to become more user-friendly.
  2. There are very few home cooks I could see tied up with PinStove in my vicinity. I am guessing that with time, as more chefs get on board, customers would have a lot more to choose from.
  3. I really loved the concept of PinStove, and I think it would be a boon to health-conscious individuals who are in a time crunch. Using PinStove also means supporting home chefs, giving them a respectable identity, helping them earn some extra bucks, which I love.
  4. Both the times we ordered from PinStove, the delivery was within the specified time limit. The food was delivered piping hot.
  5. The first time I ordered from PinStove, the food was really well packed and arrived home in perfect condition.  The second time around, our experience wasn’t all that great. That said, I believe this is something that can happen while ordering from anywhere, restaurants included. I would still love to order from them, because I love the concept of getting home-cooked food delivered at my doorstep.
  6. The food is usually delivered in plastic containers, as is usually the case with home delivery of food. I understand this is for ease of packaging and transit, as well as budget factors, but it would be great if PinStove could introduce eco-friendly packaging as well. I’m not sure if that would work out within the price range they offer, but one can hope, can’t they?
  7. I found the price of the food to be quite reasonable. The first order cost about INR 400 and the second one INR 170, both including delivery charges.

So, the next time you are hungry and unable to cook at home, you know where to turn to! Do try out PinStove!

I was approached by PinStove for an honest review about the app, and that is exactly what this is. The opinions expressed herein are entirely my own, not influenced by anything or anyone.

Strawberry Bhapa Doi| Strawberry-Flavoured Steamed Yogurt

We knew absolutely nothing about Bengali food a year ago. Our only exposure to the cuisine had been via a visit to Oh! Calcutta! years ago. Then, a trip to Calcutta happened. Food blogging and cooking challenges happened. Interactions with Bengali food bloggers happened. Durga Pujo pandal hopping happened. Visits to Bengali festivals happened. Today, we are much more aware of various Bengali dishes than we were earlier – we don’t know everything about the cuisine yet, but we surely know more than what we used to.

The husband and I are constantly amazed by the huge variety of sweets that the Bengalis make using curd in various forms. We discovered bhapa doi (Bengali steamed yogurt) last year, and have been in love with it ever since. I went on to make a pressure-cooker bhapa doi, and it turned out to be a hit. When ‘Durga Pujo recipes’ was announced as the theme for this week’s Foodie Monday Blog Hop, I decided to try making bhapa doi again. This time around, I made it a strawberry bhapa doi, in my Morphy Richards OTG. I must say, it turned out absolutely beautiful!


The texture of this strawberry bhapa doi is so, so, so good – we gobbled it all up spoonful by spoonful. It was so easy to make too. I am pretty sure this isn’t the last time I have made this.

Here’s how I made the strawberry bhapa doi.

This recipe has been adapted from Piyali Sekar Mutha’s raspberry bhapa doi post at My Tryst With Food And Travel.

Ingredients (makes about 6 servings):

  1. 1 cup thick hung curd
  2. 1/4 cup full-fat milk
  3. 200 ml sweetened condensed milk
  4. 4 teaspoons strawberry conserve

Method:

  1. Pre-heat oven at 200 degrees for 10 minutes.
  2. Take the hung curd, full-fat milk, condensed milk and strawberry conserve in a large mixing bowl.
  3. Whisk gently, ensuring everything is well combined together.
  4. Pour the mixture into a baking tray. There’s no need to grease the tray.
  5. Cover the top of the baking tray, tightly, with aluminium foil.
  6. Place the baking tray into a larger vessel about half filled with plain water. The tray should be about half immersed in water.
  7. Place the vessel in the pre-heated oven. Bake at 160 degrees for 35 minutes or till a knife inserted in the centre of the bhapa doi comes out reasonably clean. If the bhapa doi looks like it isn’t done yet, bake for 5-10 minutes more.
  8. Let the vessel rest as is till it comes to room temperature and is cool enough to handle.
  9. Now, remove the baking tray from the water and let it chill, covered, for about 2 hours in the refrigerator.
  10. Serve chilled, for best results.

Notes:

  1. I hung 500 ml store-bought curd (Nandini) in a cotton cloth atop my kitchen sink for about 3 hours, and got 1 cup of thick hung curd.
  2. I used Nandini full-cream milk and Amul Mithai Mate (sweetened condensed milk) to make this dish.
  3. I used whole strawberry conserve by L’ Exclusif to make this dish. The whole strawberries in the conserve take the flavour of the bhapa doi to a whole new level.
  4. You can use any other flavoured jam in place of the strawberry one. Mango, blueberry, raspberry.. the list is endless!
  5. This dish can be served with strawberry syrup and fresh, cut strawberries too. I didn’t have any of these things, and hence served it as is.
  6. I made the bhapa doi in my Morphy Richards OTG, but you could use a steamer or idli cooker to make it as well.
  7. Don’t miss out on chilling the bhapa doi in the refrigerator, after it is cooked. This is an important step, which will help it to set better and add to its taste.
  8. Baking times might vary from one person to another, depending upon the type of ingredients used and the oven. My bhapa doi was done in exactly 35 minutes.
  9. Don’t worry if the bhapa doi looks a little jiggly in the centre, after baking. It will set further on chilling, and it will taste good any way!
  10. It is important to cover the vessel in which you are baking with aluminium foil, to ensure that no water enters it. Ensure that the foil is tightly covered, without any tears.
  11. It is natural for a little water to accumulate around the bhapa doi, while baking. Just tilt the vessel slightly to remove it, before chilling.

***********************

Foodie Monday Blog Hop

This is my submission for the Foodie Monday Blog Hop. The theme for the week is ‘Durga Pooja Special’.

Beetroot Pasta Salad With Sweet & Sour Dressing

Recently, while I was at Godrej Nature’s Basket, I spotted this pack of Beetroot Gluten-Free Fusilli Pasta by Healthy Alternatives. Quite intrigued, I picked it up, along with a few vegetables. I used the ingredients to make a beetroot pasta salad, which I served with a very simple sweet-and-sour dressing.

I must say, the salad tasted delicious. Loaded with vegetables, it was quite filling and nutritious, and we loved having it for dinner. And, before you ask, no, the pasta didn’t smell of beetroot at all! 🙂

Here’s how I made the beetroot pasta salad.

Ingredients (about 4 servings):

For the pasta:

  1. 125 g beetroot pasta
  2. Salt, to taste
  3. 1 tablespoon olive oil

For the vegetables:

  1. A few florets of broccoli, chopped
  2. A small piece of zucchini, chopped
  3. 1 small onion, chopped
  4. 1/2 capsicum, chopped
  5. 4-5 babycorn, chopped
  6. 4-5 mushrooms, chopped
  7. A 1/2-inch piece of ginger, very finely chopped or grated
  8. 1 tablespoon olive oil
  9. Salt, to taste
  10. Red chilli powder, to taste

For the garnishing:

  1. A few stalks of fresh coriander leaves, finely chopped
  2. 1-1/2 teaspoon sesame seeds

For the dressing:

  1. 1 tablespoon olive oil
  2. Juice of 1/2 lemon, or to taste
  3. A generous dash of mixed Italian herbs (I used Keya)
  4. 1 tablespoon honey, or to taste
  5. 2 pinches of red chilli powder
  6. Salt, to taste

Method:

1. Bring about 1/2 litre of water to a boil, in a pan. Reduce the flame to medium, and add the beetroot pasta, a little salt and 1 tablespoon olive oil. Cook on medium flame, stirring intermittently, till the pasta is cooked but not overly mushy.

2. Remove the pasta into a colander and run cold water over it. Keep aside, and let all the excess water drain away.

3. Now, let’s get the veggies ready. For this, heat 1 tablespoon olive oil in a pan. Add in the chopped onion, capsicum, baby corn, mushroom, zucchini, broccoli and grated/very finely chopped ginger. Add in salt and red chilli powder to taste. Stir fry on medium flame till the veggies are cooked, but not overly mushy. Remove from flame and keep aside.

4. Now, let’s get the dressing ready. In a medium-sized bowl, mix together the ingredients for the dressing as stated above. Ensure that everything is well incorporated together. Keep aside.

5. Lightly toast the sesame seeds in a pan. Keep aside.

6. Now, assemble the salad. Take the cooked pasta in a large mixing bowl, and add the stir-fried veggies, the dressing, the finely chopped coriander and the toasted sesame seeds. Toss everything together, gently. Serve warm or at room temperature or chilled.

Notes:

1.This is my second entry to the #pricesyouwilllove contest for food bloggers by Godrej Nature’s Basket.

2. Here’s a round-up of the ingredients I bought from Godrej Nature’s Basket for the dish, and their respective prices.

  1. Healthy Alternatives gluten-free beetroot pasta (250 g) – INR 179
  2. Yellow zucchini – INR 46.08
  3. Babycorn – INR 36.72
  4. Mushrooms – INR 60

The total came to INR 321.80.

I didn’t use all of the veggies and pasta to make this dish.

2. Broccoli, ginger, red chilli powder, salt, onion, sesame seeds, honey, lemon juice and olive oil were the other ingredients I used, from my own kitchen. Even if I picked up some more veggies from Godrej Nature’s Basket, I would have been well within budget, I think.

3. Increase or decrease the quantity of red chilli powder, lemon juice and honey that you use, depending upon individual taste preferences.

4. Vinegar can be used in place of lemon juice.

5. Powdered sugar can be used in the dressing, in place of honey.

6. Very finely chopped green chillies can be used in the veggies, in place of red chilli powder.

You like? I hope you will try this out too, and that you will like it as much as we did!

Gongura Thokku| Spicy Andhra-Style Sorrel Leaf Chutney

Gongura thokku, a spicy gongura (sorrel leaf) chutney, is a very popular dish from the state of Andhra Pradesh. It makes for a beautiful accompaniment to piping hot ghee rice, and the husband and I love thulping it down with dosas as well. I learnt the recipe from a friend of my mom’s, who hailed from Andhra Pradesh, and it has been practised and perfected over time. My 92-year-old granny, who was brought up in Bellary alongside Telugu neighbours, approves of it, too.

This gongura thokku recipe is my submission for this month’s Shhhh Cooking Secretly challenge. I was paired with the talented food blogger Amrita Iyer, who blogs at The Food Samaritan. She assigned me my two secret ingredients to prepare a dish from the cuisine of Andhra Pradesh, the theme of the month – gongura and chillies. I was more than happy to use them to prepare this family recipe.

Untitled

Here’s how I make the gongura thokku.

Ingredients (makes about 1/2 of a regular jam jar):

For the spice mix:

  1. 7-8 dry red chillies, or as per taste
  2. 1 tablespoon coriander seeds (dhania)
  3. 1 tablespoon toor dal
  4. 1 tablespoon chana dal
  5. 1/2 tablespoon urad dal
  6. 1/2 teaspoon methi (fenugreek) seeds
  7. 1/2 teaspoon turmeric powder
  8. 1 tablespoon oil

For the tempering:

  1. 2 tablespoons oil
  2. 1 teaspoon mustard seeds
  3. 3-4 generous pinches of asafoetida powder (hing)

Other ingredients:

  1. 1 large bunch of gongura aka sorrel leaves
  2. Salt, to taste
  3. 2 tablespoons oil

Method:

  1. First, we will prep the gongura or sorrel leaves. Separate the leaves from the stems and place in a colander. Wash them thoroughly under running water, ensuring that no mud remains. Pat dry using a cotton cloth, as best as you can. You could even leave them wrapped in a cotton cloth for a few minutes, which will help them get dry faster.
  2. Next up, we will saute the prepped gongura leaves. Heat 2 tablespoons of oil in a pan. Add a handful of the dried gongura leaves and, stirring constantly, allow them to wilt down. Add another handful of leaves and allow them to, similarly, wilt down. Wilt all the leaves in this manner. Keep stirring, to ensure that the leaves do not stick to the bottom of the pan. Transfer to a plate, and allow to cool down entirely.
  3. Let us then get the spice mix ready. For this, heat 1 tablespoon oil in a pan. Reduce the flame, and add in the dry red chillies, coriander seeds, chana dal, urad dal, toor dal and fenugreek seeds. Fry till the ingredients emit a gorgeous fragrance, taking care not to burn them. Transfer onto a plate and allow to cool completely. When the ingredients have entirely cooled down, mix in the turmeric powder. Keep aside.
  4. Take the cooled-down spice ingredients in a mixer, and pulse just for a second. Now, add in the wilted gongura leaves, and mix well. Crush coarsely.
  5. Heat 2 tablespoons oil in a heavy-bottomed pan, and add in the mustard seeds. Allow them to splutter. Add in the asafoetida, and let it stay in for a couple of seconds. Add the ground gongura-spice paste, along with salt to taste. Cook on medium flame for 4-5 minutes, or till you get a thick paste.
  6. Let the chutney cool down completely, and then transfer it to a clean, dry, air-tight bottle. Keep refrigerated when not in use. Use only a clean, dry spoon to remove the chutney. Stored this way, the chutney stays good for up to 10 days.
  7. Serve with piping hot ghee rice or dosas.

Notes:

  1. 1 large bunch of gongura should give you about 1 large serving bowl full of leaves.
  2. Finely chopped garlic and/or onion can be added to the tempering, too. I usually avoid that. Curry leaves can be added as well.
  3. I have seen people using a whole lot more oil than I have used here. I try and restrict the quantity of oil I use, so I feel comfortable consuming the chutney.
  4. Increase or decrease the quantity of dry red chillies you use, depending upon how hot you want the chutney to be.
  5. You can prep the gongura leaves and leave them out to dry in the sun for a day (if you get ample sunlight where you stay, that is!). You can then proceed to make the chutney the next day. In fact, this is exactly how this pickle is made traditionally.
  6. You can even use a mortar and pestle to crush the spices and the gongura leaves, instead of a mixer. I use the mixer, for speed and ease.
  7. Make sure you pat dry as much of the moisture off the gongura leaves as you can. The shelf life of the chutney will decrease if there are traces of moisture on the leaves.
  8. A dash of jaggery can also be added to the chutney, if you’d prefer it. I usually skip this step.
  9. Remember that the spices and gongura need to be just coarsely ground. Don’t make a fine paste in the mixer.

Do you like this recipe? I hope you will try it out and that you will like it as much as we do. Don’t forget to share your feedback with me!


Subway-Style Veggie Delight Sandwich

It is no secret that the husband and I are big fans of sandwiches. I have posted about the various kinds of sandwiches we enjoy, often, on my blog.

The Veggie Delight sandwich at Subway is a hot favourite with us. Once in a while, we enjoy heading to a Subway outlet and chomping our way through the huge sandwich, loaded with veggies and a variety of sauces. Probably not healthy, but we do love indulging in it occasionally.

Recently, I started making the Subway-style Veggie Delight Sandwich at home, and it turned out absolutely beautiful. The bottles of Veeba sauces that we picked up at a departmental store (after much soul-searching) helped me achieve the same Subway taste. At least, now I know exactly what goes into my sandwich, and I have a modicum of control over hygiene and the amount and quality of ingredients I put into it!

21032302_10213882706046937_7093677972800871013_n

Here is how I make the Subway-style Veggie Delight Sandwich.

Ingredients (to make 2 sandwiches):

  1. 1 footlong loaf of bread
  2. Lettuce, cleaned, as needed
  3. 1 small onion, chopped into thin slices
  4. 1 small European cucumber, chopped into thin slices
  5. 1 medium-sized tomato, chopped into slices
  6. 1/2 medium-sized capsicum, chopped into slices
  7. Pickled gherkins (store-bought), as needed
  8. Slices of processed cheese, as needed, each cut into 2
  9. Pickled jalapeno slices (store-bought), as needed
  10. Pitted black/green olive slices (store-bought), as needed
  11. Veeba Mustard Sauce, as needed
  12. Veeba Cheese-Jalapeno Sandwich Spread, as needed
  13. Veeba Mint Mayonnaise, as needed
  14. Veeba Sweet Onion Sauce, as needed
  15. Veeba Harrissa Dressing, as needed (optional)
  16. Heinz Tomato Ketchup, as needed

Method:

  1. Lay the footlong loaf on a chopping board, and cut it into two equal parts.
  2. Slice each half horizontally, through the centre. Open up each half.
  3. Make a bed of lettuce on the bottom half of the bread.
  4. Spread the chopped onion, tomato, cucumber, capsicum, olives, jalapenos and gherkins evenly over the lettuce.
  5. Add a generous quantity of Veeba Harissa Dressing, Sweet Onion Sauce, Mint Mayonnaise and Mustard Sauce, as well as Heinz Tomato Ketchup over the veggies.
  6. Arrange the slices of cheese along the top half of the bread. Close the sandwiches, and serve immediately.

Notes:

  1. Ciabatta, baguette or any other long bread of your choice can be used in place of a footlong loaf.
  2. Veeba Harissa Dressing is optional for making this sandwich, as per me. The other sauces are an absolute must, to get the exact Subway-style taste.
  3. You could add boiled corn to the sandwiches as well.
  4. Veeba Honey-Mustard Sauce also tastes wonderful in this sandwich, as a substitute for Veeba Mustard Sauce.
  5. You could lightly toast the sandwich after adding all the fillings. We like eating this sandwich as is.
  6. Ensure that all ingredients are at room temperature, before you proceed to put together this sandwich.

You like? I hope you will try this out too, and that you will love it as much as we do!

*******************

Would you like to read about the other types of sandwiches we make at home? Here you go!

  1. For the love of sandwiches
  2. Hung-curd open sandwich
  3. Caprese-style sandwich
  4. Farmhouse grilled sandwich
  5. Farmhouse grilled sandwich with masala bread, home-made pizza sauce and feta cheese
  6. Chilli & mango grilled cheese sandwich
  7. Dabeli sandwich
  8. Iyengar Bakery-style bread toast
  9. Bun sandwiches, 4 ways