These Moong Dal Dhokla make for a delicious snack that you can whip up in a jiffy. They can also double up as a breakfast option or a light dinner.
I had soaked some moong dal the other day, to use in kosumalli, but I ended up getting busy with some work and being unable to make it. I had to think up some way to use the soaked moong dal, and that was how these dhokla came about. They turned out so good!
Let me show you how I made them.
Please note that this is an almost instant version of dhokla. I made them without much of prior preparation, so I did not ferment the batter.
A Look At The Ingredients Used
Split and de-skinned moong dal aka yellow lentils are the major ingredient used in this recipe. I have also added in some sooji/rava aka semolina to add an extra layer of texture.
Green chillies and ginger have been used for flavour, as well as sugar. Being brought up in Gujarat, I am used to having dhokla with a tinge of sweet to them, but you can definitely skip the sugar if you do not prefer using it.
Lastly, since the batter is not fermented, I have used a bit of citric acid to sour it. I have used Eno fruit salt to make the dhokla light and fluffy. I have learnt from Gujarati family friends that the combination of citric acid and Eno yields the softest of dhokla and khaman (the two are completely different things!), but I have mentioned some substitutes in the ‘Tips & Tricks’ section of this post, if you are not comfortable using these ingredients.
Quick Moong Dal Dhokla Recipe
Here is how I made the dhokla.
Ingredients (serves 3-4):
1. 1/2 cup moong dal
2. 1 green chilli or as per taste
3. A 1-inch piece of ginger
4. 1/4 cup semolina (sooji/rava)
5. Salt to taste
6. 3 tablespoons sugar or to taste
7. 2 fat pinches of citric acid
8. 1 sachet Eno fruit salt (plain)
9. Oil, as needed to grease the vessel used for steaming
For the tempering and garnishing:
1. 3/4 tablespoon oil
2. 1/2 teaspoon mustard seeds
3. 1/2 teaspoon sesame seeds
4. 2 pinches of asafoetida
5. 1 tablespoon finely chopped fresh coriander
Method:

1. Wash the moong dal well under running water, then drain the lentils. Take the washed and drained moong dal in a bowl, add in enough fresh water to cover them fully, and let them soak for at least 3-4 hours or overnight.
2. When the moong dal is done soaking, drain out the water from it. Transfer the soaked and drained moong dal to a mixer jar. Peel the ginger, chop roughly, and add it to the jar. Chop up the green chilli roughly, and add it to the jar as well. Add in a little water. Grind everything together to a slightly coarse batter.
3. Transfer the ground batter to a mixing bowl. Add in the semolina, salt to taste, sugar and citric acid. Mix well together. Add enough water to bring the batter to a thick but runny consistency. Keep aside.

4. Pour about a cup of water in a pressure cooker bottom, and place it on high flame. Place a trivet inside the cooker, to avoid water entering inside the vessel you will use for steaming. Grease a wide vessel, using a little oil, and place this in the pressure cooker, over the trivet. Let the water in the cooker come to a boil and start steaming – the vessel will also get hot in the process.
5. When the greased vessel is hot, add the Eno fruit salt to the batter and mix well. The batter will start frothing. Immediately pour the batter into the hot vessel and close the pressure cooker. Steam for about 15 minutes on high flame, without putting the whistle on. Switch off gas when done, and wait for 10-15 minutes to open the cooker.
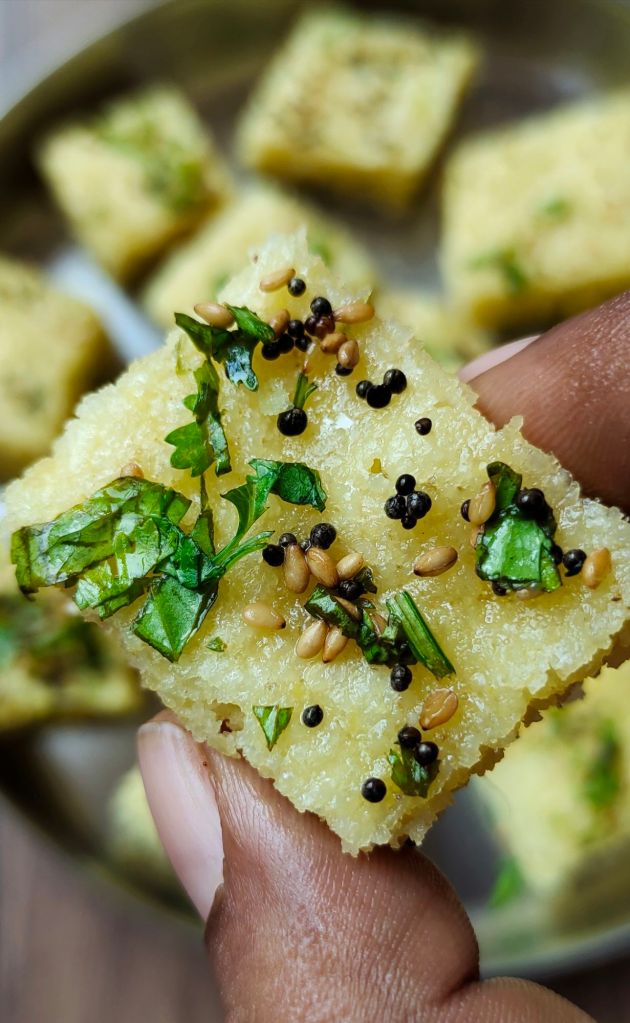
6. After 10-15 minutes, open the cooker and get the dhokla out. Now, we will do the tempering. Heat 3/4 tablespoon oil in a small tempering pan. Add in the mustard seeds, and let them sputter. Now, add in the sesame seeds and the asafoetida. Switch off gas. Let the ingredients stay in the hot oil for a few seconds, taking care not to let them burn. Pour this tempering over the dhokla and spread it out evenly.
7. Spread the finely chopped coriander evenly over the dhokla. Your Moong Dal Dhokla is ready.
8. Allow the dhokla to cool down completely, then cut into small pieces using a spatula. Serve at room temperature.
Vegan, But Not Gluten-Free
This recipe is completely vegetarian and vegan, suited to those following a plant-based diet.
However, it is not gluten-free because of the use of semolina and asafoetida, both of which usually contain wheat.
Looking For Other Khaman Or Dhokla Recipes?
I have several on my blog. Do check out this recipe for Instant Khaman, made using gram flour. This is a recipe for instant dhokla, which uses semolina or sooji/rava. This Instant Rava Besan Dhokla recipe makes use of both semolina and gram flour.
This recipe for Khatta Dhokla uses fermented rice and lentil batter, which does not require any rising agents like Eno. This Vati Dal Na Khaman recipe uses lentil batter, not the instant variety, but a lovely naturally fermented version as is popular in Surat, Gujarat. These Mug Na Dhokla are made using fermented batter that uses whole green moong beans.
Tips & Tricks
- Adjust the quantity of green chillies and sugar as per personal taste preferences.
- The batter should be thick, but not overly so. It should be runny, but not watery. Adjust the quantity of water you use, depending upon the consistency of the batter.
- For best results, use the fine Bombay rava, rather than the coarser and thicker Bansi rava.
- Like I said earlier, the batter is not fermented. I have used a little bit of citric acid to sour the batter. Citric acid – also called ‘nimbu ka phool‘ – is commonly available in several departmental stores and, from what I understand, is fine to use in small quantities occasionally. If you are not comfortable using citric acid, you could use lemon juice or sour curd in the batter – personally, though, I haven’t tried making this variety of dhokla any other way.
- I have used Eno fruit salt to make the dhokla light and fluffy. Make sure you use the plain one, and not the flavoured ones. Baking soda can be used in place of the Eno, I am guessing, though I have never tried using it in dhokla.
- Make sure you add the Eno to the batter just before steaming. Letting the batter sit around for some time after adding Eno might cause the dhokla to become dense.
- Mix the batter well after adding Eno.
- Make sure you heat the greased vessel for steaming. Dhokla turns out the best when the vessel is well heated.
- I have steamed the Moong Dal Dhokla in a pressure cooker. You can do the same in a vegetable steamer as well. Remember to steam on high flame for about 15 minutes, without the whistle, similar to how you would steam idlis.
- Wait till the dhokla has cooled down before cutting into pieces.
- I am guessing the batter would slightly sour if left to rest for 6-8 hours, thereby eliminating the need to use citric acid. However, I haven’t tried this out personally.
Did you like this recipe? Do tell me in your comments!


